
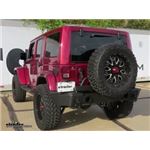
Rampage Rear Recovery Bumper for Jeep - Light Mounts - Semigloss Black Powder Coat
Item # RA86605
Retail:$1,199.99
Our Price: $878.07
You Save: $321.92
Confirmed to Fit
2011 Jeep Wrangler
Will this fit?
To see if this custom-fit item will work for you please tell us what vehicle you'll use it with.
This item qualifies for Free Truck Freight Shipping


Need help with installation?
Locate installers near me- All Info
- Q & A (0)
- Videos (1)
- Photos
2011 Jeep Wrangler - Rampage Rear Recovery Bumper for Jeep - Light Mounts - Semigloss Black Powder Coat
- Gloss Black
- Accessory Bumper
- Rear Bumper
- Off-Road Bumper
- Rampage
- Steel
Replace your Jeep Wrangler's rear bumper with this sturdy steel recovery bumper that's designed to take off-road abuse. Welded shackle mounts come with D-rings installed. Mount 4" round lights (sold separately) in the built-in receptacles.
Features:
- Heavy-duty recovery bumper replaces your vehicle's factory rear bumper
- 2 Welded shackle mounts with removable D-rings let you perform recovery operations
- Integrated receptacles let you add 2 auxiliary can lights (sold separately) up to 4" in diameter
- Ground-level lighting allows for maximum light distribution
- Recessed design helps prevent damage to lights
- 3/16" Thick steel plate construction is sturdy and built for off-road use
- Semigloss black, dual-stage powder coat finish is durable and corrosion resistant
- Easy, no-drill installation
- 1-Year warranty
86605 Rampage Rear Recovery Bumper with Light Cans - Semi Gloss Black Steel
Installation Details

Video of Rampage Rear Recovery Bumper for Jeep - Light Mounts - Semigloss Black Powder Coat


Videos are provided as a guide only. Refer to manufacturer installation instructions and specs for complete information.

Video Transcript for Rampage Jeep Rear Recovery Bumper Installation - 2012 Jeep Wrangler Unlimited
Today on our 2012 Jeep Wrangler Unlimited we'll be taking a look at and showing you how to install the Rampage Rear Recovery Bumper for Jeeps. Features a slim waist spare tire carrier and a textured black powder coat finish. Part number RA88606. It's also available in a semigloss black powder coat finish, part number RA86606. It's available without the swing-away feature in a textured black powder coat finish, part number RA88605, and without the swing-away feature in a semigloss black powder coat finish, part number RA86605. You can pick up a Rampage 2 inch Hitch Receiver separately with part number RA86611. Upgrade your Jeep's factory bumper to this sturdy steel Rampage Recovery Bumper.
The bumper's constructed out of a 3/16 inch steel plate, and it's perfect for off road use. Our welded-on shackle mounts feature removable D rings, perfect for a recovery application. It has two integrated 4 inch receptacles for auxiliary lights. Please note, if you plan to put lights in, you'll need to do this while you install your bumper. If yours comes with a hitch, it'll be a 2 inch by 2 inch receiver opening.
It'll have a 1/2 inch pin hole where you can put a pin and clip through. If you don't have one you can pick one up right here at etrailer.com, part number PC3. It also has safety chain loops here on either side of the hitch and the whole thing is rated at a 2,000 pound gross trailer weight. If your bumper comes with a swing-away arm it'll hold a tire size up to 37 inches. The nice thing about the swing-away arm is all the weight of your tire is supported by your bumper rather than your tailgate. It also features an integrated grease zerk so you can keep it properly lubed.
Now that we've gone over the features I'll go ahead and show you how to get it installed. First thing we can do is go ahead and remove this spare tire, even if you're just installing the rear bumper itself. It's just going to give us a little bit more room to work. With all those removed let's go ahead and take off the spare tire. Now let's go ahead and remove our old hitch. Unfortunately, I can't remove the hitch extender because I don't have the keys.
I'm just going to leave that in place. Behind the hitch here there are four bolts; let's go ahead and take those out. We can just remove that last bolt. We should just be able to pull down and it should come out just like that. Now we can go ahead and start removing that bumper. We need to locate the S brackets on each side and take those bolts out. Now, the S brackets are going to be attached to our frame here. This is the driver's side. Once we get this side removed we can go ahead and repeat the same process for the passenger's side. With the passenger S bracket removed we can go ahead and locate two more bolts directly behind the bumper and take those off. Now, you need to be sure to hold onto the bumper because after we take those two off it's going to be ready to come off. Now, it's not a bad idea to get an extra set of hands to hold that bumper in place. We'll be taking out that top bolt. Now we can go ahead and remove our tow hook. It's just going to be three bolts. Got this one underneath, and then two on the side. Then we can pull out that bracket on the inside, because we won't be needing it. Now, I've got both bumpers laid out back to back as you can see here. Let's locate our S bracket on our old bumper on the driver's side. We're going to be taking it off and putting it on our new Rampage bumper. Just got two bolts here. Now, you need to make sure that all the hardware comes out of the S bracket, and we'll be replacing with new hardware. If it all comes out you can just remove it. Then we'll take the S bracket and we're going to be installing it on the driver's side of our Rampage bumper, right here. We'll take our included hardware, we'll take the bolt along with the flat washer, put that through. Then we'll take the lock washer, put that on the other side, and then the nut. Now, we're not going to tighten this down all the way just yet. We'll get them both loosely installed. Now as you can see, our passenger side already has a bracket built in, so we don't need to worry about our S bracket on this side. Now we'll grab an extra set of hands to help us lift our bumper up in place. We're going to be using our factory hardware. We're going to line up our S bracket on our driver side in the same location it was removed from on our Jeep. Then for the passenger side, the welded on bracket is going to line up with the two holes where our S bracket went on the passenger side. With our bumper loosely installed, we have a bracket to install on the inner side of our passenger side. It's located right here above our exhaust. Just going to slide it in, line it up with the hole there. Then on the other side we'll take one of our longer bolts, put on a flat washer, put it through the hole here, and it's going to come out through our bracket. This side's going to be a lock washer and then just a nut. Now, if yours comes with a hitch we'll go ahead and install it now. What we're going to do is we're going to hold it up in position underneath our Rampage bumper, line it up with the two holes in bottom. Then we're going to take the bolts with the large washers on them and start threading that up through. Now we can take our two longest bolts; we're going to be putting on a lock washer along with a flat washer, and we're going to be installing it through our hitch and through our bumper on the back side here. What we want to do is feed the head of our long bolt up above our exhaust, that way we can easily line it up. Now, since our bumper and hitch is loosely installed, you're going to need to pick up on it to align the holes and then start threading that through. With both of our bolts started, let's go ahead and tighten them down. Now we can attach our bumper brackets to our new bumper. It does help to loosen them up a little bit just in case the holes don't line directly up. We'll just loosen it up, that way we can easily move it. With it loose, let's go ahead and align it up with the hole. Then we'll take our factory hardware and then thread that through. With this side done, let's go ahead and repeat the same process for the other side. Now we'll go through and tighten everything up, and then we'll come back and torque everything down to manufacturer specification. With everything torqued down on our bumper, let's go ahead and put on those tow loops. Now, if you don't have the swing-away you'd be all set. You're all ready to go, your install is completed. But if you do, just stay tuned, we'll go ahead and show you how to do that next. Now we can go ahead and remove the factory spare tire carrier. We've got these surrounding bolts; let's go ahead and take them out. Now, if you have a brake light above your spare tire, before you completely remove the mount you can go ahead and disconnect it right behind this panel here. Here on the other side we can just slightly pull out on the grommet, and then we can remove that wire. With it disconnected we can go ahead and reinstall that panel. Then we can just take our assembly and set it aside. Now we can grab our plastic washer. We're going to slide it on over the post. Then we can grab our swing-away and slide it on. We'll just take the end that slides on and then slide it on like that. Now we can install our circlip. Now, we're just using a circlip tool to get it installed around the post, but you can simply just use needle nose pliers if you don't have one. Now we'll tighten up the two bolts on the end of the swing-away here. Now let's install our tailgate reinforcement plate. Now we're just going to be using our factory hardware that we removed from our old spare tire mount. Let's just get a couple started here. We'll skip the center one for now; we'll come back to it here in a second. We can just snug them down. Now we can loosely install our tailgate reinforcement bracket. We're going to do the same thing here, use the factory hardware. Just go ahead and get it started. For the rest of the holes on the back of the tailgate, let's go ahead and drive that factory hardware back in just to seal the hole. Then we'll take our two large bolts and thread them on. Now, it's not a bad idea to put some spray lubricant on there as it could make it easier to put the bolts on. We'll put one all the way down, and then we'll just get the other one started. It's okay if you need a wrench just to help you out. Now we'll take our spare tire mount and thread that on as well. Now, the next thing we need to do is tighten down this nut here to our spare tire mount. I'm going to hold this end and then tighten it up. Now we can position our spare tire disc here anywhere we want. We're just going to go two on top and then we're going to tighten down the other two bolts to keep it from spinning. Now we can install our Heim joint assembly. We're going to start on the swing-away portion first. What we're going to do is we're going to take the bolt here. Then we'll take the thinner nut, we'll get that started. Then we'll take a flat washer, we're going to hold that in place. Then we'll take the Heim assembly, and you may even have to back it off a little bit just so you can fit it in there. Then once you get that started you're going to want to put another flat washer on the bottom. You may have to bend the bracket backward a little bit just to get your last washer in there. As you can see, I did it just fine. Now we can just tighten it down. Perfect. Now we can finish the other half of our Heim joint so we can bring our swing-away in. If our bracket is hanging down like this, just rotate it back up. Our Heim joint is going to go between those. Now, if your Heim joint is not lining up with the two holes, no problem. You can just bring it up and then adjust it to where it is, like we've almost got it there. That looks pretty good. Now that we know our Heim joint lines up we can back it off a little bit. Now, this is going to install similar to the other one, only we're not going to use the thin nut. We'll bring in our bolt. We'll start bringing it down through. We'll take a flat washer. Then we want to bring in our Heim joint. You get that down through. We also want to put a flat washer on bottom. There we go. Then we'll take our nut and thread that up on the bottom. Once we get it hand tight we can tighten it down the rest of the way. Now we can tighten down that bolt that we left loose. Now when we open our tailgate the swing-away should open as well. Now that we know we've got the Heim assembly correct, we can go ahead and tighten down our jam nuts. To get to the second one here, we're actually going to just open it up a little bit just so we've got room to work. With it open we can also go ahead and put our rubber stopper in. That's just going to help it keep from vibrating when we're on the road. What you want to do is adjust it to where you can still shut your tailgate all the way, and it provides a good connection. Looks like we're pretty good there. We an go ahead and adjust that jam nut down, and then lock that in position. Now we can adjust our other two. Our bottom one actually looks pretty good, so we can go ahead and tighten down that jam nut. As you can see, it's not making contact at all. Just going to unscrew that until it makes contact. Now, in your kit it does come with a plug to seal up that hole from where our wiring from our brake light came through. Pop that in, then we'll be all sealed up. Now let's go ahead and put our spare tire back on. Now we can go put on our lugs. If you have a locking lug you can use that, too. All right, with our spare tire back in place we're all set. That's going to complete our install on the Rampage Rear Recovery Bumper for Jeeps on our 2012 Jeep Wrangler Unlimited.
0
0
See what our Experts say about this Rampage Bumper
- Rampage Recovery Bumper for 2014 Jeep Wrangler 4-DoorMy contact at Rampage confirmed that for the bumper portion only of Rear Recovery Bumper for Jeep # RA88606 (without the tire mount) you can order their bumper kit # RA86605.
view full answer...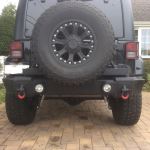
Info for this part was:

Edited by:
Leah B

Written by:
Lindsey S

Video by:
Dustin K

Test Fit:
Hayden R

Video Edited:
Zach D

Updated by:
Matthew E
At etrailer.com we provide the best information available about the products we sell. We take the quality of our information seriously so that you can get the right part the first time. Let us know if anything is missing or if you have any questions.
Thank you! Your comment has been submitted successfully. You should be able to view your question/comment here within a few days.
Error submitting comment. Please try again momentarily.