
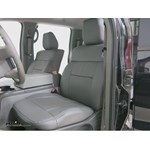
Clazzio Custom Seat Covers - Leather - Front and Rear - Gray
Item # AL-EAFOB7194GGG
Our Price: $600.00
Confirmed to Fit
2005 Ford F-150
SuperCrew Cab
Will this fit?
To see if this custom-fit item will work for you please tell us what vehicle you'll use it with.
This item qualifies for Free Shipping
In Stock

- All Info
- Q & A (0)
- Videos (2)
- Photos
2005 Ford F-150 - Clazzio Custom Seat Covers - Leather - Front and Rear - Gray
- 40/20/40 and Bench Seat
- Bucket Seats and Bench Seat
- All Seats
- Clazzio
- Dark Gray
- Center Console w Cupholder
Give your Ford F-150's cloth seats an upgrade with these seat covers that look and feel like factory leather. The perforated leather covers with memory foam centers keep you cool and comfortable as you drive. Simple, slip-on installation.
Features:
- Custom-fit leather seat covers protect your vehicle's front and rear seats from tears, stains, and other damage
- Provide the look and feel of factory leather seats
- Perforated leather construction keeps you cool and comfortable as you drive
- Breathable, ventilated material prevents moisture buildup to avoid mold and mildew
- Anti-bacterial and anti-odor coatings preserve covers' new, clean scent
- 1/2" Thick memory foam layer in center of each cover adds comfort
- Durable, hand-sewn double-stitched seams
- Integrated map pocket on the back of each front seat cover keeps items organized
- Simple, slip-on installation without removing original seat material
- Just pull covers tight and secure with hook-and-loop fasteners, straps, and S-hooks
- Easy to clean - just wash with soap and water
- Gray color complements many interiors
- Set includes covers for all seats, headrests, armrests, and center consoles
- Seat heaters (SH-1 - sold separately) keep you warm in cold weather
- 3-Year limited warranty


Upgrade your vehicle's cloth seats with these luxurious leather seat covers that look and feel just like factory original equipment. The custom-fit covers protect your seats from wear and tear, and they install easily over your existing seat material.


Each set includes covers for your vehicle's front and rear seats, as well as covers for your headrests, armrests, and center consoles (where applicable). The covers accommodate all of your vehicle's seat belts and controls without impeding access, so you won't lose functionality. Every seat adjuster, every console function, and every cup holder has been accounted for.
Perforated Leather Construction

The covers are constructed of perforated leather. This ventilated, breathable material doesn't conduct body heat so you'll stay cool on long road trips. The perforations prevent moisture build-up between the covers and seats so mold and mildew won't develop. Each cover has anti-bacterial and anti-odor coatings to help preserve their new and clean scent, and they are flame resistant.
The breathable leather also makes this the ideal seat cover to use with a Clazzio seat heater (SH-1 - sold separately).
Hand-Sewn, Double-Stitched Seams


All Clazzio covers are custom cut and hand sewn by professional machinists to ensure that they fit your vehicle's seats without flaw. The thread used for stitching the seams won't loosen, fray, or tear over time. It is, however, specially designed to break away in the event that the seat airbags deploy. And you can replace an individual cover so one set of Clazzio seat covers will last for the lifetime of your vehicle.
Memory Foam Cushioning

Each cover has a 1/2" memory foam pad in the center. This memory foam layer softens in reaction to your body heat to perfectly fit the contour of your hips and legs. This gives you an additional level of comfort that you didn't have with your original seats.
Built-In Map Pockets

Both the driver's- and passenger's-side front seat covers have a rear map pocket for convenient storage.
Easy Installation


Clazzio covers install over your seats with no need to remove any factory material. Simply slip the covers over the seats. Once the cover seams are properly aligned, tuck all excess material into your seats' plastic trim so they look tight and wrinkle-free. Then secure the covers with the built-in straps, hook-and-loop fasteners, and S-hooks. Detailed instructions with color pictures are included with each seat cover to ensure easy installation.
AL-EAFOB7194GGG Clazzio Perforated Leather Seat Covers - Gray - Front and Rear
Video of Clazzio Custom Seat Covers - Leather - Front and Rear - Gray


Videos are provided as a guide only. Refer to manufacturer installation instructions and specs for complete information.


Video Transcript for Clazzio Perforated Leather Seat Cover Installation - 2006 Ford F-150
Today we'll taking a look at the Clazzio Perforated Leather Seat Cover in gray. The Clazzio leather seat covers are a premium seat cover designed to fit your vehicle's specific year, make, and model. They offer complete coverage of your factory seat: the bottom portion, the back portion, and the headrest and even your rear seats. They're made out of a real, perforate leather which helps it breathe, so can enjoy that comfortable, luxurious feeling. They also feature a memory-foam insert for additional comfort. They simply slip on over your existing fabric, giving you an easy leather upgrade. The Clazzio seat covers are even designed to work with side air bags. The thread will perforate in the event of an air bag deployment.
The leather is treated with an anti-bacterial and anti-odor coating. They're also flame resistant and durable. When using the Clazzio seat covers, you don't have to worry about losing your factory back pockets. The seams are double stitched so you don't have to worry about tearing. They're going to last a long time.
Another great feature of the Clazzio seat covers is being as it's a custom fit, you still have access to all of your original seat functions. Now that we've gone over some of the features, I'll go ahead and show you how to get it installed. In additional to our Clazzio seat covers, we're going to be installing the Clazzio seat heaters. Those are available separately, and that will part number SH1. We're going to start right here on our driver's side. We're going to make sure and grab the correct cover for the correct side.
We'll start by slipping around the corners and working our way around and pulling back as well. Once we get it on there, we can go around and tuck it in around the plastic portion that you see here. Clazzio has provided us with a tool to make this a little bit easier. We're going to go around and start tucking it in to give it that nice factory finish. As we get this tucked in, we'll take our white string and we're just going to put it down through this little hole right here. Once we get that down through there, we're going to pull it from the backseat area.
Now we'll work our way through here and tuck this down through our seat. You want to make sure and push it all the way down through the seat so you can access it from the back. Over here, we'll take our elastic loop, loop that around our seat belt, keeps it in place there, and then we've also got another white string. We're going to direct that to the back just as we did the first time. We'll get this string pulled down, and then what we're going to do is we're going to want to tie a loop on one end. Then we'll take our string, we'll run it through the loop, and then we're going to pull that nice and tight. Once we got that pulled tight, we'll tie off our excess string to itself. Then we'll just tuck our excess string out of the way. As you pull the string tight, you want to make sure you have a nice, smooth surface here on the top of the seat. You can always pull the string tighter if you need to. Just make sure that it's pushed all the way back to the seam, and then you've got it. Now we're getting ready to install the upper portion of our seat cover. First thing we want to do is go ahead and remove that headrest. Now to get ready to install our upper portion of our seat, we want to make sure that holes are facing up, as you see here, we'll flip it over, and we're going to kind of turn it inside out. That way we can see what we're working with. You don't need to turn it all the way inside out, just get to where you can see the corners like this. Then we'll just flip it up, like this, get in position where we need it, and then we're going to work our way down. It's going to be a tight fit, but you just need to work your way down and alternate sides. We found it's not a bad idea to get an extra set of hands. You have one person push in on the cushion and the other person pulling down on the cover. What we'll do is we'll have somebody do just that. We'll just work our way down. The idea is to make sure it pulls all the way down and meets with the other cushion. You may have to push and turn and twist every which way to get it lined up with the holes on top and, of course, to meet with the corners on the sides. We'll continue working it down and straightening it up, once again just making sure that it is pulled all the way down to cover up our old cushion. Once that's tucked through, you may be able to go underneath and tug on that hook and loop. Now as you get that smoothed out, you may be able to go behind the seat and underneath and pull that hook and loop strap through to help straighten it out. While we're back here, we'll just work our way around and straighten up these corners and tuck the seat cover in between the plastic covers here and then on down. Now with our seat cover all the down and in position, let's go ahead and move on back up to our holes here. We're going to tuck the seat cover around there to make it look like the factory seat was. Just like that. Gives it a nice, little finish there. Now for our other one, same thing. All right. Perfect. Now we're ready to go ahead and work with our headrest. I found the easier it is to put the headrest back in place. That I way I can use a little bit of force to pull the seat cover down. We'll set it right about there, make sure it's locked in place, and then we'll grab our cover and we'll need to line it up the exact way our headrest is. The tag is going to be facing forward. We're just going to work that on, and we're going to pull down on the tabs on the sides. As we're putting the seat cover, we did find it useful to grab our tool with dull end here and work our way down. You don't want to pull too hard, because you'll rip it. Just work it, and have a little patience with it. Just tuck the padding of the headrest up into the headrest cover. Once we get it about 90% on our headrest, we'll go ahead and take our headrest back off and finish fastening it together. Then we can go ahead and tuck our tag up underneath. We won't be needing that anymore. We'll just check around and make sure we've got all the wrinkles out of it. We'll tuck the other flap under here. Then we'll just connect our two hooks right here. We'll fold it into itself here, working our way down just like that. Now we can go ahead and place our headrest back in place. Now that we've got both seat covers in position and pushed all the way down through the seam, it would be a good idea to go ahead and put it all the way forward. Then we'll come around back and, as you can see, we've already got our string all tied up. to make sure it doesn't slide forward, let's go ahead and connect our hook and loop. What you want to do is want to lift up on it. As you can see, our seat cover's hook and loop has come through. Go ahead and pull down on that. What you want to do is you want to hook it up underneath the seat cover here. Get one side done; go ahead and work your way around. There we go. That's a nice, snug fit. With our driver's side all done, our passenger side installs the exact same way. Now with our front seats all done, the first step to getting our back seats covered is to go ahead and remove that elastic strap that holds your seat belts down. We're just going to put that underneath the seat belt, just like that. We'll grab our seat cover. Now we've gone ahead and moved the two front seats all the way up to give us plenty of room to work with. We'll come over here, and we're going to disengage it just to let it rise up a little bit so we can work with it. Then we'll grab our seat cover. We're going to start slipping it on like so. You want to try to alternate sides and scoot it on, just like this. Just work it around the seat until it starts to tighten up. Get it nice and tight around the corners. You want to make sure to get underneath your lever here. Then we're going to raise it up slightly and then tuck our hook and loop down under the seat. That way we can grab it from underneath. Want to make sure and do that on both sides here. Now we'll get our flap tucked underneath. Once you find it underneath the seat here, you want to pull up on it just to get it nice and tight. What you want to do is connect the hook and loop here to here. Get that nice and tight. Just keep tugging on it until it gets up to where it needs to be. Same thing here. Just keep pulling down, working it around the fabric, and then you bring both hands around and start connecting them, just like that. You're going to need to work your way . It can be difficult. Since this truck is getting heated seats, we're working around our wires there. Before we finish this side, I'm going to get my flap tucked in through here and help it around just the same. Once you get one portion, it should get a little bit easier for you. Just work your way back. If you need to, you can just shift it around inaudible 00:10:20 with it all lined up. You can bring your seat belts back up. Let's go ahead and grab our tool. Just finish tucking in the seat cover around this portion here. You may have to use it as a little prying action here just to free it up and give it room to slide through. Work it in there just to give it that factor look. This one pretty much installs the exact same way. We'll just raise it up a little bit and work our way on. Now we'll just simply attach our hook and loop, pull it back down, tuck it in around our handle, and then we've got it. Tuck in our elastic strap, around our seat belt that is. With the bottom portion of our seat done, the next step for our back portion is go ahead and remove our headrests. All right, now for the back rest portion of our seat. First thing we'll need to do is go ahead and drape it around our back seat here and around our seat belt. Just work it in. You want to line up your headrest holes on either side here. Line up the holes, maybe get it around the corner there. Then we'll grab our tool, and the next step is to go ahead and tuck it around our headrest holes. With that side being done, let's do our other side here. Perfect. With those being done, let's go ahead and tuck in our flaps here behind our seat on the back. Just need to work them in and down. You can use your tool to help push them down and get them in position. We'll work around our seat belt hook up here. The idea is just to get bead snug where it's supposed to go behind there. With our top all tucked in, let's come down here and push down on our hook and loop fastener here. We want to get that connected up underneath the seat. We'll get that tucked in a little bit, and then I'm going to raise the seat back up just to get a better . just to get my hands down in there. You want to try to pull down on them and to get them connected. Just get them as far down as you can go. All right, now to do our sides let's go ahead and pull our seat belt out of the way so we have room to work. We're going to push the sides back as far as we can go to where it gets to the carpeted portion of the seat, the part that's frayed up. That's what our hook and loop is going to connect to. We'll work our way back and around the seat and then connect that. Now as you're tucking this in, the bottom portion of the seat cover can be rough to get around the seat. If you can get your hand down in there and just help the seat into the cover, you can get your wrinkles out of this corner. You may have to work with it a little bit. Now we'll get that worked in position there. Keep in mind, the wrinkles will come out over time as it settles. That being done, go ahead and tuck our seat belt back in there. Let's get the other side. It's just the same process over here. Now with everything tucked in to where it's supposed to be, you can work your way back around to smooth everything out: up top and down under. If your seat belts happen to get tucked up underneath, no big deal. You can just raise the seat back up and then pull them back out. Then you've got it. All right, let's move on to our headrests. Let's go ahead and reinsert our headrest here and get it almost all the way down. That's going to help hold it up as we're putting on the cover. The next thing you want to do is match up the cover with the shape of the headrest here. We've got the arched portion in the back; that's the way it needs to go on. To do this, I'm going to kind of turn it inside out. Once I get it there, I'm going to work it on, once again, alternating sides like I did at first. All right, once you get it started, you can even grab your little plastic tool to help you work it on. You don't want to push too hard, because you don't want to end up hurting the fabric. It can help you push the fabric up underneath the cover like so. Once we get it about halfway on there, let's pull it back out and finish it up. When you're pulling it down over the headrest, it can get kind of crooked. If that happens, no big deal. You can just work it around by squeezing it and turning it slightly just to get it to conform where it's supposed to be. Turn it upside down, and we'll just tuck in our little flaps here. It's going to look like that. Fold it over like that and slide that back in place. We'll repeat the same process on the other side. That's going to complete our look and install of the Clazzio Perforated Leather Seat Cover in gray on our 2006 Ford F150.
0
0
See what our Experts say about this Clazzio Car Seat Covers
Info for this part was:

Edited by:
Tyler C

Updated by:
Wilson B

Written by:
Matthew S
At etrailer.com we provide the best information available about the products we sell. We take the quality of our information seriously so that you can get the right part the first time. Let us know if anything is missing or if you have any questions.
Product Experts Available Now!
Call 1-800-940-8924
Thank you! Your comment has been submitted successfully. You should be able to view your question/comment here within a few days.
Error submitting comment. Please try again momentarily.