
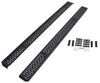
Westin Grate Step Nerf Bars with Custom Install Kit - 6-1/4" Wide - Black Powder Coated Steel
Item # 27-74755-1755
Our Price: $694.77
Confirmed to Fit
2009 Chevrolet Silverado
1500 - Crew Cab
2500 and 3500 - Crew Cab
Will this fit?
To see if this custom-fit item will work for you please tell us what vehicle you'll use it with.
This item qualifies for Free Shipping


- All Info
- Q & A (0)
- Videos (2)
- Photos
2009 Chevrolet Silverado - Westin Grate Step Nerf Bars with Custom Install Kit - 6-1/4" Wide - Black Powder Coated Steel
- Nerf Bars
- Fixed Step
- Black
- Steel
- Westin
- Rectangle
- Powder Coat Finish
Grated steel running boards have an extra-wide stepping surface with raised treads to prevent slipping when entering your truck. Serrated treads provide a rugged look and help keep mud and snow from getting in your cab. Custom mounting kit included.
Features:
- Custom-fit, cab-length running boards provide a solid step for entering and exiting your vehicle
- 6-1/4" Wide steps provide greater stability than narrower steps or round bars
- Raised treads provide superior slip-protection
- Serrated edges help clear off mud and snow to keep your cab clean
- Steel construction with textured, black e-coat resists rust and corrosion
- Custom, no-drill installation with vehicle-specific mounting kit
Specs:
- Dimensions: 86" long x 6-1/4" wide
- Tread height: 1/4"
- Quantity: 2 running boards
- 3-Year warranty
27-74755 Westin Grate Step Nerf Bars - 6-1/4" Wide - Black Powder Coated Steel
27-1755 Westin Mounting Kit for Molded, Sure-Grip, and Grate Steps
Installation Details
California residents: click here

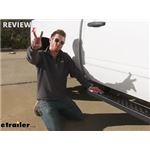
Video of Westin Grate Step Nerf Bars with Custom Install Kit - 6-1/4" Wide - Black Powder Coated Steel


Videos are provided as a guide only. Refer to manufacturer installation instructions and specs for complete information.


Video Transcript for Westin Grate Step Nerf Bars Kit Installation - 2012 Chevrolet Silverado
What's up, everybody Adam here with etrailer. Today, I have my dad's truck and we're getting some upgrades. What upgrades Well, we took the old running boards off. And now, we have the Westin Grate Step running boards on here, and they look great. If I we're to compare these to any of the other ones that we have on our website, there's two of them that are kinda in the same ballpark. One's gonna be the Aries RidgeStep.
That one's gonna be a little bit less aggressive when it comes to the traction. The style is kinda similar to this one, but I do fancy the Westin Grate Step a little bit more. But then the other one that I'm gonna compare it to is the Dee Zee Rough Step. The Dee Zee Rough Step's gonna be a little bit wider than the other two options, and it's gonna give you a little bit more traction than the Westin and a lot more than the Aries. It's kinda the same deal, but between all of them, I really do like the Westin Grate Step.
Look a little bit better, and there's plenty of traction. I don't really think I need more. But all three of those options are gonna be really great for just getting a lot of that mud and stuff off of your feet, whether it's mud or snow, depending on who you are. If you're a construction guy, you know, those construction sites get really nasty in clay, and as such, it sticks. So this is gonna do a really good job of that, but so are all the other options.
And if I we're to compare that to just your basic running board step, the more traction you have, the better you're gonna get all that stuff off of your shoes. But at the end of the day, I just kinda find myself just looking at this. Look, this is my dad's truck, and I really do like the look. And I think that's the main thing. This is why this one's my favorite of the other three that I would compare 'em to.
I just really like the look of it. It looks super aggressive. It looks super good. It's definitely an upgrade. So now, I think the only other thing I kinda wanna show you guys is just a couple different angles of me driving around, so you can see exactly what your truck's gonna look like with these running boards on, so you can see what other people see. So I love the way it looks, especially when it's driving by. You guys can see what everybody else is seeing, and it's definitely turning some heads. So this is my dad's new truck. And I was like, "Dad, these don't look that nice. "Let's get you some new ones." He agreed. So take a look at this side. It's just, you know, a basic truck and people kinda look at the components on the truck. They're like, "Oh, this guy doesn't take care of his stuff," or it's not an off-road rugged rig like a truck should be. But then look at this side. This side looks awesome. I don't know if it's just because of the white and black combo, but this looks amazing compared to the other side. And this is definitely a much more rugged look. And this is gonna just be so much cooler to look at and give you a lot more attraction as well. Like, look at this. This is so much grip and you're not gonna slide on these. This is basically the most heavy-duty when it comes to grips on your running boards. It's gonna be made of steel and has an e-coat, so you don't really have to worry about this starting to peel or fade or anything like that. These are gonna be rugged to the very, very end. Honestly, they're probably going to outlast your truck. So let's just say you're getting in your truck. I'm wearing a size 11 shoe with steel toes, so it is a pretty tall boot and I still can get all the way through and utilize the whole entire 6 1/4 inches of width to be able to get into the truck. And again, I can't really show you how much traction I'm getting, but I'm really trying to move my foot. I mean, you can just see these different extrusions and just notice that it's just gonna have a ridiculous amount of traction. So if you have some snow and stuff, you don't have to worry about it getting all clumped up, like it'll eventually just fall through. So I definitely like this for getting in and out of your truck. And as you can see, I'm literally jumping on this. I'm about 165 wet and there's no give. So a lot of these running boards, especially the ones that we took off, had a decent amount of give, but these are completely solid. I like that just because I'd just rather than not have give whenever I get in and out of the truck. But also if you put stuff on your camper shell, or you put it up on your roof, you're still gonna be able to grab as much of the step as if we we're to have the door open to be able to get up and grab whatever we need up here. Maybe if you're not one that has like a roof rack for recreational stuff, maybe you're just a ladder rack person and you have a cancel lever over top. This is gonna help you load up your ladders and stuff like that, and we are gonna have different lengths too. So if you really wanted to kinda utilize the back little section so we can get a wheel to wheel with the longer section, so we can load everything up over here. So whether you're just getting in your truck or putting stuff up on your roof, these are gonna be very, very helpful. One thing to note when I was kinda shimmying across, not getting in the truck but just getting stuff on top of my roof, I did kinda have to hold onto something because they're not out far enough for me to keep my balance on it. But I don't think that's a big deal because I like the fact that they don't go outside of my mudflaps. And I also have a very aggressive tire and some wheels with an inch offset. So it does sit out a little bit, so they're gonna be protected. Yes, I can't completely balance on there without holding onto something, but that's basically with any running board. But just the fact that they're still gonna be protected with my mudflap from like rock chips and stuff like that, I really, really like that. It's a perfect look. And as you can see, it's almost completely straight with the outside of my wheels. Just a little bit in, but it is perfectly straight with my mudflap. As you can see, I am definitely upgrading. I don't necessarily love this type of bars 'cause it's not a one-piece system, right You have one bar and then you're gonna have the extra little pieces here. You're not gonna see this with the Grate Steps just because it's all steel and all that traction that you get isn't just a little plastic insert. It literally is just the metal. A truck, in my opinion, should be rugged and all the components should be that as well. So these right here, they're just not cutting it. So you're not gonna have to worry about getting replacement parts for the Grate Steps like you see with these nerf bars. I've installed a lot of running boards in my days, and this one gave me the least amount of trouble. All running boards are kinda gonna suck whenever you're installing them, just being honest. It's mainly just because of the instructions. They're not very clear. They're very generic and not specific to your specific truck. So to help you out, we shot the install on the inside of our warehouse right here. And hopefully, that'll kinda clear things up for you. To begin the installation, you need to get an idea of the hardware you're working with but also the brackets. So to be honest, the instructions are not very clear and they're kinda hard to follow. Just stick with it. Hopefully, this video is gonna help you out. But just make sure you have the right brackets for the right side. Look at the configuration and use the drawings that they put in the instructions to kinda get an idea of where we're gonna put 'em. So for this side, we're just using these. So basically, they're just gonna go up in the cab, pretty much universally spread all the way through the whole entire thing. So there's gonna be an equal amount of distance, typically, between all of our different brackets. So let's show you exactly where they're gonna go on this truck. So for example, on our truck at the very back of the cab, our bracket's gonna go like this. And just note that we are gonna have the two slot facing out. That's what's gonna connect to our running board. I spent a decent amount of time looking at the instructions. And at first, I thought it was gonna go here, but obviously, that's not gonna work because it just doesn't really line up. Then, I thought maybe we're gonna use this plug, but that doesn't really line up. So there's a hole right here, right in line with his bottom tab. And as you can see, that all lines up. So kinda trial and error. Just use the instructions to your best ability, but that's what this little bracket right here is gonna go. So on our truck, what we're gonna do with our back bracket, it's a little different than the other two. We're going to take this little plug out like that. We're gonna take a little piece here. I'll slide it into place, kinda like that. It'll go over that hole. And then, what we'll do is line this up with that hole. Try to hold that bracket on there. And then, we can thread that in. And now, we can take our bolt with a lock nut and a washer. Kinda get that going. I like it pretty tight but not all the way 'cause we still have some to do, and we do have a little bit of movement here. So now, we're gonna go ahead and do this. But with this one, what we're gonna do is this is the combination. Basically, we're just gonna have a washer on this side of the bracket. The bolt goes through and the washer on the other side with a lock washer and nut. So let me take this off real quick. And basically, just go through here. Put it up like that. So now, we've got our bolt through with our little washer down here. Put another locker up top and then our little lock washer, and then our nylon lock nut. Just like that. And the sequence that I'm gonna use is I'm gonna tighten this one up just so it goes up exactly where we want it. And then, I'm not gonna fully tighten it, just get it nice and snug. And what we're gonna need for that is a 13-millimeter socket and a wrench, and you can tighten these up. All right, so that's pretty snug. Not 100%, just wanna make sure it's nice and where I want it. And then, we can kinda snug up the other one as well. So for our middle bracket piece, we have two different options. It's gonna be the same setup for each. So I can either put it up here, which is gonna make the distance between this bracket and our front bracket closer. Or I can put it back here, which is gonna make the distance between this bracket and our end bracket closer. So it's uniform each way. So kinda think about where your traffic's mostly gonna be. I'm gonna put it in the front just because majority of the time, someone's in the driver seat or the passenger seat, and I usually don't have people riding the back as often. So I'll put more support in the front. We're gonna have the same exact hardware set as the other bracket. But the only difference here is we're not gonna have to pull a plug and slide that little piece in 'cause this is already pre-threaded. So if you do have something to kinda clean out those threads, go for it, 'cause there's nothing really doing it. So now, we're gonna do the same hardware situation, bolt, lock washer, washer. And kinda get that going. Definitely do this by hand, just so we don't cross thread anything. So we cross thread these bolts, we're in a bad spot. So now that the top's in, for the bottom, what we're gonna do is just have this little bolt. We're gonna have a washer on one side, a washer on the other side, a lock washer, and then the nylon lock nut. And you're gonna just need a 13-millimeter socket and wrench to tighten all those down. We're gonna do that same exact thing for the other bracket in our front, just like the middle one. So that's basically the gist of it. We can just do that same thing on the other side. It really is gonna depend on what kind of truck you have. So for instance, it's not gonna be exactly the same on the other side. There's one bracket that's a little different, but all the hardware and stuff that we showed you is gonna be the same. So just pay attention to the instructions just to make sure that you're putting the right brackets on the right side, in the right places. Now, let's prepare the running board. So depending on your truck, the mounting hardware might be a little bit different, meaning the brackets. But all of the mounting hardware are gonna come with this, which is bracket A, and this is gonna have to go first on all the different applications. But the other brackets might look a little different, depending on your truck, but same idea. So what you wanna do with these is we're gonna actually go on the end over here and slide them in this little slot right here. Kinda lay them in like this. All right. And then, we'll do the same thing with our other brackets. Work 'em in there. And then, if you have these installed already, just kinda back them off a little bit just so you can slide them over or you can just make it easier on yourself and just remove 'em for now. We will need these later. So the idea here is whenever we go ahead and put these down, it's gonna basically bind them together. You will need an Allen key. It does not come with it. But as that starts to get tightened down on both of 'em, it'll kinda lock it into place and kinda keep both of those brackets together. So as I tighten this, it'll push down the other bracket, and now this bracket isn't going anywhere. But we don't wanna do that right now. Just wanted to show you exactly what these little studs do. So I'm gonna back these off and I'm gonna do my best. You can either get a tape measure out to kinda get exactly where they need to be. But basically, what I'm gonna do is kinda just get 'em all kinda set up, get 'em exactly where I think they're probably gonna be, and then just kinda tighten 'em up a little bit, get it underneath, loosen 'em up, and then just line 'em up with our brackets. So what I did was I just brought the running board down here with the little pieces underneath. And basically, what I did was is I lined up the middle bracket to where it goes in, so I know exactly where the middle bracket is. But now what I need to do is to kinda loosen this up a little bit and slide this down. We wanna make sure that this bracket stays perfectly lined up with the other one. So I kinda get one lined up, get it hand tight so it doesn't move on you, and then kinda just lay it down. All right, so as of right now, I have two of the brackets lined up, but we can kinda get these going. So kinda show you what's going on with one, once we kinda get it lined up, we wanna take our Allen key and tighten these up, so they don't move. And then, once that's tight on both of them, you will have to kinda tighten these up evenly 'cause if one's a little bit tighter than the other, it might move around a little bit. So now that I have those two brackets all set up, I'm gonna do the same thing for back here. Just kinda lift it up, try not to move it, loosen these up a little bit, and then shift them both down. Get them lined up, drop 'em down. And now, I can tighten up the brackets to make sure they're not gonna move with our little Allen key. And once all the brackets and everything are all lined up, we can start putting the hardware on. At this point, it's a good time to kinda position your running boards. So these, they're not really a fixed point, just the brackets are. But we can kinda slide everything around. So my goal here was just to have a little bit of room in between my mudflaps, and I'm still gonna have full coverage of our back door for the crew cab that we're doing on it today. So adjust it. We can also adjust it in and out, just depending on exactly where you want it. I wanna pull it out a little bit just because sometimes I have bigger boots on and stuff. So just make these adjustments now, and make sure they're nice and lined up, and then we can go ahead and start tightening everything down. With our hardware, we are gonna want to put some anti-seize Loctite. You can grab that here at etrailer. This is gonna be in a central part just to make sure these aren't gonna get seized on there. You just wanna make sure that you get plenty of it on the threads. Not too much but just enough just to prevent anything from happening. We're gonna do that for all of our studs. And on all of our studs, we're gonna put a washer, a lock washer, and then a nut. This is not a nylon lock nut. So you can just run 'em up with your hands. And we're gonna do that for the remaining five. And we do have to torque these down to 15 to 18 foot-pounds. So grab yourself a torque wrench, and get 'em nice and tight. Now that we're done with the passenger side, we can go ahead and do the driver side. Well, my dad's gonna be extremely happy with the upgrade that we made on his Silverado. And again, this was a 2012 Chevrolet Silverado. I'm Adam, and that's basically it for our look at the Westin Grate Step running boards..
0
0
See what our Experts say about this Westin Nerf Bars - Running Boards
Info for this part was:

Video Edited:
Jacob T

Video by:
Chris R

Written by:
Daron K

Test Fit:
Adam E
At etrailer.com we provide the best information available about the products we sell. We take the quality of our information seriously so that you can get the right part the first time. Let us know if anything is missing or if you have any questions.
Product Experts Available Now!
Call 1-800-940-8924
Thank you! Your comment has been submitted successfully. You should be able to view your question/comment here within a few days.
Error submitting comment. Please try again momentarily.