
Summer Starts Here - Save up to 70%
To see if this custom-fit item will work for you please tell us what vehicle you'll use it with.


Get into and out of your Toyota Tacoma with ease by using these sturdy, durable steps. Multi-mount system ensures a precise, stable fit. Wide, flat, non-slip surfaces provide sure footing, and the polished finish offers a hint of style.
Features:
Specs:

Videos are provided as a guide only. Refer to manufacturer installation instructions and specs for complete information.
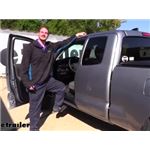
Hi there Tacoma owners. Today in your 2020 Toyota Tacoma, we're going to be taking a look at and showing you how to install Carr's Hoop II truck step. These are available in either a black or silver powder coat finish or a polished aluminum. We're going to be showing off the black powder coat finish today. This is a small, durable step. It's going to make it easier to get in and out of your vehicle and also to access anything that you might be storing on top, if you've got a roof rack system or anything else.
It can give you that little boost you might need to be able to get up there. And with its 500-pound weight capacity, you can be sure that if you need it to load anything on top of the roof or anything, it can support your entire weight plus whatever you've got, to be able to get it up there without any issues.It also makes it easier to get in and out, if you have some mobility challenges or if you just find it difficult to lift your leg up this high to step on in. On top of our step surface here, cast into it, it has a bumpy surface and they're kind of jagged if you touch it with your finger. It's not going to poke you to the point where it hurts but you can feel it's got a nice point that's going to dig into the sole of your shoes, giving you good traction when you get in and out. They've also put the car logo on there, which gives it a nice appealing look to it.
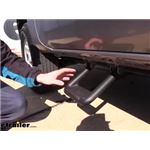
These steps are custom fit for your Tacoma. They come with all the necessary hardware and brackets to get it installed and never see one for each side. Why don't you follow along with me and we'll show you how to get it installed so you can have the confidence to do it at home.We'll begin our installation by determining the location of our step. Now you will also notice that our trucks on a lift here but you could easily do this on the ground. This lift here, the vehicle's actually sitting on the ground.
So it's very similar. We just got it up to make it easier for video purposes. The mark that we want to make is going to coincide with the front of our seats. You can open up your door and just determine where the front of your seat is and then make a mark down here on the pinch weld. I've already made a mark here where the front of our seat is and then we want to go four and a quarter inch on each side of the mark we just made and we're going to make more marks.
This is where our brackets are going to mount at this location here. And this is going to keep us to where our step is centered right at the front of our seats. So when we go to get out, we can just turn our legs and it's going to be right in the right location.So it's best that you have your seat in the normal position where you normally drive. So that way, it's set up for your particular vehicle and you. Once you've got those marks made, we want to go from the bottom of the lip here and we want to measure up three eighths of an inch. And I made another mark, I made this one horizontal and it gives me a plus shape. And where those two lines intersect, that's where we're going to be drilling out our holes to mount our brackets. We're going to be drilling them out to a 5/16 diameter. You can either start with a small drill bit like an 1/8 inch to make a pilot hole and then enlarge to 5/8 or just go right to 5/8. If you're not that confident, then you might want to start with the 1/8 of an inch and then step it up from there. So we're just going to line that up and just drill it on out.So now that we got those holes drilled out, we can begin attaching some things. But one of the things I wanted to point out was the hardware because this is a universal kit designed to fit many different trucks and you're going to get hardware for all those different trucks. So it's a little overwhelming when you first open up the box because you're going to have over double the bolts that you're not going to use versus the ones you're going to use. So, we're going to be using on each side, this is just going to be one side of hardware I'm showing you here. You're going to use the 5/8 length, 5/16 diameter bolts. You're going to have two on this side and you're going to have four washers with the correct diameter slide over those. We're also going to have two long self-tapping screws. You'll have four of the smallest diameter but longest length bolts that come in your kit.So for those, they'll also have the nuts that match those. These are going to be a little bit smaller than the nuts for the thicker diameter hardware there. You've got four of those. And then we need two washers per bolt, so you're going to have eight washers. The rest of the hardware that comes in your kit, you're going to have a whole lot more, that's going to be for other vehicles. So you don't really need to worry about that. So you can just set that stuff offside in the bag. We can now start attaching our brackets. The manufacturer does recommend that any points where you'll have metal on metal contact to put some silicone. So we're just going to put a little bit of black silicone on it. If you need some black silicone, we've got small tubes available here at etrailer.com. And that's just going to give us a little protective layer because if it does move or we have any vibrations down the road, it may wear off some of the paint. This is going to ensure we stay sealed up, so we don't cause any corrosion.We're going to use those small bolts that we pointed out. We're going to put a washer on it. So what I did notice is that these can't go on the outside, unlike the instructions describe. Your steps going to hit the nut on the other side and it's not going to amount to the brackets. So we need to go from the inside out. So we're going to go through our bracket first, through that mounting hole. So we're just going to slide it in there and we can take this guy and slide that on through. We'll then follow that up with a washer and one of the larger nylon locking nuts. We're going to go ahead and loosely install the other one in our other hole here, as well. We can then come back and snug these up. So we're going to hold the inside with a wrench, 13 millimeter and tighten up then on the other side with a 13 millimeter socket. While I'm holding this, I'd also like to push up just to keep the bracket as close to the bottom of the vehicle as possible.We're going to go ahead and snug down the other one the same way. Now that we've got those snugged down, we need to take the brackets and we do have to do a little bit of bending on the brackets because we need to bend them to where they're flush up against the bottom of the frame. So you can see how these are bent down here. We want to bend those up until they curve up, flat up against our body. So I'm going to use a hammer to tap those up into place. And it doesn't need to be perfect, we're just trying to get it as close as possible and you can actually see it's bent here and then it levels back out. So, that gets us pretty close to the shape we want to be in. We're going to be putting a bolt there to draw it up tight, as well.So now we're just going to go up through that hole with our 1/8 inch drill bit this time. And we're only going to be using 1/8 inch. This is a pilot hole for the self tapping screws that come included. Once you get the hole drilled out, you can take the self-tapping screws that come provided in your kit. We're going to slide it up into that hole and then we're going to tighten it down with an eight millimeter socket. We can now take our step and we're going to set it in between our brackets. We're going to line up the hole that's closest to you at the top. First, we'll get that hole lined up. And then from the outside of our steps, going towards the inside, we're going to slide our long bolt through. We're going to do the same thing on the other side. So this way the step will hold itself up. Each of our bolts is going to get another flat washer on the other side. And then we'll follow that up with a nylon locking nut.We want these to stay loose for now because now we need to adjust our step to the point to where it is level. To do this, you simply just pull up on your step until you find the level spot. And you're also going to have the rear hole line up with the rounded line of holes. So we're just going to get it to where it's pretty close to level, it's pretty close. That's going to line us up with the second from the highest hole there. We're going to go from the same direction, from the outside towards the inside. And they're going to get the same hardware, just a couple of flat washers and nylon locking nuts.We can then go back and snug these up using an 11 millimeter socket and wrench. Now that we have this side attached, we can now repeat the exact same procedures over on the other side to get that one installed. If you want to make sure that they're the same distance on each side, then since this side was already adjusted for your seat where you normally sit, what you can do is just measure from the front here to the back and make the distance from that center mark the same on both sides. And that completes our installation of Carr's Hoop II truck step on our 2020 Toyota Tacoma.
Average Customer Rating: 4.7 out of 5 stars (260 Customer Reviews)
Get into and out of your vehicle with ease by using these sturdy, durable steps. Multi-mount system ensures a precise, stable fit. Wide, flat, non-slip surfaces provide sure footing, and the polished finish offers a hint of style.Very functional steps for the price that I paid
It fit well and does what it is intended to do. Was easy to install...after the holes were drilled. If you would like more adjustability to where the step can be located, I'd recommend a longer step. On a 2024 2500HD Sierra crew cab, the frame cross member allows for only one attachment point (+/- maybe 1/2") for the front step. It would have been nice if solid carbide drill bits were included instead of twice as much hardware as I needed (each step came with enough nuts/bolts for 2 steps). Cobalt and Titanium bits worked, but took a while and I could only get about 2 holes drilled before bit was shot. Overall I'm happy with the purchase.
Originally ordered these as a replacement for the front. Did not check size before ordering.
Decided to put them under the rear doors instead.
Since I already had them on the front and was able to see how they were mounted, it made the install was a piece of cake.
The instructions were clearly understood for my Silverado and only took me about 15 minutes per side to install.
I have since ordered the larger pair for the front and will use the same brackets to replace.
Only gripe is the finish on the ones that were originally on the truck (8 years old) has chipped off due to mag chloride on the road and frozen ice being knocked off.
Since I was not the original purchaser, I cannot claim warranty issues as they are guaranteed for life.
Hopefully with the new ones Carr perfected their coating, we will find out in another 8 years!

It helps me to climb into my truck,with adding an extra step. Very happy with it.
Prompt shipping. Product appears as adv ertised.
Purchased to replace one that had broken with previous owner,not sure how it was broken. That said delivery was as expected and packaged in good shape . Steps seem sturdy and well built.
why are they called Nerf bars? none of my other Nerf stuff looks like that.....
My order arrived in less than a week and it took about a hour or so to install. Instructions were clear and easy for most any fitment. For my Chevy it could not have been any easier. This truck is for my daughter who has spina bifada so it enables her to climb in easier. The steps look great and I'd highly recommend them and etrailer. I've used etrailer a few times now and will continue as they have quality parts at some of the best prices!
Great product, easy installation
Thank you
These steps are great very easy to install and etrailer as usual was fast shipping and great to work with thank you
Awesome customer service. Answered all of my questions to help me get an account setup and to get the correct part.
It's a nice install and nice-looking product.
You always deliver a quality product fast.
easy install good instructions
We love them! Work and still look great !??
The Carr side steps are well designed, well engineered, and well manufactured. The kit comes complete with all the necessary hardware, and the instructions are clear and easy to follow. Overall, I found them quite easy to install. Only time will tell as to their durability.
Once u watch YouTube for installation, they are great
Love this step!It is a replacement for one we lost in an accident. Glad they sell just one!
Very well made and so easy to install!
Great product but I couldn’t use your directions because I mounted it on my Ford 8n tractor. In fact I only used the four bolts that connect mounting brackets to step. I cut two pieces of flat stock welded it on frame and drilled 2 1/4” holes 2 on each mount and viola the job is finished and now my wife can get one and off tractor with ease. Great product and it was the only one I found that fitted my needs for mounting flat on top of stock and stair is adjustable. I recommend this product to anyone looking for a quality piece at a great price. Thank you etrailer for creating this outstanding step.
Fit perfectly. Great addition to my Jeep as I'm getting older.
Good quick service. Side Steps are well made and easy to install. Good videos on install if needed.
Still very happy with the steps. Instructions were useful and the product has held up well. It doesn't have a lift kit or muddier tires, but my old F250 is still pretty tall. The steps make entry and exit much easier for and old guy and his short wife.
Simple ordering precise & quick. Nice Email response from etrailer. Easy instructions right out of the box & on to the truck. Easy in & easy out of the vehicle, nice & sturdy you cannot go wrong with a reputable name to back it up. I am a satisfied consumer.
This fits perfectly on a 2014 Tundra. I had trouble finding ones that fit with the way the rocker panels are angled. Worked out well and I’m very happy with the results. etrailer is a great place to search for items you need and the service is excellent.

Info for this part was:
At etrailer.com we provide the best information available about the products we sell. We take the quality of our information seriously so that you can get the right part the first time. Let us know if anything is missing or if you have any questions.


Thank you! Your comment has been submitted successfully. You should be able to view your question/comment here within a few days.
Error submitting comment. Please try again momentarily.