
To see if this custom-fit item will work for you please tell us what vehicle you'll use it with.
Thank you! Your comment has been submitted successfully. You should be able to view your question/comment here within a few days.
Error submitting comment. Please try again momentarily.

California residents: click here
Videos are provided as a guide only. Refer to manufacturer installation instructions and specs for complete information.
How's it going, Ryan here at etrailer.com. Today we're going to be taking a look at, and showing you how to install the line of ARIES, Single-Row LED Light Bars. One of the main things that really separates this light from many of the others, is not only how much light it's going to put off, but also its size. Most of the other bars, that have twice as many LEDs, still aren't going to shine as bright as this one. And that really goes to show you the quality of the LEDs that this light uses. So this is going to work perfect if you're looking for a lot of light, but don't have a whole lot of room to sacrifice.
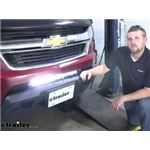
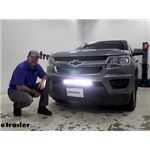
On our vehicle we have here today is a perfect example but there's no way that a light bar of the same length, that has two rows of LEDs could possibly fit inside of the small opening. Not only is this going to work great for those custom jobs like we have here, it's also designed to work perfectly for other accessories. Things like grill guards, full bars, and headache racks.Now for you to see how well this light's going to work, especially in conjunction with your headlights, we can do a quick comparison. Right now we have our regular headlights on and they do a decent job at lighting up the road, but sometimes we need those scenarios where we need extra light. So now we'll go ahead and flip our light bar on.
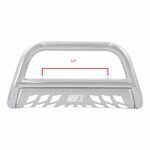
As you can see, you have way more light and we won't have any problem seeing when it's dark out. It's also going to have a nice little switch, when you turn your lights on, it's going to have a red indicator light. One thing I did notice and I thought it was pretty cool that the last four LEDs on the end of our bars are going to have a different pattern behind the lens, and that different pattern is going to help throw that light out further to the sides.Now this is the 20 inch light bar that we're looking at today. However, there are other sizes available and you can see etrailer.com for specific lights. But in my opinion, this length is the best of both worlds as far as how bright it is and how compact it is.
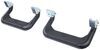
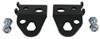
And another big thing that really separates this light from any of the others is what it's made from and the quality of the construction. The glass, or the lens, if you will, is going to be made from Lexan. And just to give you an example, that's what high powered race cars use for their windows and that's because it's extremely strong and lightweight. So you're not going to have to worry if you're doing some off-roading and your friends in front of you happens to throw up a little gravel or something, you're definitely not going to have to worry about this getting cracked.Another thing I really like is how well our bracketry is built and all the hardware is going to be really nice too. The only thing I would change is the fact that our bracketry is silver and I personally think it would look a little bit better if it was black to match our light.
But that doesn't mean you can't always spray paint it if it bothers you. Now, the housing itself is made from aluminum and everything is going to fit together really nice and tight. That's part of the reason, among other things, is why this is waterproof. So either rain or snow, you're going to be good to go. This is designed to operate in extreme temperatures. So whether you're in the desert or in the mountains, you know you're going to have a reliable light source. So not only can it withstand those extreme temperatures but it also passed various tests in regards to vibration, dust, as well as salt. And because of that, that's going to give you tons of different options on where you'd want to mount your light bar.Now this particular 20 inch light bar is going to have 9,800 lumens, and that's the amount of light that it's going to put off. So just to give you a comparison, your average vehicle headlight only has about a thousand. So if you think about it, this is almost replicating eight to 10 vehicle headlights. Now there are a ton of different options out there as far as light bars go, but in my opinion, this one is one of the more quality ones available. And since everything is included with the light, as far as your wiring, your switch, your inaudible 00:04:07, installation, it's going to be relatively easy. And for most applications the process is going to be fairly similar of how we did it today. Speaking of which let's go ahead and hook the light up together now.Today, we're going to be installing our light on a 2018 Chevrolet, Colorado. But I do want to point out the way that the light itself will be installed, is going to essentially be the same for just about any make or model, with the exception of where you want to physically mount the light bar itself.First, we can loosely assemble our mounting brackets. So we're going to have a pre-attached nut on the stud right here, so we can take that off. You can just take it off by hand using an 11 millimeter socket. On the side that has the wire coming out you're going to use the bracket that's labeled "P". So this hole, it's going to go over the stud. Go ahead and put that nut back on, tighten it down a little bit. Then for the remaining hardware, it's going to go through this slot into the light itself. We're going to take the plastic washer and that's going to go behind or in between the light and the bracket. Once we have that lined up, we're going to take our tamper-proof Torx bit bolt in the small flat washer, run it through. We're just going to get it tightened down my hand. That way we're still able to easily adjust it up and down. Now the other side of the light is set up the exact same way. So we'll just repeat that process and we're there.So at this point you can determine where you're going to mount your light. We're mounting it here in the air dam. What I did is found the center of the air dam, I just used a tape measure, as well as the center of the light and I made a few marks, that way we can put it up there and eyeball it and make sure that's where we want it, which in our case it is. Now before we actually secure the light, what I'm going to do is take our wiring and drop it down through here. That way it'll already be somewhat in position and make it a lot easier to hook up without having to work around a mounted light.So I went ahead and just dropped her wiring down into the area where we're going to monitor light. I ran it down, along through, it comes down behind our light, comes out right there, just went through a little opening in the air dam, and finally the plug that goes into the light itself is right here. With our wire dropped down into position, we can go ahead and set our light back in place and mark the holes we need to drill to secure our brackets. Now in our application, since this has just been plastic, it wasn't very secure. So what I did was is used some no-drill brackets, that you can find here at etrailer, put around our bumper beam to give it a nice secure spot to mount our light to. I have it laid out in the correct position, so I'll just use a marker and put little dots on our bracket holes, that way I know where to drill.Now we can grab our larger bolt by a flat washer and drop those down through each one of our brackets. When those are in place we can then line up the bolts with the holes that we drilled. Then on the bottom side of the bolt, we'll go ahead and get it hand-tight using the nylon lock washer. Get that done on both sides.Now we can go ahead and focus on hooking up our power and ground wire. What you're going to want to do is come to your power wire, which is this red one. We're going to have a fuse holder before we hook these up. We want to open that up and pull that fuse out and set it to the side, and we'll put that in later. Now where we're going to connect these is right at our battery. If you open up the tray here, we're going to have a few different options on where to hook it up as far as power goes, and I'm going to choose the stud right here. So go ahead and take that nut off. We'll take our power wire, put that in place. We'll just re-secure our nut.And for our negative wire or our ground, I'm just going to ground it right to the battery as well, except on the negative side. Take that nut off, put our ring terminal into position and re-secure the nut. Now these are pretty large ring terminals, so if it is too big that your nut is going to barely hold it in place, one thing you can do is pick up a washer, slide that over it and that'll help fill that gap and give you a little better connection. Now at this point you could go ahead and mount your switch, wherever you would want to mount it. In our case we're going to do it inside of the cab of the truck. So I'll go ahead and run that and show you how I did it.And so here's how we ran our wires to the inside and the relay wire drops down and what I did was, chose a safe spot to drill a small hole into the firewall and picked up a rubber grommet to run the wire through, just to help keep it protected. Now we can go on the inside of the truck and show you how it drops down.This is where the wiring came through the firewall into the cab. Now I do want to point out, I did have to disconnect our switch from our wiring to get it into the cab. It's really easy, these just simply pull right off of the terminals on the switch, but it is a good idea to take note of what color wire went to which terminal on the switch, just so there's not any potential confusion later. Once our wiring is in here we can go ahead and focus on mounting our switch.Typically what you'd want to do is mount your switch somewhere that's easily accessible. In our particular application, we're going to go right here in this area by our factory headlight switch. So I'll go ahead and do is get this panel out of the way and then I'll see how to drill an opening, get the switch mounted and all hooked up.Here's our panel and where we're going to mount our switch. So I drilled a hole out using a stuffer bit until I found the right size for our switch to fall into. One thing I did find on the switch, there's going to be a piece of plastic, almost like a keyway, if you will, that can prevent it from going into the hole that you drove. So what I've done is just taken a hand file and created a little notch here for that key fall through. Go ahead and line everything up and then the switch will simply just push into place.Now we can go ahead and plug our wires back into our switch. We'll just push right over in the terminals and you can push those little clear rubber coating down over the metal. With the switch hooked up, go ahead and re-secure your panel back into place.Back here at the front of the truck, to finish up our wiring, we can take the end that we dropped down and the plug that comes right out of the back of light. Just clip those two together. I can come back here into the engine department where our fuse holder is and reinstall the fuse that we took out earlier.Before we tidy up all of our wiring and tighten all of our hardware down, it's a good idea to flip our switch, make sure the light works. Once we flip our switch, as you can see, it works and we know everything's hooked up correctly. I went ahead and secured all of our wiring using some zip ties, which are sold separately. Now I do want to point out, regardless of what type of vehicle you have, you're going to want to make sure to get all this wiring secured. .And before you tightened out all the hardware, that's securing our light bar, go ahead and adjust it where you want it to be positioned. And at that point you can tighten everything down.That'll finish up our look at and our installation of the line of ARIES, Single-Row LED light Bar..
Average Customer Rating: 5.0 out of 5 stars (2 Customer Reviews)

This light bar is GREAT. The main reason I bought it, was when living on the third coast in the winter I could spot them hogs on the road.
LOOK at the videos below. That is my chev
Great light so far!
Do you have a question about this Off Road Light?
Info for this part was:
At etrailer.com we provide the best information available about the products we sell. We take the quality of our information seriously so that you can get the right part the first time. Let us know if anything is missing or if you have any questions.


Rich S.
8/20/2021
This ARIES 20 Single Row LED Light Bar has been in service on my 2018 Colorado for over a year. This light bar is just as powerful as it was the day it was installed. I love it. One other thing I like about it, the old saying, out of sight, out of mind. If you need a light bar, this would be a good choice.