
Summer Starts Here - Save up to 70%
To see if this custom-fit item will work for you please tell us what vehicle you'll use it with.


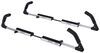
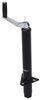
This quiet, aerodynamic roof rack with a from-the-factory look lets you carry gear on your Ford F-450 Super Duty's naked roof. Sturdy, lightweight aluminum crossbars include top channels with noise-reducing Vortex strips. Integrated locks deter theft.
Features:
Specs:
The low-profile, aerodynamic Rhino-Rack RS 2500 roof rack lets you carry gear and accessories on your vehicle's roof quietly and with little wind drag. It's designed for installation on a naked roof (a roof without factory raised side rails, flush rails, fixed mounting points, tracks, or rain gutters). The rack's Vortex Aero crossbars have built-in rubber strips that disrupt airflow for a quiet ride, and the bars are constructed of aluminum so they won't rust. These bars blend seamlessly with the support legs to provide a from-the-factory look, and they are custom cut to your specific vehicle so they require no adjustment during installation. The legs also include built-in locks that protect your gear and the rack from theft.
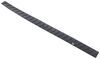
The rubberized Vortex strips in the top channel of each crossbar disrupt airflow with evenly spaced, wave-shaped grooves. This carefully controlled turbulence minimizes wind noise and whistling, so you won't need to add a fairing to your roof rack. And the slim, elliptical Vortex Aero crossbars cut through the air with minimal drag - even at highway speeds.
The RS 2500 roof rack has a flush-mount design so the crossbars terminate at the legs with no overhang. This provides the rack with a seamless, from-the-factory look, and it also helps to improve aerodynamics by reducing drag and wind noise.
The Vortex Aero crossbars are made of structural-grade anodized aluminum with H-shaped internal extrusions. These extrusions strengthen the bars without adding a significant amount of weight. And the aluminum bars won't rust so you can leave them on your roof year-round.
The rack's durable, glass-reinforced nylon legs are designed to stand up to cargo loads and weather extremes. They're also UV treated to withstand long-term exposure to sunlight.
The roof rack arrives at your doorstep almost completely assembled. The crossbars are already mounted into the nylon legs. And the bars are pre-cut to match the width of your vehicle's roof, so you won't need to waste any time centering them. The few remaining assembly steps are straightforward and require only the vehicle-specific fit kit.
The vehicle-specific fit kit includes pads and clamps specifically designed to fit the contours of your roof. To install, simply attach the pivoting plates and rubberized pads to the bottom of each leg. Then secure the legs to your vehicle with the metal clamps. Decals inside the legs and a diagram in the instructions help you to orient the crossbars on your roof.
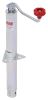
Once the crossbars are properly positioned, use the included Allen key to tighten them in place. The Allen key is designed to serve as a simple torque wrench. The curve in the blue plastic handle straightens when you've applied enough torque to each bolt.
Each crossbar has a built-in C-channel so you can carry channel-mounted accessories such as bike racks, watersport carriers, and ski racks. The Vortex strips in the top channels come in 3 pieces, so they're easier to adjust than a single long, continuous strip. You can remove, trim, and re-insert the Vortex strips around the mounting hardware of your accessories to keep the crossbar channels capped and quiet. Replacement strips (sold separately) are also available if you remove your accessories or switch to clamp-on accessories.
You can also attach most clamp-on accessories to the bars, and the Vortex strips provide a shock-absorbing, no-slip cushion for any accessories that rest on them.
Locking covers on each support leg let you secure accessories mounted in the crossbar top channels. These sturdy nylon covers give the rack a finished look and also help secure the rack to your roof. The cover locks are keyed alike, so a single key opens all locks.
 Alternate Instructions
Videos are provided as a guide only. Refer to manufacturer installation instructions and specs for complete information.
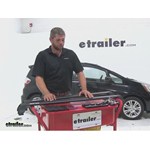
Today, were going to be taking a look at the Rhino Rack RS 2500 Series Roof Rack System. These are the custom fit design made for a wide variety of application. They use the vortex arrow crossbar. These crossbars have a subtle slope to them. Its going to help to contour it to the vehicles roofline. Theyre made of an extruded aluminum.
Theyve got nice heavy-duty bracing inside that makes them very strong. The elliptical design is going to help to reduce any kind of wind or road noise, and also help maintain that fuel efficiency with that aerodynamic design. Very similar to a factory style roof rack except we dont have the overhang that extends past there.The bars themselves when theyre extruded, they use an H-shape or an H-style. Its hard to see, but you could see its not just a hollow bar. Theyve got some nice rigid material that runs in there.
Its really going to keep these bars sturdy for a long time. They have strips that cover our T-slots that are located right here in the top. These are nice and lightweight. It allows you to slide your T accessories right in, and then you can follow that up with your strip protector that will go on top. These are designed not only to allow you to keep just a small opening here to come up through, but this is also going to keep out the dirt, and debris, and stuff like that that may try to get in to that slide.The strip can be cut to accommodate any different length, and they are going to come with a couple extra.
The legs themselves are made from a UV-treated, glass-reinforced nylon. This is going to be durable and weather-resistant for years to come. The custom fit as you can see, we have two different length of bars. For the application that were doing today, the fit, the roof tapers in. Weve already got this precut from the factory.
Theyre going to come with exactly what we need. Weve got four pads. In this particular application, all four pads are the same. These are going to fit right under the bottom of the foot pack. That nice smooth rubberized surface is whats going to be on your cars finish to protect it from any kind of scratches.The clips are designed here to bolt right on the end of the foot pack. These fit around the underside of the roof line of your vehicle. As you can see here, weve got two different lengths. Again, this is a custom fit. Youre going to get exactly what you need in this package to put it on your vehicle. These are also rubber-coated on that underside. Were not going to have to worry about scratches or any kind of scuffs on our paints finish. Also, rubberized texture is going to help hold that on to the vehicle.After we have our kit on our car, weve got four locking covers. These are designed to go right on the end of the foot pack, turn them with a key. Ill show you later just how they go on, so you wont have any questions there. This is going to keep the roof rack on our vehicle. Its also going to keep Remember that small black cover that slides on to the end of the bar where our T-slot goes Once our locking cover comes up, it covers that. Its going to hold that on. This is going to help keep any of the accessories that we might have attached into that T-slot on the vehicle. Lastly, its going to come with four security-style hex head bolts and a really nice extended tool here to help get the proper force applied as were tighten that down onto our vehicle.Now that weve gone over some of the basic features of the rack and what its going to come with, let me show you how to install this on your car. Our Rhino Rack kit is going to come with a full set of instructions, so well know step by step how to install our bars on our vehicle. I got a list of warnings here, some things youll want to keep in mind such as dont go through the carwash, dont strap your kids to the roof, things of that nature. Then, were going to have our full warranty terms and conditions card. Now, Rhino Rack does offer a lifetime warranty with their product, so they really stand behind it and believe theyve got something going on here.Weve already preassembled three of the foot packs, but I wanted to show you how to assemble the fourth. In your instructions, its going to indicate your plastic part of your foot clamp whether the arrow should be pointing in or out. In our case today, it should be pointing out, so weve got our arrow pointing out. Well then have our pad that needs to go on. Its also going to have an arrow. Itll tell you in the instructions whether that needs to be forward or rear. In our application today, that needs to be forward.Now, the bars look the same from both sides. Weve decided that were going to have our Rhino Rack label facing forward. Thats going to help us remember which way we should put this bar on the roofline of our car. If thats going to be forward, well have the arrow facing forward. Were going to put that right under the pack here. You can see, weve got two square tabs that stick up and one circular one. One square will go here, circle will go here, square will go here, so our arrow is facing towards the Rhino Rack emblem. It doesnt have to go that way on your vehicle, but thats a very easy way to be sure you get them on your vehicle properly.Were just going to clip that in until we feel those three points click in and get a secure hold. Were then going to take the clamp thats designed to go around the underside of our roofline and hold on as well as one of our bolts. Now if you look right the end of the bolt, this does have a security key style. It looks like a standard Allen head, but its got that small circle inside. Youre provided tool matches that perfectly. Somebody with a standard Allen key isnt going to be able to come up and remove this. Take our clamp, bring it around this side. Maybe I can turn this over, you get a little better look at it.Our clamp is going to fit up. The bolt will go through the hole in the middle, and its going to thread in to the small pivoting nut located inside of our foot pack. All right. Now that weve got that started, Im going to show you how to get this installed on your vehicle. Our first step needs to be opening up our front doors on our fit. With those front doors open, were going to take our front roof bar. Place it right up onto the roofline of our vehicle and allow our clamps to come around the underside. We need to do a measurement now. The measurement comes from the center of where the two doors meet forward to the center of our foot pack.Today in this particular application, it will vary vehicle to vehicle, so be sure to look in your instructions. We need to set this at 27 centimeters or 270 millimeters. Im going to do this measurement on both sides. This is going to help me ensure that I have my feet in line with one another. Now once I have both sides set to the proper measurement, and again, refer to your instructions because every application is a little bit different. Im going to take the provided tool, and I just want to take the slack out of my bolt here. I dont want to tighten it down too much because I may want to adjust it a little bit side to side. I just want to take a look. For right now, just getting it up to where we got slack out of it, and were not going to have to worry about it moving.Now, Im going to do the exact same thing over here on the other side. What I did here with my fingers, Im just verifying that Ive got my pads sitting at about the same spot on both sides. Meaning, I dont have my bar offset to this side too far or to that side too far. Again, just taking the slack out of the bolt for right now just to hold that in place. Then, Im going to come around, and Ill actually start torqueing them down. As you can see, these bars are great. We dont have any overhang that comes off on the end. Whatever weve got is going to be inside of the roofline of our vehicle. They look really sleek, really stylish, almost like a factory roof rack would look. All right. Just tighten them down a little bit at a time on that center bolt that we showed you earlier.Go over here, do the same thing. This tool is really handy. Its got a longer side on it. It helps you get plenty of torque as you can see at the T-handle setup. I really like this one. Its one of the better ones provided by any other manufacturers. Clean that out 10:01. Now once we have that torqued down where we wanted, were going to take one of those black covers that I told you about earlier. Were going to slide it in this side. Push down, simply turn the key. That paired with that security bolt that I showed you that had that little round thing that sticks up in the middle, its really going to help keep anybody from getting this rack off of our car no matter how bad they want it.I just finished tighten this one down. Im going to do the same thing with my black cap. Im just going to put it right over the end. Theyre all keyed alike. You will have four keys that are going to come with it which is great. You got two or three cars, you can put one on each key ring and then keep an extra on the spare set in case I hope you dont, but in case I guess you lose all four sets of keys that you have. With front bar installed, Im just going to open up the rear doors. Im going to grab my rear bar. Im going to place it on to the rear roofline of the vehicle.These things are really great to set up. As we said before, they customized to each vehicles application. I need to back this now just a couple turns. Maybe the same thing on the other side. Now once we have this positioned roughly on the roofline of our vehicle, were going to do another measurement. This is going to be from the center of our front foot pack to the center of the rear foot pack. In this particular application, its 70 millimeters, or Im sorry, 700 millimeters or 70 centimeters. Im going to say it one more time because I know you cant wait to hear it, but please refer to your individual instructions for the individual kits. Every measurement will be a little bit different.We do this measurement on both sides. Its going to ensure that we have our feet in line with each other just like the front, but this one is important because it also makes sure that we have both the front and the rear bar running parallel to one another. If we didnt have them running parallel, that could give us some headaches down the road when were trying to add some accessories on or something in that nature, so keep our bars running parallel. Just like I did on the front, Im going to do it over here because Im already here taking out some of that slack.Take a look at how the footpads are sitting on the roofline, theyre both sitting on there about evenly. As you can see, Ive got a little overhang on the front here. The same thing on the other side there, just a little bit of an overhang, so I know Ive got them in the right spot. Were then going to tighten down each side a little bit at a time now that weve got our slack out. You can see in our case here, as weve been tightening it down, its drawing our bar over a little bit, so that little bit of overhand we have is now gone.Our pad is sitting squarely onto the side roofline of our vehicle. They really are good at making these custom fit roof racks. They fit on there. Theyre the perfect size. Theyre going to fit every time. Close our doors, and Im going to cap this off just like we did on the front. Slide the two tabs in that side. Push it in, and give that key a turn. Just like that, were ready to throw a few accessories on there, and we can hit the road. Now that weve got our roof rack cross rails on our vehicle, were going to take it out and get some Go Pro footage, and also get a reading off of our sound meter to see exactly what kind of noise we get with the bars installed and also without.Without our crossbars installed on our vehicle, we we're getting adjustable readings somewhere between 73 and 75. Once we installed our bars, those readings went up slightly to 75 to about 77 decibels. Now, what does this mean for you, and how its going to work with your life As we we're going down the road sitting in the car, we experienced no real noticeable difference. That will complete todays look at the Rhino Rack RS 2500 Series Roof Rack for Naked Roofs using the Vortex Aero Crossbars in black. .
Average Customer Rating: 4.8 out of 5 stars (363 Customer Reviews)
This quiet, aerodynamic roof rack with a from-the-factory look lets you carry gear on your vehicle's naked roof. Sturdy, lightweight aluminum crossbars include top channels with noise-reducing Vortex strips. Integrated locks deter theft.Great product and fit. I must admit that my reasons for choosing this rack were slightly petty: I wanted contoured bar ends (no overhanging bars), I wanted low-profile (compared to OEM), and I wanted the rack in black. Yakima's forthcoming Flushbar is attractive, but not available for my GTI when I needed to make a move. So I went this Rhino Rack.
The bars look great and are almost silent when naked. I can hear a change is wind noise at 60 mph, but no measurable sound increase. At 70 mph, I hear what sounds like crosswinds, but no howling or ringing. I tried Rhino Rack's fairing, but the rack is quieter without a fairing. The Vortex 2500 RS is that good! Don't bother with the fairing, especially if you drive at high speeds (it vibrates against the paint at speeds greater than 73 mph).
Installation is a breeze, especially once the initial fitting is done and the included "arrow" stickers are placed. The included security torque wrench is a slick feature. I wouldn't consider the key locks to be security against rack theft since the plastic covers are probably easy to break off. But they are a slight deterrent and guard against accidental removal of the covers.
My primary use is to carry a cargo box, but the rack may see duty carrying other loads, too.

The product fits perfect on the roof of my 2012 Crew cab Silverado. It has the rounded smooth corners, which it makes it appear to be manufacturer installed since my track is black. I used to remove them every time after I was finished using them. Several months ago, I decided to keep them installed all the time and it has not been a problem. I know how high the top of the track stand from the ground with the bars installed. So, when I go to a cover garage, I know ahead of time if the truck will clear or not. I use them to carry my safari rack when I go to the mountains about 5 time a year. This product is very easy to install and comes with all the proper instructions. The only drawback with the instructions is that it uses the metric system to instruct the user on how far from the center of the cab each bar should be installed but whomever wrote the document did not use a decimal point. If the user is not familiar with the metric system, it can throw the user for a loop.
Ideally, I wanted a permanent-mount roof rack that looked like it came from the factory. I did find a company that makes them, but my auto body guy thought it was a bad idea. This Rhino Rack is the next best thing. It doesn't like factory-issue, but it's sharp and doesn't look like some slap-on. It also seems much more solid and substantial than the factory rack I had on my old car (Pontiac Vibe). Installation was no issue, with only a couple hiccups. The rubber strips weren't already installed on the rails and it was a bit of a pain to get them in so they didn't have any bumps. Other than that, everything went great. I took my time with measuring where the racks go on the roof, but that's a one-time thing, after marking where the racks go for the next install. Speaking of which, the white arrow stickers they give you weren't very helpful for me since I have a white car. But I had some other miscellaneous auto stickers that I used to make a thin black line for the racks to line up to. I like the line better than having to guesstimate the center of the clamp to line up to the arrow. But I'm probably more worried about being exactly lined up than I need to be. The etrailer youtube video (link) was an excellent resource for installation if/when the written directions weren't clear to a bonehead like me. I was kind of hoping the rails would fit in the space under the C-Max's rear seat, but they're just a little too wide. Bottom line, I'm very happy with the rack, and etrailer did a great job handling my order.
No complaints here. Racks arrived partially assembled, along with a set of instructions which made assembly of the second rack a cinch. Well written instructions and graphics for roof mounting made it a breeze. This rack style clips to the under side of roof for quick removal if needed. I use mine a couple times a week and have left it on ever since. Stylish and quiet on the freeway. I use it to carry surfboards. Safer to carry boards on racks than inside the car and keeps the interior clean from wax and saltwater.
I was a little skeptical about ordering these crossbars, there was no application listed for a Mercedes E Coupe with panoramic sunroof. I am happy to say that they will work with the sunroof, allows about 1/2" clearance between the bottom of the bars and the roof panel. The fit is perfect, easy install, and very quiet, even a 80mph with bikes mounted.
Purchased Rhino Rack RS2500 for 2010 Ford Fusion. The instructions were very well written and easy to follow. Installation took about 1 hour. The rack fits perfectly on my car and seems solid as a rock. I paid for 2 day shipping and the product arrived within 48 hrs. Very satisfied customer.
Great Product,quick delivery with Ups Updates,very simple install.Great customer service from etrailer,from order all the way down to delivery to my house received emails from etrailer.Looks great on my 2010 Ford Fusion Sport
Great car rack. Looks like a factory install. Took my time (measuring and tightening) installing only because I'm a pefectionist. Shipping was quick and to my door. I would recommend etrailer to anyone and would use their product again.
Purchased this product to transport my kayak on my 2014 Kia Cadenza.
It came pre-cut specifically for my car and partially assembled. What was not assembled, was sufficiently labeled and instructions were great.
Completely satisfied with this product.
Btw, there is plenty of clearance to open sunroof.
I had been carrying my kayak INSIDE my 2010 Prius for a year and decided it was time to add a little class to my act with the addition of a roof rack. I was interested in a rack that would be durable, easy to install, and not noisy. I'm quite pleased with the performance of the Rhino Rack with the vortex aero crossbars. It really has exceeded my expectations. I particularly like the rubber pads that runs across the top of the bars because I cinch the kayak down tight against these without fear of damaging the kayak. On the Prius, the rear rack bar installs easily every time; however, it takes me a few minutes to get the front rack properly positioned because of the slope of the roof line. Overall, I'm quite pleased, and I do recommend this rack for the 2010 Prius.
I have these on a 2008 Chevy Colorado to haul kayaks and the racks work perfectly. They easily install in under 15 minutes. There is more noticeable wind noise, however most of that is likely due to the Thule Hull-a-port pro racks. I was initially concerned about water leaks because these mount underneath the weather-stripping. However that has not been an issue at all and the truck lives outside year round through rain and snow. I've had them through all 4 seasons now and they've held up well. I'd recommend them if you're looking for a more factory look than the "through-the-foot" style racks from other brands.
The Rhino Vortex Aero crossbar for my 2018 Prius is the second Rhino rack that I've bought, the first one being a few years ago for a 2010 Prius. Perhaps because of the redesign of the Prius roof line, I find this new Rhino rack is much easier to get properly lined up on the roof. It can be installed in just a few minutes whereas it took about 15 minutes to get the racks properly lined up on the roof of the 2010 Prius. I've made the "maiden voyage" with the new Rhino rack loaded with a kayak for a 70 mile round trip at highway speeds up to about 65mph. The rack + kayak were not at all noisy. I especially like the rubber vortex strips on top of the crossbar that allow me to cinch down the kayak nice and tight. In summary, easy to install, not noisy, works great, and looks good!
It came pre-assembled shrink wrapped, at first I thought it wasn't going to fit on my roof because the metal brackets weren't lining up properly on the door jams, but once I started tightening them down, they formed to them tightly. They look pretty good, and do the job of holding my 50lb kayak to my roof; just tested it on a 400 mile trip- although I did not go over 62 mph because I didn't want to risk it first time out. Comes with extra weather stripping to seal the top and yes you will notice some wind resistance with some noise but its not super annoying. The lock covers are plastic, thus only serve as deterrant. Overall, these are not cheap but considering the market of aftermarket roof racks and the quality of this one; i reccomend this one for at least a sonic hatchback.
This was fairly easy to install - be sure to NOT over-tighten the security bolts. There is very low wind noise when kayaks were and were not loaded - that was nice, especially for long trips. The instructions only had millimeter measurements and no inches conversions, so know your metrics. Service representatives were fabulous when we called to ask questions too!
I have this rack set up on my '04 Silverado - to me they are just as good or better than the big name/big price roof racks. I like that they are vehicle specific, and don't have tube supports hanging out the sides. This may or may not work for your use but certainly makes for a cleaner factory type look. I've had them on and off several times and appreciate the supplied locator stickers that go on the inside of the door jambs when re-installing, makes it easy. I currently have a wire basket mounted to the Rhinos. Thumbs up, good product.
Fantastic rack! Was a little challenging for me to install simply because I am a male and I don't follow instructions closely but I got 'er done. Once on, these babies stay put and don't interfere with anything on my VW Golf. Get these and save a few bucks in the process. I also purchased a discounted Thule alpine box and it works like a charm with these rails. Oh, I was able to purchase that box because I saved so much on the roof racks. See the pic? Our rare snowstorm in Northern VA shows how good these racks look with a little white dusting.
These crossbars are solid. I bought them along with two of the J-Style Kayak Carriers (S512) and one set of Anchor Straps (RRRBAS-2) so I could haul a few new kayaks. The crossbars were extremely easy to install, especially after watching etrailer's videos. I couldn't notice any additional wind noise when they aren't loaded (granted in an '02 Subaru it can be hard to tell) so I leave them on most of the time. Although, they do come on and off quickly without much effort if you put the provided marker stickers on the inner doorframe the first time you mount them. I keep the keyed allen and the security key in my glove box. I really like that they don't have any overhang like most aftermarket crossbars. Although, that means these are only intended for use on your specific application so if you plan on selling soon, dont expect to keep the rack. The rubber feet and coating give me confidence that there is no damage being done to the roof and they are very sturdy. Overall, a great purchase!
I am impressed by how good these racks look on my 2014 Mazda 6. They were very easy to install - took me less than an hour. Could have been in less time but i was very careful with the measurements. The racks feel very sturdy and of high quality. I was originally looking for Thule racks to fit my Mazda, but Thule did not offer the flush crossbars as i was looking for a sleek factory look. Overall i am very satisfied with these racks and happy with etrailers excellent customer service, even post purchase. I just installed a Thule Criterium bike carrier - i needed an adapt8 adapter but it worked out well!
The installation was dead simple and took me 25 minutes. They look great and are strong. I tried my best to pull the loose and I cannot even budge them. At 80 MPH they do not make a sound.
I definaltly recommend these rack bars.
I bought this roof rack for 2014 Porsche Cayenne Diesel. I prefer to drive with "naked" roof. In my opinion car looks nicer without factory installed roof rails. BTW rails can't be installed by the dealership, only in a factory. By choosing Rhino-Rack Rs 2500 I can drive most of the time without roof rack and install it quickly for vacations. Product came mostly assembled with clear instructions. I am enclosing pictures. Also I did my research before deciding what to buy. Thule aero blades can't be custom fit. You need to purchase a 60" aero blade which creates overhangs on all 4 corners(I don't like how it looks). Rhino-Rack is custom fit for every vehicle and has no overhangs. I tried to fit my Thule box - fits perfectly. Regarding wind noise - can't tell the difference between driving with and without roof rack(I even tried with sunroof open). Overall very satisfied with the purchase.
Purchased, received, and installed Rhino Rack Vortex Aero Crossbars on my 2012 Ford Focus Hatchback. The fit is perfect. I watched the video instruction first so doing the job was super easy. I had absolutely no problems with the installation. The bars are very solid and well made. My sister said they look "legit" , like factory installed luggage racks do! I have decided to leave them on the car as there is no wind noise off them. Plus they do look cool. I also purchased the Rhino Rack 440 master Fit Cargo Box: Highly recommend this box. Super easy to installed - very solid attachment to crossbars.
Installed rhino rack aero on our 2014 Ford Escape, bare roof install. Took 45 mins from unpacking to complete install. Looks great and very secure. Comes complete with everything including locking covers. Very happy with product and value. Fast shipping with etrailer, great communications. Bought the rhino rack cargo, roof top carrier. Once that arrives I will post that review also. Great company to deal with. Thank you.
I bought this rack to take my bike on trips without the bike taking up room in the trunk. The rack has a clean design and the bars align perfectly to each other, and there's no interference with doors or the sunroof. The rubber feet even have cutouts to nest inside the roof gutters (see photo). There's no buzzing or vibration at speed, only a little extra wind noise. The slanted ribs on the slot covers eliminate any trailing edge vortex noise. The car is a 2017 Ford Fusion Hybrid.
Farley easy to put on and I like the look of them were see if there good this summer will update later
Purchased this Rhino Rack for my Chevy Spark. I have a sunroof and that did not get in the way of the rack. I can open it. It is a really great rack, locks and was relatively easy to install. You do have to measure it.
I dont know if it is because my roof's space is so small; but the whistle effect from this is absolutely terrible. I also don't know if this would be the case with anything I use, due to the lack of room to even position it.
It does the trick perfectly though, it is removable and lockable- just what I wanted.
Do you have a question about this Roof Rack?
Rhino Rack Accessories
Fit to this rack on your 2014 Ford F-450 Super Duty
Info for this part was:
At etrailer.com we provide the best information available about the products we sell. We take the quality of our information seriously so that you can get the right part the first time. Let us know if anything is missing or if you have any questions.


Thank you! Your comment has been submitted successfully. You should be able to view your question/comment here within a few days.
Error submitting comment. Please try again momentarily.