
Summer Starts Here - Save up to 70%
To see if this custom-fit item will work for you please tell us what vehicle you'll use it with.


2,500-lb Load leveling capacity. Custom helper springs install above your Chevrolet Silverado's rear factory leaf springs to reduce sway and prevent sagging when towing or hauling heavy loads. Includes bolt-on installation kit.
Features:
Specs:
Note:
Hellwig Leaf Spring Comparison

Videos are provided as a guide only. Refer to manufacturer installation instructions and specs for complete information.
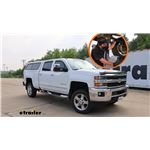
Hey, everybody, Ryan here at etrailer. Today, on our 2017 Chevy Silverado 2500, we're gonna be showing you how to install the Hellwig Load Pro 25 Progressive Helper Springs. But before we do that, let's take a minute, check 'em out, and make sure they're gonna work for you. This is what the Hellwig suspension upgrade can look like underneath your truck, and it's a really simple concept how it works, right So the Hellwig spring pack is going to essentially attach to your factory spring pack and that's how it's gonna provide that additional support. So whenever you have weight in the back of the truck or hooked up to your trailer, whatever, your suspension is going to want to squat down. When that happens, our new springs are going to help combat that and provide that additional support we're looking for.
So a lot of times too, there's different types of springs I guess you could say. So with these, it's a progressive-style of spring. And so what that means is the further down it goes, the more support it's going to provide. And then, you have constant-style springs which are always providing support more or less. And the thing is with them, you know, I'd really only recommend them if you're towing essentially all the time.
Because when you're not towing with a constant-style spring, it's going to kind of make your ride rough and it's just not ideal. As for a progressive style, when you're not using 'em or not towing, or anything like that, you're really not gonna feel a difference in the ride quality in terms of stiffness or anything along those lines. This particular set of springs here is gonna be rated for 2,500 pounds. But regardless on what your spring pack is rated for, that's not going to add to your load carrying capacity of your truck, if that makes sense. That's just what these can actually handle.
Now when it comes to picking out a suspension enhancement, you know, there's a ton of different options available out there, you know. And this is kind of a good middle ground option I feel like 'cause you have some adjustability, you have that extra support when you need it, so not bad there. But another really popular option would be an airbag or an air spring, a lot of people use those. With them you get a lot of adjustability kind of on the fly, you just change your air pressures. With those, you know, in my opinion, I think the ride gets a little rougher sometimes in most cases, and there's some maintenance involved with them too.
You know, you have to keep certain amount of minimum pressure in 'em, things like that, you know, potential air leaks and everything in between. And then, something else that's kind of comparable to this I guess you could say or kind of in the same league is the Roadmaster Active Suspension Enhancement. It's kind of a similar design, how it attach to the leaf springs, but it has a big spring in it. And with those, I'm kind of a fan of 'em honestly, so I would use 'em. With those I would suggest, you know, if you don't tow all the time, but when you do you just need a little extra support, you know, you're not doing anything crazy, those are a pretty good option, 'cause I found that they give you that little bit of extra support, but still actually maintain, a pretty comfortable ride. You really can't even tell that they're working when they actually are. So that's just something I thought I'd mention and throw out there. These are going to be adjustable too. So if you find that how you originally have 'em set, if it's giving you too much support or not enough, you can always come back in and and tune 'em up. But these though you are gonna have to get some tools out and stuff. You know, you just essentially tighten or loose these bolts which will either let the leaf spring lift up or pull further tighter to the original leaf-spring pack, and that's how you would set that tension or preload. You know, if you wanted a stiffer ride or more support, you would draw your leaf-spring pack a new one closer to the original one and kind of preload it a little bit more. So you can tune it up. Personally, if it we're me, I'd find what kind of works and probably call it a day. Just so you don't have to come back down here and undo bolts and everything like that, I'd probably find something that works good across the board and let it be. As far as the build quality goes, they actually seem pretty nice. They have a really solid, almost a hammer-tone, powder-coat finish on 'em. So I don't really see 'em rusting out, at least very quick. You know, I mean just about everything sooner or later will. But I think these should hold up for quite some time. You know, all the hardware seems like it's well built and everything just kind of went together, you know, you didn't really have to fight with it a whole lot. As far as, you know, getting these parts installed on vehicles they're all gonna pretty much bolt up the same way if you will, not really a whole lot to it. You know, the center portion is going to clamp down to your leaf-spring pack, and then you'll have your clamps on each end of the leaf spring. So pretty straightforward. Not really a whole lot to it, not a lot of moving pieces, so a lot of people should be able to tackle a job like this at home. To begin our installation, we're first gonna start by kind of pre-assembling all of our springs here. So you're gonna have a long spring, a medium spring, and a short spring. So you want the long one to be on top, you know, you got your middle one, and then this one will be on the bottom. And if you look, all right, each one of these springs are gonna have a hole drilled in it, somewhat close to the middle of it, but it's gonna be offset a little bit, all right So you're gonna want those offsets on the same side, if that makes sense. So, you know, this is the short side of our small spring, short side of our medium, short side over a big spring. So we got that all positioned, we're gonna line up all them holes. You can take this bolt that they give you. All right, that's gonna feed through those holes. I have a split-lock washer and a nut that'll get threaded on there. We'll snug this down. I got a 9/16 socket and wrench. (drill whirring) You know, make sure that these are all kind of flushed with each other and everything else. And once we have that set properly, come back with your torque wrench and torque it down to the amount specified in your instructions. (torque wrench beeps) And then, grab this bracket here. And this is gonna set like that on the bottom side of our leaf-spring pack. And you can just kind of flip everything up like that, make sure it's lined up. And then, you have this five-hole plate Which Will rest on top of it. Then you have the smaller U-bolts. And so these are gonna come from the bottom up. And then, there's lock nuts. And the way you can tell, I don't know if you can pick it up, but on one of the flat parts, there's almost a little round indention or divot if you will, that's gonna let us know that these are locking-style nuts here. We'll thread these on. Same deal for this one here. And you wanna make sure everything is lined up, you know And we'll snug these down. It's an 11/16. (drill whirring) When you're running these down, you know, you wanna kind of draw everything in evenly. (drill whirring) To kind of hit each one just a little bit. (drill whirring) I like to get 'em pretty snug, try to hold it in place. And, again, just make sure everything, all these spring packs are lined up. (drill whirring) So about like that. Once you have these snug, and everything's lined up, and you're happy with it, don't forget to come back and torque the hardware down. (torque wrench beeps) To make everything a little easier to get installed and set up, you can take a jack and lift up by the frame of your truck. For those of you at home, if you're in the garage or whatever, you can just use a floor jack. And you don't need to get carried away. We're not trying to get the tires off the ground or anything like that. We're just trying to lift the truck up a little bit to kind of stretch out our suspension and create a larger opening over there. And you don't have to do this, but it definitely gives you some more room to work, just temporarily lower and remove the spare tire if you want so it gives you a little more head room. But our new spring pack is going to set on top of our factory spring pack here. And so what we're gonna do, if you remember the new spring pack, it was kinda offset. You know, you got a long and then a short end. We went the long end to face towards the back. And so let's kind of work this into position here. And set it in place. About something like that there. And position this where you think everything's gonna line up the best, which we'll kind of show you in a second here. But, in our case, it looks like you take the whole assembly and push it all the way forward, that'll be pretty good. And then, you can take these U-style U-bolts, have one there. Then, of course, you know, one on the front side. On the bottom of it, you can take this strap, put that over. Then take a flat washer and a nut. And we're just gonna get these hand tight for now. So I got these started hand tight, you know, snug enough to where this is gonna kind of stay in position, but, if need be, you can still kind of move this around and reposition it. So we're in good shape there. Then we're gonna have these other U-bolts, right So we'll have two of these. One will go on each end of the spring at the very back where the spring kind of divvies down. Got our U-bolt there. We'll drop that down like that. And we wanna find a spot where it's gonna set, you know, on one part of the leaf spring I guess. So if you need to, you know, these U-bolts are, you got those angles so if you need to reposition it, you can always flip it like that or like this to find the most ideal spot so to speak. So I think we're pretty good there. We have these straps that'll go on, followed by flat washer, and a nut, get that hand tight. Same deal right here. And I'll repeat the same process for the front end of our spring. We got our front one on, and this is how it turned out. And so once you have this started, you know, get a few threads going, lower your jack, that way the truck will be under its own weight again and everything like that. And then, just check the fitment again. You know, if this shifted on you a little bit, you can always come in, kind of tap it into position where you want it and so on. So I think we're in pretty good shape now, so we can start to run everything down. You can move back to the middle now. And so this U-bolt and then the one just like it, in the front side of our axle, we can snug these down. So it's an 11/16-size socket. When you're doing these U-bolts, you wanna kind of do 'em evenly. So run it down for a second or two, switch over, and just kind of go back and forth. (drill whirring) With these all snug, now you wanna come back and get 'em all torqued down here. For our U-bolts on the ends of our leaf springs, what you can do is take a 7/8 socket and essentially just snug these down, kind of get the slough out of 'em and, you know, tighten 'em down enough to where they're gonna stay. But don't go much further than that, because whenever we tighten these up more, that's going to kind of set the preload of our spring pack. (drill whirring) We'll just snug 'em up and go from there. (drill whirring) Once you have the preload set how you want it, you can double nut these. So essentially just take another nut. It's essentially gonna act as more or less a jam nut. We'll run that down and snug up just that second one. (drill whirring) And then, come back and torque just that second one down. Moving back to your center U-bolts now, you're also going to want to double nut those. So, you know, put it on, snug it down, and get it torqued. Once you get that one side done, you'd simply come over to the other side of your truck and repeat that exact same process to get this one installed. And that'll finish up our look at and our installation of the Hellwig Load Pro 25 Progressive Helper Springs on our 2017 Chevrolet Silverado 2500.
Info for this part was:
At etrailer.com we provide the best information available about the products we sell. We take the quality of our information seriously so that you can get the right part the first time. Let us know if anything is missing or if you have any questions.


Thank you! Your comment has been submitted successfully. You should be able to view your question/comment here within a few days.
Error submitting comment. Please try again momentarily.