
Summer Starts Here - Save up to 70%
Roof Rack Includes:
Part Numbers: Y00409,Y28TR,Y03536,Y06135
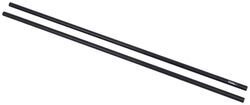
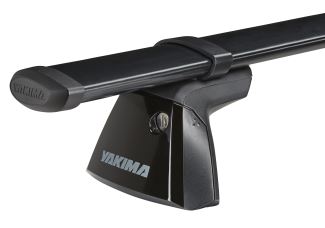
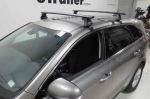
These multipurpose, galvanized steel crossbars supply the backbone for your aftermarket roof rack system. Works with accessories that clamp around the bars. Pair with Yakima towers, fit kit, and RoundBar SL Adapter to create a complete roof rack.
Features:
Specs:
Heavy-duty towers allow you to mount 2 Yakima crossbars safely and securely to your vehicle with a naked roof. Tower pitch adjusts to create a level roof rack on curved roofs. Includes torque tool for worry-free installation.
Features:
Specs:
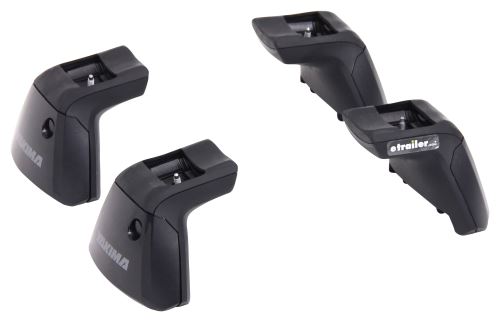
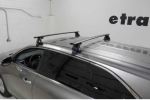
The heavy-duty BaseLine towers allow you to mount 2 Yakima crossbars to your vehicle with a naked roof. The towers can be adjusted during installation to ensure your crossbars are level and that the rack is seated correctly on your roof. The BaseLines' versatile BarBeds accommodate Yakima's full line of crossbars. The towers install with Yakima's DropHook system and BaseClips .
Versatile BarBed
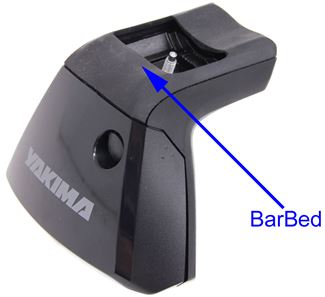
The BaseLine's BarBed is specifically designed to work with Yakima's entire line of crossbars.

The BarBed is curved to accommodate the elliptical shape of the CoreBar and JetStream crossbar. The CoreBar includes brackets that slide over the bar and secure to the towers with bolts. The JetStream attaches directly to the tower with bolts.

The towers also work with Yakima RoundBars with adapters . The adapters slide over the bars and secure to the towers with bolts.
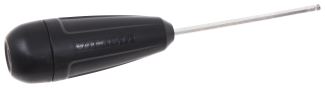
The crossbars mount to the BaseLine towers with the included torque tool. The tool clicks 3 times once you've reached the correct amount of torque so you don't have to worry about over- or under-tightening. This is the only tool you will need to secure the bars to the towers and the towers to your roof.
Adjustable Pitch and Toe Angle
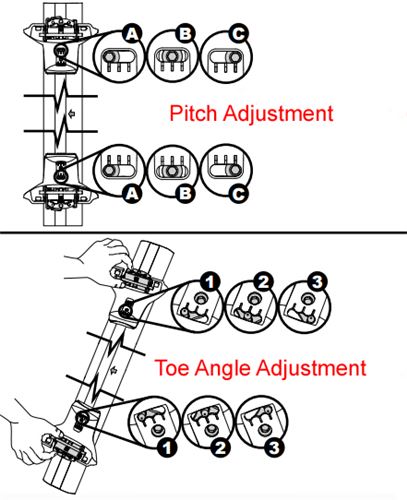
The pitch and toe angle of each tower adjusts to provide a level mounting surface and to ensure the rack is seated correctly on your roof. To set up, install the towers on your crossbars and place them so the bottoms of the towers are facing up. Next, adjust the pitch and toe angle to the correct position as indicated by your fit kit's instruction manual. The pitch adjustments are labeled A, B, and C, and the toe angle adjustments are labelled 1, 2, and 3. Once these are set place the rack on your roof.
Secure Installation with DropHook System
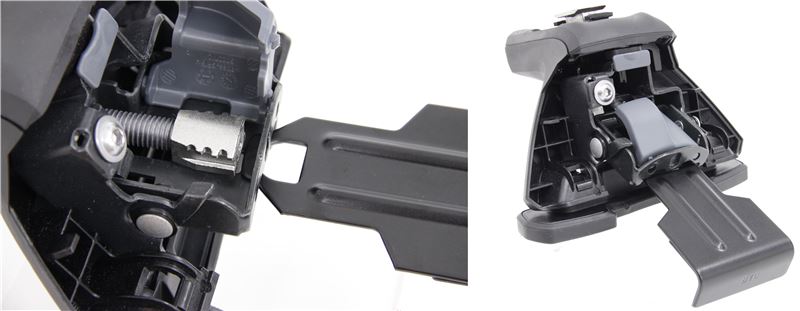
The towers install with custom-fit BaseClips . To mount a tower remove the cover, open the door inside the assembly, and attach the BaseClip to the hook inside the tower. The clip adjusts on 3 axes as you tighten it to ensure a safe and secure fit. Once the clip is tightened down, close the door to secure the clip in place.
Same Key System Locks
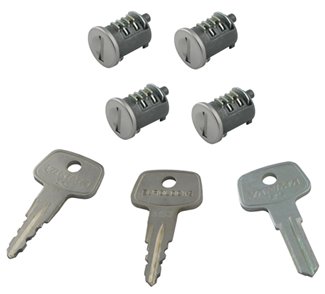
BaseLine towers are compatible with Yakima SKS lock cores (Y07204 - sold separately) that allow you to secure the roof rack to your roof. The SKS locks are all keyed alike so a single key opens all the locks. The locks can also be swapped out to make all of your Yakima products keyed alike.
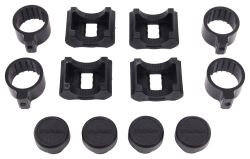
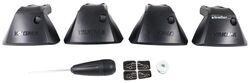
These adapters allow you to use Yakima RoundBars with BaseLine, SkyLine, TimberLine, or RidgeLine roof rack towers. Kit includes 4 adapters and 4 endcaps.
Features:
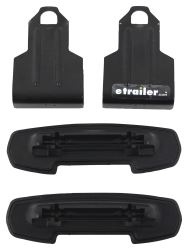
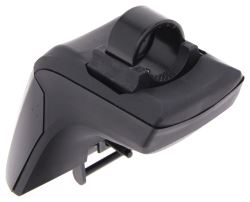
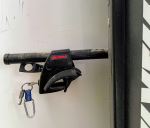
These custom clips and pads let you mount Yakima BaseLine towers on your vehicle with a naked roof. Clips attach to hooks in tower assemblies, and pads clip to bottoms of towers.
Features:
Specs:
DropHook System Installation
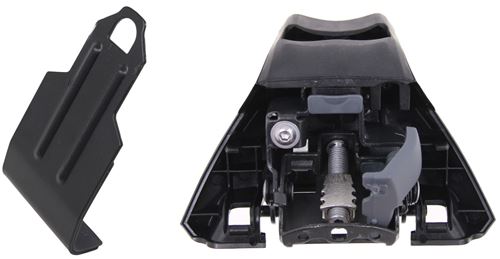
Custom-fit BaseClips let you mount BaseLine towers to your vehicle with a naked roof. To install, remove the tower's cover, open the gray door inside the assembly, and attach the clip to the DropHook inside.
The clip adjusts on 3 axes during installation to ensure a perfect, secure fit on your door jamb. Once the tower and clip are seated correctly, simply tighten the clip down, close the door, and replace the cover.
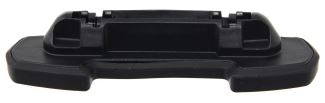
The included molded rubber pads protect your roof from scratches and abrasions. The pads easily clip onto the bottoms of the towers and are specifically designed to fit the shape and contour of your roof.
Videos are provided as a guide only. Refer to manufacturer installation instructions and specs for complete information.
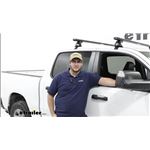
Hi, Matt with etrailer. And today we're gonna be talking about the Yakima Roof Rack System on top of our 2022 Ram 1500. Now this will be a great option for you if you're running outta space in your cargo area, your bed, or you have a tonneau cover in the back and you can't get a ladder rack on top of it. This is gonna solve that solution and give you another area to put cargo on top of. This is gonna be comprised of three parts. The first part is gonna be our 60 inch crossbars on top.
Now these are gonna be the HD ones, so they're gonna have a very high weight capacity, and they're gonna be very sturdy. We're also gonna have this T track on top with this weather strip that goes on top of it to prevent any debris from getting in here and help reduce that wind noise. And then at the very end of it, we're gonna have these anchor points. These anchor points are gonna be great if you need to tie anything off, anything like a kayak. And then we're gonna have the base that connects to our crossbar from underneath.
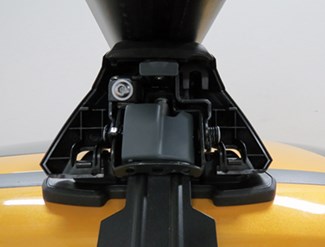
And if you look right here, we're gonna have this circle. And what that is is a plastic core that you can get replaced with a Yakima lock core. And that Yakima lock core can get key alike to any of the other Yakima accessories. If I remove this, you'll see we have all the hardware underneath, so that's nice that we do have this end cap to cover all of it. And then we can also see how our bases connect.
Now we're gonna have this base and clamp system. That clamps just gonna grab onto your gutter, and this base is gonna have a rubber base to it that sits in this channel over here. Now I'm not a big fan of this base on how it fits on the Ram 1500, just because this is a little bit wider than this channel we have, but it's still gonna give you a secure fit. Now we can get some measurements on how it's gonna sit up here. So if I go from the top of our roof to the bottom of our crossbar, that's gonna be 3 1/2 inches.
So that's gonna give you an idea, if you plan on putting on any clamp-on accessories, how much space you have. That should be plenty of space to put on most clamp-on accessories. Now for the total height is it gonna add to your system From the top of our roof to the top of the crossbar. Those are gonna be about 5 1/4. So that's something to think about. If you're going through a low hanging area, what I'd recommend doing is taking the total height of your car plus your crossbar so you know what areas you can make it under. And then if you have any accessories on top of that, make sure you include that measurement as well. Now if we're talk about the overhang, it's gonna be very minimal, so you're not gonna be likely of hitting your head on it. Now I will say the counterpoint to that is you're not gonna have a lot of space to put any clamp-on accessories at the very end of here. If you have anything like a ski carrier that you want closer to the side of your truck, so it's a lot easier to get that stuff off, then that's gonna be the downside of this. As far as what you can put up here, you're gonna have a weight capacity of 220 pounds for the system itself. But what I recommend doing is checking what your roof is rated for. Then after that going from the lowest component. You're also gonna be able to put your T channel accessories on here. That's what I'm gonna recommend you use, because if you try using clamp-on accessories, you will be able to use them, but some of them might not be able to fit around these thick bars. Overall it's gonna be a great option for you if you do plan on using a ladder rack and you wanna put on any really long items like lumber, kayaks, or even ladders. So you're gonna have four points holding those longer items up. Now it's also gonna be a great option if you have a tonneau cover and you can't use a ladder rack. So if you wanna store any additional cargo that doesn't fit in your bed, then this is gonna be a great option for you too. As far as the installation went, it was pretty straightforward. It's just something where you need to pay closer attention to the instructions. But if you need a hand with it just stay tuned and we'll help you out with it. Now to kick off the install, we're gonna lay out everything. So we're gonna have our crossbars and behind that we're gonna have our towers and the end caps that go with them. And then we're gonna have our fit kit, which includes the clamps and the bases. You'll also have this included Allen key with a torque device on the back of it. And what I recommend grabbing is some tape measures and some tape to make this a lot easier. Now when you get your towers, you might notice that this plastic holder and this metal block isn't in here yet. If it is, you're good to go, but if it isn't, how you just put this in is just by matching up the shape of it with this hole, putting in at an angle. You'll notice we have this ridge at the front side. I'm just gonna apply pressure until it clicks into place. With it in place, I'm gonna grab that metal block and I'm gonna put it on this bolt that's in here. Now you'll notice if I want access to that middle bolt, I gotta get past this tab. And how I get past that tab is by turning it around and pulling this safety tab. And with that off, you can see that bolt is showing through now. Now I'm gonna put the metal block on the other side, lined up with that bolt, and then screw it on. You don't wanna do this completely, just slightly where it's making contact, because we're going to have to make adjustments later on. After you're completed this step with this tower, just repeat that same process with the other one. Now when you get your towers, they might not have this plastic holder in it yet and this metal block not in it yet. So how you do that is just by taking the plastic piece, lining it up with that hole. You'll notice we have this tab on the front side. We'll put it in at an angle and then apply pressure until it clicks into place. Next up, we'll grab this metal block and line it up with this bolt on here, just so that hole is lined up, and just apply pressure. Then you're turn it around, pull this plastic tab, your safety tab. Then finally we'll flip it around. And we'll see this bolt that's in this channel right here. We'll just put this Allen key in here and just tighten this slightly. We would just want to tighten enough where it grabs onto that metal block, 'cause we're gonna want a gap underneath it still. Now we're gonna grab our crossbar, make sure it's flip upside down so you can tell if it has this ruler on this side with this channel, with this bolt sticking out. I'm gonna take that bolt out using or included Allen key. And the trick to do this is once it's loose, you can grab your crossbar, flip it over, and catch that bolt and put it aside. Next up, I'm gonna take this end cap off. And then I'm gonna put my first tower on in the opposite direction that I need, lining this middle block with that channel. Then I'm gonna slide it all the way down to the other side, just roughly placing it. Next up I'm gonna grab our other tower and put it in the right orientation, making sure it's making an L shape just like this. And repeating that same process until it sticks on there. And finally, just make sure you put this end cap back on. (faintly speaking) Now for the next step I'm gonna reference our instructions and get the measurements we need between our two towers. So what I'm gonna do is come over to the crossbar, and I'm gonna use that ruler to line up the front of our tower with where it needs to be. Once there, I'm gonna grab our Allen key, make sure that security tab is pulled out, and tighten this bolt just slightly. Just enough where it's not gonna move around if I'm grabbing the crossbar, but enough where, if I need to make any adjustments. Now the next step is getting our pitch and toe settings, and you can find those in your instructions as well. In our case for the rear and front ones, that's gonna be on setting 2 and B. And what setting 2 and B is is on these center lines. So we wanna make sure that our bolts match up with that. Starting with the pitch, I wanna make sure it's on the center line. And if it is, I'm gonna tighten it a little bit more. Now that change our toe, it's already in the correct position, but for, if for some reason you do need to change yours, we're gonna put this base on. And you wanna make sure this arrow is facing out away from the center of the crossbar, matching up these two plastic channels with this metal bar, until it clicks into place. (plastic clicks) Once it's clicked into place, you can actually push on this, either direction, to change that toe, I mean. But we want it in the center, so I'm gonna make sure it's centered, and then tighten down this bolt the rest of the way. Now we're gonna roughly place our rear crossbar up here. Now when you are putting on your front crossbar, you wanna make sure you put that 10 inches away from your windshield. Now for putting on your rear crossbar, you wanna make sure that is 32 inches away from the front of your front crossbar. So I'm just gonna roughly place it up there now and then I'm gonna get that measurement afterwards. And that measurement is just gonna look like this, going from my front crossbar to the front of my rear crossbar. Once you have that measurement, then go to the other side and make sure that's the same measurement so everything's squared off. Now we can check how things are sitting up here, and things aren't looking good right now. So what we want is the base to sit on this black track. So what we're gonna have to do is take off the crossbars and bring our towers in just slightly. Now before we take off the crossbars, what I recommend doing is grabbing some painter's tape or masking tape and marking where the front of your base sits. And once you have that mark, then you take this off. And when you place it back up here, it's gonna be a lot easier. Now these bases are in the right place, sitting in the center of this black strip. Now I'm gonna grab our clamps, and in our case that's the B10. And what we're gonna do is open up this access door, slide this clamp in here with that hole that is gonna grab on to a drive bolt. Now in some cases it won't fit for right now, so what I'm gonna do is come back through with an Allen key and loosen both of these up. 'cause what this is gonna do, it's gonna allow our clamp to stick further out and further away from the side of our vehicle. As you can see it moving right there. Now I can slide this clamp underneath that dry bolt where it has a hook, that I grab onto it. And it still looks like it needs to go out just a tad bit to go around that gutter, just like that. Now I'm gonna start with my swing bolt to tighten it back in. You might have to do some adjustments so it fits right underneath that gutter. And what we want for this side is for it to wrap around and just make contact, and then wanna go to the other side and repeat that same process. And then we'll just tighten in enough to where it's gonna start clicking on your torque device. Now something I will say about this fit is this is a pretty tight fit. We had to do some working around to get this clamp to fit on there, just by pulling on the crossbar, just a little bit, so we can get that full coverage on that gutter. But it still was able to get on there. And once you have both sides tighten completely, then you can put this access door back into place, along with the safety tab on top. And our last step is just gonna be putting on this end cap. The best way to do it is to put it on at an angle, and then just apply pressure (plastic clicks) until it clicks into place. And now what I recommend doing is just doing a good shake test, make sure nothing's moving, and if it doesn't then you're good and you can put whatever accessories you have up there. Well, if you liked everything you saw today, that's just a look at the Yakima Roof Rack System on top of our 2022 Ram 1500.
Average Customer Rating: 4.8 out of 5 stars (17364 Customer Reviews)
These multipurpose, galvanized steel crossbars supply the backbone for your aftermarket roof rack system. Works with accessories that clamp around the bars. Pair with Yakima towers, fit kit, and RoundBar SL Adapter to create a complete roof rack. Heavy-duty towers allow you to mount 2 Yakima crossbars safely and securely to your vehicle with a naked roof. Tower pitch adjusts to create a level roof rack on curved roofs. Includes torque tool for worry-free installation. These adapters allow you to use Yakima RoundBars with BaseLine, SkyLine, TimberLine, or RidgeLine roof rack towers. Kit includes 4 adapters and 4 endcaps. These custom clips and pads let you mount Yakima BaseLine towers on your vehicle with a naked roof. Clips attach to hooks in tower assemblies, and pads clip to bottoms of towers.I have been using Yakima racks for around 40 years and have never had any problems. However, I am amazed at the price increases over the years. Etrailer prices were by far lower than most. Overall, a very excellent purchase.
I'm happy that this allows me to save money by using my old round bars on my new vehicle, with only the purchase of new "towers" and these adapters.
Really easy to install & work as specified. So happy with the customer support/service at etrailer.
Kimberly has shown that great customer service is not dead! etrailer and Kimberly are great to work with and have earned my business and will always be the 1st and last place I look for my rack+ needs!
As for the application, I needed more space to fit my cargo box on top of my 4Runner TRD Pro’s rack. I came up this this… Thank you!
Free delivery that showed up in 3 days!!! Can't beat it. The crossbars with the Control Towers and LandingPad 9 fit perfectly on my Honda Element. Had them installed in about 30 mins. Don't have my cargo box yet and wanted to test strength, so I had my 110lb wife standing on them with no issues (yes, the car was parked). Plan to take a long camping trip next week with a cargo box on top...wife will be in the vehicle:-)
Excellent solution for my 2023 Chevy Silverado. In the past, I have had rails installed on the roof of my pickup trucks, but I find the BaseLine towers to be a better solution, since they don't permanently change the truck. Plus, they are much more solid than SkyLine system on the rails.

Love my Yakima roof rack!! It exceeds my expectations.great product. Also thank etrailer for the tec support! great staff always there to help thanks again!!
Follow the instructions, and you can't go wrong on the self installation
Kit worked perfectly on my 2021 Subaru Forester. The whole install took 30 minutes. Never been disappointed with etrailer.
A great company to do business with, and lots of merchandise in stock. I orderd a roof rack for my truck on Tuesday morning and it was on the porch when I returned from work on Thursday. I will deffinitely order more from etrailer.com
Excellent selection of rack parts. Very useful installation videos help when choosing between products. Easy ordering process. Quick delivery.
The rack has been so useful since I purchased it. Staff at etrailer.com were exceptionally helpful in getting the best option for my car and answering questions. I recommend this company, for its 110% customer service, excellent prices and timely delivery.
One quick phone call and Gwendolyn figured out exactly what I needed for our new car to use my old Yakima rack.
Solid build quality and easy installation on my '21 Mazda CX-5.
Your notice of schemes was a lot better than the yakima site provided. They did not suggest the scheme you did.
But when the products arrived, the instructions were by yakima. Generally worked as instructed except the tower to tower transverse mounting dimensions needed to be tweaked for a perfect fit.
So far so good. Purchased these towers to use on a 2022 GMC Canyon with HD bars that I already had, primarily to carry my canoe. Yakima's fitting instructions worked perfectly and the whole system seems really solid.
Yakima Crossbars were as you would expect - steel bars coated in a soft black coating (be mindful when you are utilizing these with the top mounts as the clamp will eat through the soft coating when you tighten them down). I had issues with my yakima round bar setup as the brackets and tower system were allowing water to leak in. This is in no way reflective of what youll experience but Yakima has superb support. I spoke with them twice on my issue and out of their kindness they shipped me an entire setup to replace my existing one for free.
The Yakima roof rack system is an Outstanding product. I purchased the product to replace the OEM roof rack because it was too flimsy to carry the tandem bike mount and my bike. The Yakima roof rack is solid and provides me the peace of mind while hauling my bike on the roof of my car. etrailer provided the product for the best price as always.
The roof rack is great. Solid.
Ackage came 2 days early the install was somewhat easy (did it by myself)
Did not get to mount anything to it but seems really sturdy. One thing I can say is mark out your mounting points with provided stickers then put up and make adjustments to the roof rack.
Great first experience dealing with you guys! Shipped fast, and was a faster install. You gave me the right parts and it went together in a flash.
Will definitely be doing business with you all again.
I ordered a Yakima Roof Rack for my Toyota Prius from eTrailer.com. Part of the reason for purchasing from eTrailer.com was the promise that the racks were made specifically for the car and would not dent the roof.
I received the rack on July 31, and installed the racks on my Prius according to instructions included with the racks. Our tandem kayak is 65 lbs . The towers were placed on the outer most part of the roof as indicated by the instructions. Yakima saddles were attached to the crossbars to hold the kayak. Nothing was close or touching the top of the roof. We transported the kayak to a nearby lake, 6 miles, and back. The next day we removed the racks from the roof and noticed 4 dents on the top of the roof. It was obvious that transporting the kayak on the rack caused the dents.
We had to pay $100 to have the dents removed from the Prius roof.
I cannot continue to use this rack that puts dents in the car's roof. I was extremely disappointed in the racks. In reading the Toyota manual and contacting them by phone, there is no mention of using or not using roof racks.
I was shocked to learn from Rachel at eTrailer.com that your company takes absolutely no responsibility for this Yakima product they sell. The best they can do is to pass the buck and refer us to Yakima.
Very disappointed, and out a lot of money for a product that damages your car. Will not recommend or buy here again. eTrailer.com does not even deserve one star in this review.
Typical Yakima cross bars. Coating is a little too easy to cut or gouge, but probably needs to be that way to get the grip it provides. Good enough solution for me, and allows me to continue to use all the attachments I've accumulated over the years that require a round bar
Installation of the hitch, wiring,rear bike rack, and new roof rack towers went well. I didn't set any speed records, but I was more concerned with doing no damage on a new 2019 Toyota Sienna AWD van. The hitch fit up well per instructions except that I was able to work around the exhaust without lowering it. Underbody panel and rear fascia did both need to be removed. Very happy with the end result. The new van is now set up to haul the bikes and canoes and move my log splitter.
first try was missing what was needed
Etrailer helped. It was great!
Ask the Experts about this Roof Rack
Do you have a question about this Roof Rack?


Yakima Accessories
Fit to this rack on your 2019 Ram 1500
Info for these parts were:
At etrailer.com we provide the best information available about the products we sell. We take the quality of our information seriously so that you can get the right part the first time. Let us know if anything is missing or if you have any questions.


Thank you! Your comment has been submitted successfully. You should be able to view your question/comment here within a few days.
Error submitting comment. Please try again momentarily.