

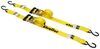
16x38 rucRak Custom Cargo Carrier with Tailgate Table - 2" Hitches
Item # RU37FR
Retail:$799.95
Our Price: $599.95
You Save: $200.00
Confirmed to Fit
1999 Jeep Wrangler
Will this fit?
To see if this custom-fit item will work for you please tell us what vehicle you'll use it with.
This item qualifies for Free Shipping
In Stock


Need help with installation?
Locate installers near me- All Info
- Q & A (0)
- Videos (1)
- Photos
1999 Jeep Wrangler - 16x38 rucRak Custom Cargo Carrier with Tailgate Table - 2" Hitches
- Cargo Mounts
- JK
- TJ
- YJ
- Spare Tire Cargo Carrier
- rucRak
- 16 Inch Long
- 38 Inch Wide
- Black
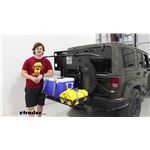
This cargo system for your Jeep Wrangler is perfect for outdoor adventures. Cargo carrier holds a cooler, bags, and other bulky gear. Tailgate tray holds food, drinks, a grill, and more.
Features:
- Modular cargo system hauls your gear using your vehicle's spare tire and hitch receiver
- Cargo carrier secures a cooler, bags, and other large, bulky gear
- Tailgate tray holds food, drinks, a portable grill, and more
- Folds up to mount tool holders or license plate holders (sold separately)
- Bolt-on installation to your spare tire with 3 included lug nuts
- Adjustable weight distribution bar slides into 2" hitch receiver to provide support for carrier
- Jeep's rear door opens with carrier fully loaded for cargo area access
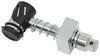
- 1-1/2" Diameter pole stand lets you set up an umbrella, fishing rod, or flag
- Powder coated aluminum carrier and steel support bar are durable and corrosion resistant
Specs:
- Carrier application: Any OEM spare tire and aftermarket tires up to 20" diameter x 10" thick
- Support bar application: 2" x 2" hitch receivers
- Cargo carrier weight capacity: 125 lbs
- Cargo carrier dimensions: 16" long x 38" wide x 3" tall
- Tailgate tray dimensions: 15-1/2" long x 36-1/2" wide x 1" tall
- Carrier weight: 33 lbs
- Support bar weight: 16 lbs
- Limited lifetime warranty
1223-04-JKB rucRak Cargo Carrier for Jeep Wrangler YJ, TJ, and JK 1987-2018
Installation Details Alternate Instructions

Video of 16x38 rucRak Custom Cargo Carrier with Tailgate Table - 2" Hitches


Videos are provided as a guide only. Refer to manufacturer installation instructions and specs for complete information.

Video Transcript for rucRak Custom Cargo Carrier with Tailgate Table Review
Hi, everyone, Aidan here at etrailer. And today we're gonna be taking a look at the rucRak spare tire-mounted cargo carrier. It's gonna be made for a variety of different Jeep models, as well as the Ford Bronco, and give you a cargo carrier for your spare tire. Let's check it out. Now why go with a specifically spare tire-mounted cargo carrier Well, the reason for that is you often run into clearance issues with your hitch. Now this does utilize the hitch with this load bar, and that's what makes this such a unique offering.
The main carrier is mounted to your spare tire so you don't have any clearance issues with the hitch and the spare tire, but the load bar is underneath to provide some extra support because we can't deny that the hitch does have excellent support capacity for your cargo. By having the load bar, we're resting some of that weight on it and taking the stress off of our spare tire mount, which, especially if you have a stock spare tire mount, can be a big concern when we put more weight on it. Now with that in mind though, you still do have a weight capacity. This cargo basket on the bottom can hold 125 pounds. So not the biggest weight capacity out there, especially when compared to the hitch-mounted alternatives, but it's gonna be more than enough for a small bag and a cooler.
But the big draw here is the fact that it still works with your door, allowing you to tilt the whole thing away, still access the cargo area of your Jeep and keep the cargo carrier fully loaded out back. And the reason it's okay to have the cargo carrier fully loaded now unsupported by that load bar in the hitch is because the vehicle's standing still. That's our static weight, and that's really not gonna be a problem. The 125 pound weight capacity is referring to dynamic weight when the vehicle is moving because for every bump that we hit in the road, that's gonna be putting a lot of shock and vibration at the back, especially if we have a larger spare tire and weight in the cargo carrier, and that's where we need the extra support of that load bar underneath. But the function with your tailgate and the spare tire isn't the only thing that makes rucRak unique.
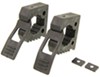
You'll find a lot of different mounting options all throughout the carrier, like these holes on the side that are spaced out perfectly. If you've got rotor packs, that bracket can attach here and store either your fuel or water off to the side of the basket, or maybe up top on this tabletop tray, where you'll find a couple different holes that we've utilized to mount this universal tool holder. This isn't included, but we do carry this one here at etrailer, if you wanted to pick it up for something similar, holding either an ax, a shovel, or, in our case, a paddle. And that brings me to the tabletop. These hand knobs here will control it, and that's one of the things that kind of defines the rucRak.
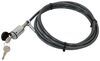
It'll fold down. And when you're, say, at your campsite, you've got a place now to set your plate with your food, some small cup holders to put a drink down into, and just generally have a place to set things. And with that down, we can now see the umbrella holder. So when you're parked at your campsite, if you've got a larger umbrella that you want to use for some shade or maybe put up a flagpole, this little slot here can accommodate that. So for me, this is what makes the rucRak so unique. Personally, I have a truck, and I use that for camping quite frequently and it's got a hard tonneau cover on it. So when I'm at my campsite, if I need a place to set something, the tonneau cover is just that for me. And then I've got the bed for storage space underneath. Now, for me, if I didn't have a truck, I'd be wondering how I can get a similar function out of my vehicle, especially if I drove a Jeep because the cargo area back here, if you've got the second row seats up, it's not big. And if you're going on a camping trip, say with your whole family or even just an extended camping trip with one person, space quickly becomes an issue. And just having a small space to put your stuff and not have to pack something, like a folding table, which can take up a ton of room, would be a really nice option for either a Jeep or a Bronco. Or take our setup today, we've got this whole thing kitted out for, say, a day at the water minus the kayak, but there's roof racks and kayak carriers for that. We've got storage space for our paddle using that tool holder we picked up, we've got our cooler with lunch and some drinks for afterwards, and a dry bag with a change of clothes for if we happen to fall into the water. But this is all gonna be kept outside the Jeep, where if it gets messy, it doesn't matter. We don't have to track that inside, and we still retain the full cargo area of our Jeep with some of our other stuff if need be. With our cargo unloaded, you can much better see all the different slots and gaps on here where we can feed our straps through. So tying down and securing your cargo here is gonna be really easy because of all those points to tie off to. Now underneath the cargo carrier, much like we did on the very top, we've got these quick-release pins. When we pull on both sides, that'll allow us to fold the rack up against our vehicle and re-pin with those same quick-release pins. So fold it up, it's gonna save you a lot of space. The exact space will depend on your spare tire situation because this is gonna sit very differently on every single Jeep, depending on things like where your hitch sits, what size spare tire you have, if you have a stock or aftermarket spare tire mount, things like that, but it will save a ton of space. And, of course, with the Jeep being an off-road vehicle, if you do tend to take this off the beaten path a bit, it's not gonna stick down very far and affect things like our approach or departure angle. Now, if the load bar and the hitch is a concern for you, you could take that out of the hitch entirely and leave just the main cargo carrier mounted to the spare tire. And because of the lightweight powder-coated aluminum material, the empty carrier only weighs 33 pounds, which isn't gonna put a lot of stress on our spare tire mount. So if you do want to take it on some trails, do a little bit of light off-roading, you can. The tabletop, while folded up, will also block your back window quite a bit. But if you've got a backup camera, which this Jeep unfortunately does not, there's a large rectangular cutout here and a circular cutout in the main mount where that backup camera could sit, retaining function of that at least. So overall, I think this is a really solid option for a cargo carrier on your Jeeps and Broncos. Again, the big thing is just to make sure you get the right one for you. Because this mounts to the spare tire, the mounting bracket has to mount up with, or match up with the bolt pattern on your spare. So picking up the right one will be important because the Bronco fit is gonna be different than our Jeep JK fit and they'll be different from the Jeep JL fit. But with all that in mind, you're probably wondering now how it installs. It is gonna be a bit more of a permanent install because it's bolted in, but the result is a really solid fit. And because of all the different variables, like tire size and hitch style, there will be some things you need to figure out. But we'll walk you through the whole thing during the install process. It's actually pretty straightforward and we'll check that out right now. To start the installation and the first time set up process, you want to go to your spare tire and make sure that you get the lugs removed, replacing them with these new mounting studs. We've already got most of ours removed, this one's already loosened up as well, but I've just hand-tightened one of the mounting studs in place so that it keeps our spare tire on while we get the others run down. We'll just take that included socket. It's extra long so it'll wrap around those mounting studs just fine, and we'll tighten these up to our spare tire to fully secure it and give us a mounting point. Now no specific torque rating is specified, but it's a good idea as you're tightening these down snug to kind of hop around so we, at least, tighten it down evenly to the spare tire mounting bracket. (wrench cranking) Now those mounting suds will come with two nuts each. Just pre-install one of them right now. This is gonna be the backing nut, and it'll help give us a place for our mounting plate to sit and then the second one will go back on later to tighten it up. The mounting plate will have a specific orientation. And depending on which kit you get, whether it's for the Jeep JK like we have or the Jeep JL or even the Bronco, it's gonna look pretty similar. You just wanna basically line it up with those mounting studs and see which holes it passes through. That way we know that this side is up. If we flip it around the other way, the holes just aren't gonna line up. So we know that that's the incorrect orientation. And the mounting plate isn't secured yet, but I'm gonna leave it up there just so you can get an illustration of what I'm talking about. These uprights will need to mount to that main bracket. And depending on whether or not you have an aftermarket tire, we'll have to go a certain way. So for our aftermarket wheel entire combo, since it's quite a bit larger than stock, I'm gonna have to go on the outside face of that bracket. Whereas if I had a stock tire, I'd have it tucked behind that mounting bracket, sitting closer to the tire, but that just won't work For our application today. Again, that's just gonna vary depending on if you have an aftermarket or a stock tire. Now on the ground, we can get these legs mounted up. Those two threaded holes to the bottom are the ones we're gonna focus on, and they'll line up with two of the holes in the mountain bracket. Now there's three different heights we can mount this in. The top holes, middle, or the bottom. That'll depend on mainly your spare tire carrier. And in certain instances, the year, make, and model of your vehicle. For us, with an aftermarket spare tire, that raises the spare tire up a bit. We're gonna be using the top locations and just running our screws into place there and tightening them up with the included Allen key. We can then install the load distribution bar into our hitch. Now our hitch is in an aftermarket bumper, and I can only put it in this far before it stops out. So I'm just gonna pop it out to the nearest hole and secure it with a hitch pin clip. You will need to provide that yourself. (metal clacking) (metal snaps) Now the goal is to line that up as best we can with the feet on our mounting bracket here. Now, if I take a step back, I notice that the bottom is kind of tilted in a little bit more, which just means that the backing nut we have on that bottom stud is tightened down more than the rest. So there's no specific place these need to be for the backing nuts, but my best advice is to make sure they're as even as possible. And how far down they are will depend on where your load bar is. And for our application, especially, we want these feet to sit pretty squarely on the load bar. Because I can't push this load bar in any further, that means my macing nuts will need to be a little bit further out than I might want, but we still have plenty of thread for them to attach firmly. And that's what we'll do right now, adding those final mounting nuts and we'll tighten them down evenly. (metal clanking) And if you plan on using it, now is a good time to install the umbrella stand to one of the sides on the mounting bracket, just lining up the holes and included hardware. (metal clacking) Now I'll go back through and tighten up the umbrella holder first. Then I'll finish tightening the mounting bracket with a spare tire. I left it loose right now because our tire doesn't give me tons of clearance for my hand back there. And having this ever so slightly loose helped me get that extra clearance. And these will just use that same included tool as the mounting studs earlier and just tighten them down evenly. (wrench cranking) Now before we mount anything else and make it harder to reach, I'm gonna get this little logo plate installed with these nylon spacers and Allen screws. The spacers will just go behind and line up with these threaded holes on the mounting plate. And these will just tighten up with the same included Allen key that we've been using up until this point. I'm also gonna take care of these feet right now, making sure they make contact with our load bar before I get the cargo carrier in my way. So these can just get threaded down until they make contact and provide a little bit of support. And to secure them, you'll take this other nut and run it up against and tighten that down so that it can't thread back into that leg. Now before you go and get this fully tight, you may consider just checking that this gap between the bottom of the vertical and the load bar is somewhere between 2 and 3 1/2 inches. That way you at least have enough thread here to play with and get a good strong hold. And we'll just tighten this up with an 11/16 wrench on both sides. We can start mounting up our cargo trays now. The basket on the bottom, we've got the bracket mostly preassembled right now, it's gonna live by mounting to these vertical uprights. We're gonna go for the one on the bottom, getting that lined up and passing the bolt through. (metal clacking) There we go. And once they get one side done, it's gonna be a lot easier to get both hands involved on the second one because on the screw we've got a flat washer, but we want this nylon spacer to go in between all of that. And it's really not gonna be possible to do one handed. You kind of have to drop it in and get that to pass through the screw (metal clacking) before feeding it through. (metal clacking continues) Then we can go back to that first side and do the same thing with our nylon spacer. (metal clacking) We'll secure both sides with another flat washer and a nylon lock nut. And once both sides are started by hand, we'll tighten it up using a 1/2 inch wrench. And the same included Allen Key. We can test to make sure that this folds properly. And here's why we pre-read it, two of those on the top so that we can line it up with those brackets and just hand-tighten a nylon lock nut on either side to hold it so we don't drop it. Then we can do the same thing for the bottom locations, and just go back through and tighten everything up once it's hand-tight. And we'll use a 9/16 wrench to fully tighten those nuts down the rest of the way. (metal clacking) Last thing is the tabletop. Just take it so that the rucRak laser cut there is facing the correct direction. Slide it over those vertical uprights and line up these holes with the threaded ones at the very top of our vertical uprights. You'll take the two hand knobs and just loosely install those real quick to hold it up for you. And that will allow us to come to the back, where the smaller pivot point holes are located, and add in these quick pins on both sides. And then we can just finish tightening these hand knobs down the rest of the way. That should make sure that that's solid. And everything from this point should be fully tightened up. I'd recommend just taking one final check of the whole system, maybe checking for clearance on the tailgate and making sure that your feet are set to a good height and they're not binding on that load bar. But aside from all that, your rucRak should be set up and ready to go. But that'll do it for our look at the rucRak spare tire-mounted cargo carrier for your Jeeps and Broncos. Thanks for watching.
0
0
See what our Experts say about this rucRak Jeep Storage
Info for this part was:

Video by:
Dustin K

Video Edited:
Chris R

Updated by:
Matthew S

Edited by:
Daron K

Written by:
Alex H

Installed by:
Aidan B
At etrailer.com we provide the best information available about the products we sell. We take the quality of our information seriously so that you can get the right part the first time. Let us know if anything is missing or if you have any questions.
Thank you! Your comment has been submitted successfully. You should be able to view your question/comment here within a few days.
Error submitting comment. Please try again momentarily.