
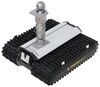
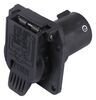
SaltDogg Electric Tailgate Salt Spreader for 2" Hitch - Powered Auger - 11 Cu Ft
Item # 337TGS07
Retail:$4,072.07
Our Price: $3,244.00
You Save: $828.07
Confirmed to Fit
2014 Dodge Ram Pickup
2500 - 6-1/2 Foot Bed - with RamBox
2500 - 6-1/2 Foot Bed - without RamBox
2500 - 8 Foot Bed
3500 - 6-1/2 Foot Bed - with RamBox
3500 - 6-1/2 Foot Bed - without RamBox
3500 - 8 Foot Bed
Will this fit?
To see if this custom-fit item will work for you please tell us what vehicle you'll use it with.
In Stock


- All Info
- Reviews (1)
- Q & A (0)
- Videos (2)
- Photos
2014 Dodge Ram Pickup - SaltDogg Electric Tailgate Salt Spreader for 2" Hitch - Powered Auger - 11 Cu Ft
- Salt Spreader for Truck
- Hitch Mount
- Buyers Products
- 11 Cu Ft
Use this large-volume tailgate spreader on your 3/4- or 1-ton truck to de-ice residential and commercial lots. Horizontal auger and vibrator easily churn most types of salt, and a 12" spinner casts it up to 30'. In-cab controller included.
Features:
- Electric salt spreader lets you de-ice driveways and parking lots with your vehicle
- Works with rock salt, bulk salt, and 50/50 salt-and-sand mixes
- Installs on most full-size trucks
- Perfect for small residential or commercial areas
- In-cab controller lets you operate spreader from the warmth of your cab
- Auger and spinner speed can be adjusted with built-in dial
- Digital display is easy to read
- Horizontal steel auger breaks apart material effectively and pushes it down the chute
- Powerful vibrator agitates salt for a smooth flow inside the spreader
- Large spinner casts material up to 30' to get your job done faster
- Powered by 12V, 1/2-hp independent gear motor
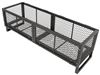
- Corrosion-resistant polyethylene hopper has a sturdy, double-wall design
- Powder coated carbon steel frame and deflector shield are corrosion resistant and long-lasting
- Simple installation and easy removal
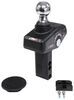
- Slides into your vehicle's 2" trailer hitch receiver and sits on your bumper
- 12V wiring connects to your car battery, bypassing your vehicle's electrical system
- Made in the USA
Specs:
- Application: 2" x 2" trailer hitch receivers
- Overall dimensions: 31-1/2" long x 53" wide (at top) x 46" tall
- Hopper dimensions: 26" long x 51" wide x 35" tall
- Hopper capacity: 11 cu ft
- Spread range: 3' to 30'
- Spinner diameter: 12"
- Total weight (with empty hopper): 230 lbs
- 1-Year warranty
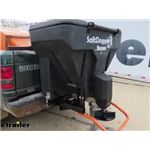
Melt ice and snow away on long driveways, short roads, or large lots with this SaltDogg hitch-mounted, electric salt spreader. Landscapers and property owners will love this spreader that has an 11-cu ft capacity and casts material 3' to 30'. You won't need to refuel or service a gas engine because the operation is electric. The quiet motor also won't wake up residents while you're de-icing late at night or early in the morning. Its powerful auger provides a smooth, consistent flow for rock salt, bulk salt, or a 50/50 salt-and-sand mix.
How to Use the SaltDogg

First, slide the spreader into your 2" x 2" trailer hitch receiver and rest the unit on your bumper for support.

Decide what type of de-icing agent you'll be using. Then pour in your material. The dual-action lid lets you open it from the front or the back, allowing you to load the hopper from the ground or from a higher position on your truck bed. To protect the contents inside the hopper, close the lid and secure it in place using the cover latches.

The slanted walls in the hopper help to channel the material down into the trough. A rotating, horizontal steel auger then breaks apart any large clumps and pushes the material down the length of the trough. The powerful churning action of this horizontal augur is more effective at moving salt down the chute and preventing clogs than that of standard vertical augers. Meanwhile, the vibrator agitates the material to further move it towards the chute.

Once the granulated agent passes the chute, it's sent onto the rotating spinner where it gets dispersed.

You can control these functions from the comfort of your cab with the variable-speed controller. Turn the spreader on with the power switch, and then use the dial to adjust the speed of the auger and the spinner. These 2 parts operate off the same motor and function together. A number next to the dial will indicate the speed setting that you're on. Turn the dial up higher if a stronger rotation from the auger is needed to break apart large chunks of material or if a faster rotation from the spinner is needed to cast your material a greater distance. If you need an extra burst of salt for an exceptionally icy area, push the blast button and the speed setting will automatically jump to 9, the maximum speed. After a moment of heavy salting, the speed controller will return to your previous number value.
If there is moisture in the hopper that causes the salt or salt-and-sand mix to stick together, turn the vibrator switch on to help crumble the material up and move it down the chute.
High-Performance Electric Operation
This salt spreader uses a 12-volt, 1/2-horsepower motor to power the auger and spinner. This independent, electric motor runs quieter than a gas motor, and it also requires less maintenance. Because it's not uncommon for salt to stick together, the steel auger maximizes the spreader's performance by breaking apart clumps, which prevents clogs in the chute and heavy chunks from falling onto the spinner. The 12" spinner can spread material in a 3' to 30' radius. To withstand the corrosive effects of the salt, the spinner is made from a durable polyurethane.

To prevent damage to the spreader and controller, a 50-amp circuit breaker is included. This breaker will shut down power to the SaltDogg if an overload of current passes through the machine. It also has a push-to-trip button to manually trip the circuit breaker.
Heavy-Duty Poly Hopper
The patented double-wall hopper on this spreader has a 11-cu ft capacity. It's also constructed of durable polyethylene, which makes it resistant to corrosion and impacts.
Simple Installation
This SaltDogg spreader will work with most 3/4-ton and 1-ton trucks with a 2" x 2" trailer hitch receiver.

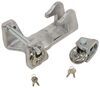
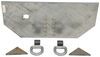
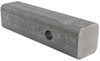
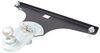
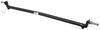
To install this spreader, begin by sliding the receiver mount into your hitch receiver. Then attach the hopper using the included brackets. As you tighten the mounting hardware, the spreader will clamp down around your bumper for support. Next, install the spinner, spinner shield, disk protector, and lid on the spreader.

Mount the controller in your cab and plug it into the included power cable. Attach the power cable directly to your car battery for power - this setup completely bypasses your vehicle's wiring. Then plug the main wiring harness into the controller and route it back to the spreader where you will plug it into the 12V motor.
Simple Maintenance
You'll want to keep the salt spreader lubricated throughout the long winter season. To do this, spray lubricant around the motor shaft. This will help prevent water from penetrating the motor. Apply dielectric grease to all electrical connections between uses and before long-term storage as well.
When the SaltDogg is not in use, be sure to empty any unused material because salt or salt/sand mixes can freeze or solidify and cause the spreader to jam. At the end of a job, wash out the entire spreader and rinse off the external surfaces to help protect it from any type of corrosion.
TGS07 Buyers Products Salt Dog 11.0 Cubic Foot Hitch Mount Salt Spreader
Installation Details Alternate Instructions


Video of SaltDogg Electric Tailgate Salt Spreader for 2" Hitch - Powered Auger - 11 Cu Ft


Videos are provided as a guide only. Refer to manufacturer installation instructions and specs for complete information.


Video Transcript for Buyers Products SaltDogg Electric Tailgate Salt Spreader Installation - 1999 Dodge Ram Pickup
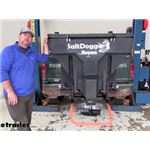
Hi everyone. Shane here with etrailer.com. Today, I have a 1999 Dodge Ram 2500. I'm gonna walk you through how to install the Buyers Product SaltDogg 11 cubic foot Electric Tailgate Salt Spreader. This salt spreader are gonna be designed for you are 3/4-ton and one-ton vehicles, because of the amount of salt that it can hold. And it's gonna work with many different types of salt mixtures.
So you're not really held up by using one type of salt if you use a different one. The sides are gonna be polyethylene, very durable. They're gonna be double-walled. You don't have to worry about corrosion there when we have our salt sitting inside. It's gonna have a built-in agitator, and the agitator is gonna help break up any large clumps you have in there, which, if you've spread salt before, you know that it clumps up if it gets a little bit more moisture.
An auger that runs out the back or down to the ring. That's gonna help push your salt out. It's gonna push it out to a 12 inch disc. This 12 inch disc is gonna allow you to spread salt up to 30 feet wide. So, it's really gonna work well for like, your residential areas.
Maybe you have a large parking lot, or a couple of large parking lots. This is gonna allow you to get those areas done pretty quick. All this is gonna be ran off a half horsepower, independent gear motor. Our auger is actually gonna have nine different speeds. We can adjust that by a knob, which we'll show you here in just a little bit.
On the control panel, which mounts inside the vehicle. We can stay warm while we're activating this. Now, the disc is rotating, throwing our salt. We're gonna have a nice cover here, a nice guard, that's gonna block the salt from actually hitting the vehicle. Our lid here is gonna be constructed out of the same material. It's gonna be very easy to take on and off, if you're adding salt or you wanted to clean it out. You simply take these rings, and you slide them off, and you rotate it up. We'll take a closer look inside the hopper here. You'll notice a screen on the top. If we are dumping bags in here, maybe one of our bags has some clumps in it. the clumps are gonna stay up here. We can break it apart and get them down to the bottom. You'll notice the guard down at the bottom there. That is to, if any salt is down in there, that does clump up or those happen to clump up, that's gonna keep it from getting stuck down inside, before the agitator can get it broken apart. Our lid is actually held in place by four of these rings. And they're gonna slide over just like that. You're gonna have two pin and clips, like this. You're gonna have one here, and one on the opposite side in the back. And then it helps secure the lid down onto the hopper. Here's our main control box. You have a power button. This is gonna display your speed of your disc. Here we're gonna have our blast. We have to have our spinner or our disc spinning, at at least one. When we hit our blast, what it does, is it's gonna bump up to nine. It kinda gives you a, allows you to blast the salt out to a wider area in a shorter distance. So, we don't have to turned up to nine and leave it on nine. This allows us to blast out that salt in shorter distances in different areas. This is gonna be a vibrator. So again, when we we're talking about breaking up some salt clumps that are in there, you're gonna hit that button, and that's gonna agitate all the the salt inside. And it's gonna cause it to break apart, so it comes out, so the auger can send it out to the disc very easily. As far as the installation, installation is gonna be pretty simple and straightforward. It's gonna come with the necessary wiring harnesses to get it installed. And, it's not gonna require you to tap in to any wiring on the vehicle itself. It is, however, gonna require a two inch hitch receiver. So, if you don't have one, you can find one here at etrailer. To start your installation, you're gonna remove the receiver out of the box, or the bracket that's gonna hold the salt spreader in place, and slide it into the receiver tube of the hitch. That's where I'm gonna take a long hex bolt. We're gonna put it on a flat washer. On the side of your hopper you're gonna have a metal bracket. We're gonna slide it through. We're gonna have a flange nut. You're gonna put it face up. We're gonna go ahead and tighten it all the way up against the bracket. We're gonna take another flange nut. We're gonna put it on with the flat side facing down. We're gonna throw this up about halfway, just like that. External hands are gonna lift the hopper into place. The long bolts that we just installed, are gonna go right into these holes. You're gonna have one on each side. So, ideally what we want is, we can use any one of the holes in this bracket. We can use the two bolts or two nuts, flange nuts on the inside here, to adjust the height. What we want is, we want the backside here to be sitting on the bumper. So that just the bracket itself is not supporting the hopper when it's full. We want space between our tailgate and the backside of our hopper. Ideally, you want about 3/8 of an inch. You may not always get that, because you're gonna have to kind of slide the hitch in and out to determine which hole in the actual hitch itself, is going to be suitable. So, once we get it close, our bolts that will go up here, hex bolt, flat washer, go from the outside in. And, then on the inside, put a flat washer and a nylon lock nut on each bolt. Then, you're gonna take a 3/4-inch wrench and socket. We're gonna tighten this flange nut up against the plate, so it holds this bolt in place. And we're gonna come back, and we make sure that this guy is loose. We're gonna tighten this nut down till we get that to sit on the bumper. We're gonna tighten this down, to keep it from moving. Once we get those tight, we'll come back and we'll tighten these down. You wanna make sure that you don't over-tighten these, cause this is a plastic. You don't wanna break it. We're gonna come back, we're gonna torque these nuts down, just the ones going to the bottom of the frame, evenly to the amount listed in the instructions. Once you get your hardware torqued here, we're gonna adjust the hitch, or adjust the bracket inside the receiver tube. There's gonna be three holes, three or four holes located on it. We're gonna adjust it in enough, so it's close enough to the tailgate, but not touching it, so that we can get the hitch pin and clip in place. Then we're gonna come back, and we're gonna install the guard. The guard is gonna go in place right here on this plate. And it's gonna sit like this. Take our hex bolt with our flat washer. And on the bottom side, we're gonna put on another flat washer. It's gonna go on like that. We're gonna take our spreader wing. We're gonna slide it into place, like this. This is where it would sit. And then we can try to determine where this need to sit. If we pull it out all the way, it's gonna hit it. Then we can go left or right, and center. It kinda gives us an idea of what we need to do with it. We'll come back with a 9/16 socket wrench. We'll get it centered and then tighten it into place. Next, we'll install our spreader disc. You wanna line up the whole on the side of it with this hole. It's gonna come out the other side, and just install the cotter pin. Next, we're gonna install our spinner protector, to protect our spinning disc. We're gonna take the carriage bolt with the neck on it. We're gonna go inside this frame rail. We're gonna drop it down through the hole. Sometimes there could be, where they drilled it out, sometimes there could be a little weld on there. We'll just have to get that out first. We'll drop them in. Two holes on this side, two holes on the other. You'll notice this is angled. We want the angle to go down. We're gonna match it up with the holes, right through like that on each side. Then, we're gonna take a flat washer, and put on a nylon like that. Once we have all of our hardware in place, we'll come back with our 9/16 socket and wrench, and tighten everything down. Next thing we're gonna do, is we need to start running our wiring. There's a whole in the firewall right here, that has a rubber grommet in it. We're gonna use that hole to get our wiring through. Because the plugs that have to go inside are so big in size, what I'm gonna do, is I'm gonna take the plugs that I'm going to be wiring to the back, and feed him through the hole out, and then I can run them to the back. And then, we'll have one more wire that we need to pass out through the hole and connect to our battery. We're gonna take these three, our red wire, black wire, and our green and white, and we're gonna pass it through the grommet. The grommet is right up in this square you just follow it up, it's gonna get you right up by the firewall. Next, we're gonna have the wire that has, or a bundle that has your power and ground wire. And then this connector, this connector is gonna stay inside. It's gonna connect to the main control unit. These two, we need to get through that grommet, or through that hole in the firewall to the outside, where we will be connecting it to the battery. Next, we need to remove the bracket from the control unit. There is a washer that goes in between here and this box, so just make sure you don't lose it. You can put it back in place. And then, we're gonna mount the bracket. You can mount this pretty much wherever you want. We're gonna mount it kind of in the same area that they had their previous one. Once you have an idea of where you want to put it, you're gonna take some self tappers, you're gonna mount it into place, you can reinstall this. And then, our wires that we have wring in, go on and connect them to the appropriate plugs. And then we can pull our extra out. We're gonna have a breaker that we needed to install somewhere close to the battery. I found right here, on this flat section, is a good place. It's not gonna come with the mounting hardware, I'm just gonna use self tapping screws. You need to pay attention to what post does what. You're gonna have one that goes to the battery, one that goes to auxiliary, which is the wires that are coming from inside. The one that goes to the battery, there's gonna be a cable that looks like this. It's gonna come with the ring terminals on it. Just remove the nut that's on there, mount this on, and connect it to the positive side of the battery. And on our short wire, we're just going to apply the circuit post. We're not gonna make that connection just yet. We're just gonna get our wires in place. I'm gonna have their positives and negatives that we ran out of the firewall. What I did is, I routed them right back behind all this wiring, over to this side, like that. I'll make my connection. And then I can bundle this up, and stick it down in here. The red wire is gonna go on the other side, where it says auxiliary. Once you get your two positive wires tightened onto your breaker, you're gonna have little rubber caps. Go ahead and put those on the end of your pins. That way, if anything happens to, or fumbling against it, this metal object, it will not spark. Now we're gonna take our power and ground, and connect them directly to the battery. I just wanna get this end, ran it to the back of the vehicle to get it hooked up to our salt spreader. Let me get it done real quick, and I'll show you how I did it. While you're routing your wiring back, you wanna make sure you're staying away from anything hot. I routed mine right against this hard line on the frame rail, from the front, to the back. All your wires are gonna be, it's gonna have wire loom on it. So it's gonna stay protected pretty well. Follow it straight back. Well over the top of the frame rail here to get passed the fuel tank, on the outside here, route it right through the gap between my body and body mount, went back behind my bed mount here, below my two pipes for my fuel tank. You can't really see it, but inside my frame rail right here, 'cause we're open on the inside. Run it over the top of my shock mount to the outside of my frame rail, to this hatch channel on my bed, And then back inside where it's coming right here. And we're gonna hook up black to white, red to black, and we'll test it out. I wanna make sure that our spinning wheel is running in the right direction. You want to make sure the vehicle is started. Put on the power button. You'll see that we're getting power. It's gonna tell you where we're at, or what speed you're at. You can change the speed of the disk by simply turning the knob. Once you've tested everything out, you can go ahead and bundle up your wires, and you're ready to go. It's gonna do it for a look at the Buyers Products SaltDogg 11 Cubic Foot Electric Tailgate Salt Spreader..
Customer Reviews
SaltDogg Electric Tailgate Salt Spreader for 2" Hitch - Powered Auger - 11 Cu Ft - 337TGS07
Average Customer Rating: 5.0 out of 5 stars (1 Customer Reviews)
Use this large-volume tailgate spreader on your 3/4- or 1-ton truck to de-ice residential and commercial lots. Horizontal auger and vibrator easily churn most types of salt, and a 12" spinner casts it up to 30'. In-cab controller included.by: Doug F09/24/2020
I had a faulty switch so I had trouble getting it hooked up , but Kaylyn was very helpful taking care to get me another one , it took a while but she was in contact with me throughout, the unit works as it should hopefully it will be the same for this winter
1
1
See what our Experts say about this Buyers Products Salt Spreaders
- Will the SaltDogg Electric Hitch-Mount Salt Spreader Work with SandThe SaltDogg Electric Hitch-Mount Salt Spreader part # 337TGSUV1B won't work with sand but we do have an option that will work with a salt/sand mix, the SaltDogg Electric Tailgate Salt Spreader part # 337TGS07 but it does however require a pickup.
view full answer... - Will the SaltDogg Electric Hitch-Mount Salt Spreader Work w/ Sand?I have a solution for you but the SaltDogg Electric Hitch-Mount Salt Spreader item # 337TGSUV1B can only be used with dry-bagged #1 free-flowing rock salt or refined sodium chloride. I verified this information with the manufacturer. The weight of the sand compared to the weight of the salt is the limiting issue. If you use sand and have a failure your warranty will be voided. The SaltDogg Electric Hitch-Mount Salt Spreader item # 337TGSUV1B can be mounted to both 1-1/4" and 2" hitches....
view full answer...
Do you have a question about this Salt Spreader?
Info for this part was:

Edited by:
Tyler C

Video Edited:
Dustin K

Updated by:
Wilson B

Test Fit:
Shane H

Video by:
Jonathan Y

Written by:
Mark S
At etrailer.com we provide the best information available about the products we sell. We take the quality of our information seriously so that you can get the right part the first time. Let us know if anything is missing or if you have any questions.
Product Experts Available Now!
Call 1-800-940-8924
Thank you! Your comment has been submitted successfully. You should be able to view your question/comment here within a few days.
Error submitting comment. Please try again momentarily.