
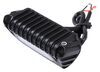
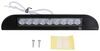
Ultra Bright LED Flood Light - 4,050 Lumens - Black Aluminum - Clear Lens - 12V/24V
(14 reviews)
Price: $63.59
In Stock
Ultra Bright LED Flood Light - 4,050 Lumens - Black Aluminum - Clear Lens - 12V/24V
Item # 3371492190
Retail:$107.73
Our Price: $63.59
You Save: 41%
In Stock


- All Info
- Reviews (14)
- Q & A (0)
- Videos (2)
- Photos
Buyers Products Work Lights - 3371492190
- LED Light
- Exterior Lights
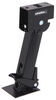
- Pedestal Mount
- Rectangle
- Flood Lights
- Work Lights
- White
- Flood Beam
- Buyers Products
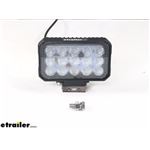
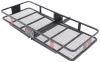
5-15/16" x 4-13/16" Rectangle. LED work light produces a bright white light. Flood beam illuminates a wide area. Durable aluminum housing and impact-resistant polycarbonate lens. Pedestal mount.
Features:
- Rectangular LED work light provides bright white light for industrial and agricultural applications
- Flood beam illuminates a wide area - reaches up to 547'
- Great for work trucks and utility vehicles
- LEDs are energy-efficient, long lasting, and vibration resistant
- Durable, water-resistant construction
- Black powder coated, die-cast aluminum housing is durable and rustproof
- Tough polycarbonate lens is impact resistant
- IP67 rated - stands up to dust, dirt, and water
- Compatible with 12V DC and 24V DC systems
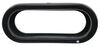
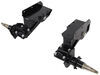
- Pedestal mount with included bracket and stainless steel hardware
- Adjustable bracket lets you adjust the angle of the light as needed
- 18" Long, 2-wire lead with blunt cut ends
- CE and RoHS compliant
Specs:
- Dimensions: 5-15/16" long x 4-13/16" tall x 1-1/2" thick
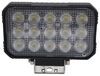
- Light output: 4,050 lumens
- Color temperature: 6,000 K
- Diodes: 15
- Wattage: 24 watts
- Power draw at 12V: 1.96 amps
- Operating temperature: -4 F to 122 F
- Input voltage: 12V-24V DC
- Wire length: 18"
- 5-Year warranty

Combination Beam Spread and Light Density Information

1492190 Buyers Products Ultra Bright LED Work Light - Flood Beam - 4,050 Lumens - 15 Diodes - Aluminum - Rectangle - Surface Mount - 12V/24V


Video of Ultra Bright LED Flood Light - 4,050 Lumens - Black Aluminum - Clear Lens - 12V/24V


Videos are provided as a guide only. Refer to manufacturer installation instructions and specs for complete information.


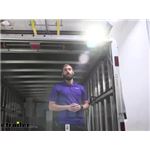
Video Transcript for Buyers Products Ultra Bright LED Flood Light Installation - Enclosed Trailer
Hey guys, Kevin here with e-trailer, and today I will be showing you how to install the buyer's products ultra bright LED floodlight. So, the installation of these lights is gonna be super simple. It's a simple two wire setup here with your power and your neutral or ground. All you have to do is run your wiring from whatever power source you're getting it from in our case. It was from the reverse lights. So, really easy to just tap into our wire that was already ran to the back of our trailer by the manufacturer.
So all in all, it's gonna be a super simple install but could vary depending on what your setup is. So to start out our installation we're going to have to kind of map out where we want our light to be kind of already decided I'm gonna have it here. So I took some painters tape and just made my line so that I can get to it from both sides. That way I know exactly where I'm gonna be drilling through. On the inside of our trailer, we had a metal cover that ran across The whole roof here that hides all of our wiring.
So I had to take that down. And then right in the center of this painters tape I took a little hole punch and just did a little notch into our metal here. That way, when I come in with our drill bit I don't have to worry about it kind of skipping over and getting into our wiring here just because it's such a tight area. When you're mapping out where you want your light you're gonna need to make sure that you have enough room to put two holes cuz you're gonna need one for your wiring. And, then one for our bracket that's gonna hold our light up onto our wall.
So you're gonna want to keep that in mind when figuring out your placement. So I had my hole up nice and tight to the roof here and it's gonna fall right inside of our lip here. So we can have all of our wiring all together and then it'll be hidden behind that plate. So we don't take a chance of any of that getting damaged. But now for my bracket that's gonna actually hold the light.
I'm gonna need that down a little bit lower just because I don't want to drill into the wall here and then end up catching that lip at all. So I'm gonna take my a bracket. I'm gonna hold it down just a bit. I'm gonna mark out my hole with a Sharpie here And then I'm gonna take my whole punch and hammer the in the center of that. Now that I have my two holes drilled out, I'm gonna go ahead and tie our wiring to another strip of wire that I just have laying around and I'm gonna try and run that through our smaller hole and pull that into our trailer here. So I'm gonna need some tape. And we can just fish it through. I wanna be careful. You don't wanna get this too thick and not be able to pass it through the hole. Lost our tape, but we still got it through And we can pull all of our wiring in Next, we can start going through our bracket and bolting that on the hardware that came with our kit is just not gonna be long enough to go through our wall here just with how thick this is. So I've actually gone and gotten some other bolts that are gonna match up that way we can secure our bracket. So with my longer bolt, I put that through our bracket. The bolts that come with your bracket are gonna actually not are gonna be the head. The Head-On's gonna be a little bit bigger. So they're not gonna kind of spin like this one is, but unfortunately that's just what we have to deal with. So I'm gonna have to hold that a little bit tighter when I'm tightening it down. We're gonna place that through our hole. I've got a locking washer and a nut just like we had with our kit. Let's get that on my hand. And then we can tighten it down. Wanna be careful that I'm moving, keeping my bracket level. Moving it if I need to, as I'm tightening this down. And then with that in place, we can go ahead and grab our bolt. It's gonna slide through our bracket and hold our light in place. Sliding the bolt into the bracket, getting my light somewhat lined up. This is gonna be a little bit tight. 'Cuz there are little teeth around into our light here. They kind of grip into the teeth on the bracket so that when you tilt it and kind of hold it in whatever place you tilt it into, All right, with that in place, we can place it on our locking washer, our nut. And I'm not gonna fully tighten this down yet just because I wanna get power to these lights and get them kind of oriented in the way that is gonna help us out the most. And then we can fully tighten them down. So on the inside I'm gonna strip X some of this casing just a little bit more just because I'm gonna need little bit more wire. And we can go ahead and strip back the casing on our individual wires. Twist that up. Fold that over. It's got all the good stuff. Now we can take a ring terminal cause our black wire's gonna be grounded to our frame, Which it might just fold that over one more time, just cause this wire is so thin that on there and that is down. So while the manufacturer didn't actually put in it any reverse lights, they luckily did run the wire all the way down here. We found that out by hooking up to our seven way and testing the power with our reverse. So what I'm gonna do is I'm gonna cut off this little plug that they attached to it, cuz we're gonna splice in a new wire that Twist that up a little bit. All right, go ahead and hook up our new wire. I'mma have to pull this up. Are you gonna be able to see or do you want a ladderI can see it. Up topMm-hmmOkay. I'm gonna hook those two together and just run the other end of the bud connector to it. That's what I'll do instead. All right. So I'm gonna run my power wire for my light up to this first running light wire. I'm gonna put these two together, and then we're gonna stick on a butt connector. We'll have those two on one side and then we're gonna run another wire on this other side of our butt connector over to our other light so that we can power that one too. Okay. So, now we can stick in our jumper wire here, crank that down. And then we can tuck our wiring up in here. I'm gonna go ahead and shoot a self tapper through our ring terminal. I'm gonna, I'm gonna have it up in this corner. So, it's gonna be a little hard for you guys to see but just letting you know Now that I have our wire ran down to our other light I'm gonna go ahead and do the same thing I do to first light by stripping it at the casing and then stripping it at the individual wire casing and adding on our ring terminal and then our bud connector. Now that all of our wiring's finish we can go ahead and put our trim piece back in place that I was talking about that I pulled earlier. That's just gonna hide all of our wiring prevent anything from falling down and getting caught on our Garage door lift here. So now with all of our wiring hooked up on our trim back in place, we can go ahead and test out our lights. As you can see gives us a huge amount of visibility with our trailer. And it's gonna be adjustable by simply just tilting down your light so that you can get the brightness wherever you need it to. Or if you're trying to back up into a farther space or maybe you're working on your car something like that outside, you can push it back further and really get a wide wide range here of what your light's gonna hit. One other thing that I recommend doing is pulling your wire a little bit out. So, that way you have enough to go back and forth as you're turning your light and then just caulking around that hole right there. We don't want any chance of water coming down and getting in that hole and then ruining all of our wiring inside or rusting out our trailer. Then I'm also gonna do that right above the bracket as well just because we had a drill slightly bigger hole than what our bolt is so that we can get it through. Well guys, I think that does it for our installation today of the buyers products, ultra bright led floodlight. My name's Kevin. Thanks for watching..
Customer Satisfaction Score:
98% were satisfied with this product
2% of customers were not satisfied
Customer Reviews
Ultra Bright LED Flood Light - 4,050 Lumens - Black Aluminum - Clear Lens - 12V/24V - 3371492190
Average Customer Rating: 4.7 out of 5 stars (14 Customer Reviews)
5-15/16" x 4-13/16" Rectangle. LED work light produces a bright white light. Flood beam illuminates a wide area. Durable aluminum housing and impact-resistant polycarbonate lens. Pedestal mount.by: Roy 11/14/2021
Appear to be very good quality lights. Well made with all stainless steel hardware. Mounted them just below rear bumper of my truck for backing boat down ramp in the dark. These lights really light up the ramp.
by: Richard 09/24/2019
Lights are good but not as bright as I had hoped. That's my error. They were put in box with a class 5 hitch and the box was tore big time in several places. Can't believe the lights didn't fall out or get broke.
by: David 11/03/2021
Replaced 2 original spot lights on 11 yr old hosre trailer. Super bright. Quick and easy replacement. Took 30 minutes to change both. Highly recommended
by: Trisha07/28/2019
Super Bright lights...extremely happy with them. Use them for back up lights at night in the woods on logging jobs.
Easy warranty exchange.
by: Wilson Fence01/07/2021
The packaging you guys use is top notch. You sell great products and deliver them quickly and in the best packed boxes I have ever seen. Thank you for the investments you have made in your logistics system. I’ve been a long time customer and will continue to use you for my fleet needs every chance I get.
by: Tracy 02/24/2021
The lights were what I expected them to be. Shipping was delayed, but had excellent customer service who kept me updated on when the product would arrive.
by: Travis 08/10/2021
This light outs out more light than what you think. We now have them installed on 2 of our work trucks.
by: Javier 08/01/2020
Great quality product!
by: Bill 04/17/2023
by: John 11/30/2021
by: Daniel 07/22/2021
by: Jacob 09/26/2022
by: George 07/10/2022
by: Steven 04/16/2021
14
14
See what our Experts say about this Buyers Products Work Lights
- Replacing Halogen Flood Lights On a Haulmark Enclosed Trailer for LED UnitsI recommend the Buyers Products Ultra Bright LED Flood Light in either 4,050 Lumens # 3371492190 or 9,000 Lumens # 3371492196, to replace the halogen lights on your Haulmark Race Enclosed Trailer. You will want to verify the fitment for these as I am not 100% sure of your opening dimensions. These lights are 5.9" wide, 4.8" tall from the mounting plate and 1.45" thick. Both lights create a flood pattern of light with their 15 diodes. The 4,050 lumen light only uses 24 watts of power while...
view full answer... - Wiring Up Ultra Bright LED Flood Light 3371492190 in Place of Light that Grounded Through HardwareYour old light was grounded to the mounting hardware so when you install the Ultra Bright LED Flood Light part # 3371492190 that you referenced you could just run the black wire to the mounting hardware of the light and that would ground it properly.
view full answer... - Is The Ultra Bright LED Flood Light Sold By Itself Or In PairsThe Ultra Bright LED Flood Light - 4,050 Lumens - Black Aluminum - Clear Lens - 12V/24V # 3371492190 comes in a quantity of 1. If you want to buy multiple units you will need to specify the quantity amount on the product page when our adding to your cart.
view full answer... - How Many More Lumens Will an LED Flood Light Put Out When Compared To a Halogen Flood LightI am not sure which flood light that you are referring to but if you know the type and wattage rating of the bulb then you can get a good idea of the lumen output. The Optronics Halogen Utility Light part # QH16CTS for example contains a 35 watt halogen bulb therefore it will have an estimated lumens output of around 700. For an LED replacement, I recommend the Buyers Products LED Flood Beam Light part # 3371492190 which has 16, 24 watt LEDs for an estimated lumens output of around 4,050....
view full answer...
Do you have a question about this Work Light?
Info for this part was:

Expert Research:
Jameson C

Installed by:
Kathleen M

Video Edited:
Chris R

Edited by:
Daron K

Written by:
Brian T
At etrailer.com we provide the best information available about the products we sell. We take the quality of our information seriously so that you can get the right part the first time. Let us know if anything is missing or if you have any questions.
Product Experts Available Now!
Call 1-800-940-8924
Thank you! Your comment has been submitted successfully. You should be able to view your question/comment here within a few days.
Error submitting comment. Please try again momentarily.