
To see if this custom-fit item will work for you please tell us what vehicle you'll use it with.
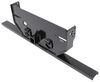
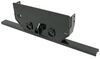
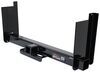
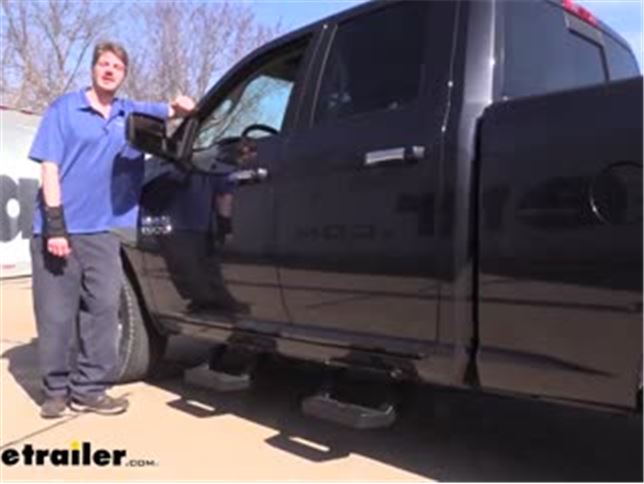
Get in and out of your Ram 1500 with ease by using these rugged, aluminum alloy steps. Diamond tread surface provides sure footing, and the black finish complements almost any application. Multi-Mount system ensures a precise, stable fit.
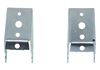
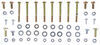
Features:
Specs:

Videos are provided as a guide only. Refer to manufacturer installation instructions and specs for complete information.
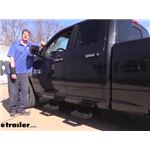
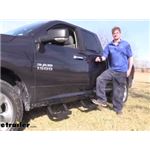
Hi there Ram Owners Team in your 2018 Ram 1500. We're gonna be taking a look at and showing you how to install cars LD custom fit truck step. These are available in either black titanium or polished aluminum. These steps are gonna make it easier for you to get in and out of your vehicle. And they're even better I find than a running board or a Nerf Bar. You can see the step here does hang a little bit lower than running board or nerf bars do.
And it also sticks out from the truck a little bit further. So you can see here, my ankles got plenty of room with some of the running boards. You're trying to step in it and your foot hits or your ankle hits something sitting on there. But this has got plenty of surface area for me to stand on, get in and out of the truck. And it really is nice the way that it sticks out a little bit further as I was just getting in and out.
One of the things I noticed is when I went to pivot most of the time running boards, my ankle is hitting on the side of the truck when I go to pivot around. But on this one sticks out further. I don't make any contact with the truck and I can get in and out really easily. The aggressive raised treads will improve traction and all weather. So whether it's just maybe a little bit damp out due to some early morning dew, or you've got a full-on ice storm here, you're gonna have plenty of area for that muck to go down in the grooves and the spikes where they poke up can get through and reach your shoes, giving you plenty of traction.
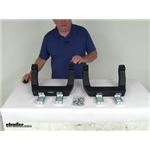
They are a cast aluminum construction. So it's going to be resistant against corrosion and the black powder coat that we've got on here or any other coating, whether you go with the titanium or the palace is going to further help protect it against corrosion. And the set does come as a pair so you can get a set and install it in the front. You can have one for both the driver and passenger side and pick up another set since it is custom for your ram truck, the same hardware and stuff's going to come included and work for the rear as well. And with them being aluminum they're also going to be lighter than a steel or iron variant.
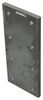
It just makes it a lot easier when you're going to assemble them. You can easily do this by yourself and hold this up here and get everything marked in lined up. These are a semi-custom design, as they are designed. They're custom for ram trucks, but at semi-custom cause they are designed to fit a wide variety of years. You do get plenty of hardware that comes with it. There is going to be some drilling required, but if you follow along with me, we'll show you how to get it installed, to get the confidence to do it at home. Before we go ahead and put these on the truck we are gonna to do a little bit of pre-assembly. This is just gonna help us line up the marks that we're gonna need to drill. This is a semi-custom fit. So since it is semi-custom you are gonna get a lot of extra hardware here. All this stuff that you see up here is all extra. You're not gonna use any of that stuff. I did lay out the hardware we're gonna use for each step down here. These are the longer of the two bolts you're gonna get. You can see you've got some that are slightly shorter the slightly shorter ones we won't be using. These are also the slightly longer of the small, short bolts here. You're gonna get some that are slightly smaller here. We don't want those either. You do have an option here for your self tapping screws whether you wanna use the wrong ones or the short one. That just depends on the location. You choose to mount that on the frame. So now we're gonna figure out where we're gonna put it on the frame. We're gonna take our brackets here. We're gonna take one step. We're gonna line up these holes here in the side with the holes in the side of our step and this little L portion here. We want that where it shoots up to be facing away from our step here. So that way it kind of wraps up and around towards where our step is, and this isn't gonna be permanent. We're gonna be taking these right back off once we make our marks. So we're just gonna slide some bolts through it. And we're gonna do the same thing with the other side. Once we get that one through and we're just gonna temporarily put a nut on there we don't need to tighten it down really tight or anything just to help keep the bolts from falling out while we're making our marks. So I'm gonna go ahead and put the other side on now same way. So next, we're gonna take our assembly here and we're gonna put it on the inside of the frame. And then you're gonna mark the location both here at the top. And then I also like to mark each side of the silver brackets for both arms. And what you wanna do is when you're putting this up here you wanna find out where you want your step. The ideal location would be to put your seat in the position you normally set in, and then at the front of your seat, that's where you wanna line it up with the middle of your step. So you just wanna open your door. You wanna try to line that up. Now, the next thing you wanna do after you've kind of figured out roughly that location. And we need to come back here on the inside and see if we're even going to be able to put it there because there's a lot of imperfections on the frame here and we need to have a smooth flat surface for our step to mount to. So you can see, I had made a bunch of marks here on the frame, cause I was trying to figure out where I was gonna put it because when we had it lined up in the location where it would line up at the front of our step, one of our brackets here was hitting in this location where this is sticking out. We can't put it in that location. It has to be on a flat spot on the pinch weld. So this is we can't go further forward. 'Cause we'll show you here see how it's gonna be hitting here. This little ear is not gonna sit flush. You could keep going further forward. If you're a shorter person and you could likely go further forward as necessary. But if you're a taller gentlemen, unfortunately you're gonna have to put it a little bit further back. It's still gonna work fine here in the back. We're only about an inch back from where we would like it to be. So that's not too far off. It's gonna work just fine here. Go ahead and mark your holes. So that way we know where we want everything to line up. So now that we know what our brackets are gonna go we've got one more Mark to make. I've gone ahead and taken that bracket off and I'm wining it up here. You can see the mark we had made there at the top. I'm just setting it over that. And then we're gonna mark the hole right here at the fort. We couldn't access this hole before to mark it because of our legs in the way, but we needed the legs on there. So we knew the distance between the two brackets. So I'm gonna take this one now and just go up to the other mark we had made towards the front for the other leg and mark that one and then we can start drilling these out. So now I'm gonna go ahead and drill out the lower marks that we had made using a five 16 drill bit. The upper ones are gonna be a different size. We'll save those for later. And then we're gonna repeat that for the other hole here at the front. We'll not take the shorter bolts that we had discussed earlier. We're gonna put a flat washer on it. We'll then slide it through the frame, slide it through the bracket, place a flat washer on the other side. And then we'll follow that up with a nylon locking nut. Now we've got this one loosely started. We'll go ahead and loosely start the other one. Now, if you're having a difficult time getting all the hardware on there, you can see here on this one I admitted one of the washers on the inside. We're still gonna put that on there but we're gonna tighten it down first, loosen it back up. That'll kind of squish everything together to make it easier to get all that hardware to fit. So we're just gonna loosen it back up. Now when we'll be able to slide that washer on there and tighten it back down, I've gone ahead and loosen it and you can already see that the bolt is sticking out much further than it was before. So we can just easily get that washer on there now and we'll have no problem getting that nut started. And now we can go back and tighten down both of our brackets. When tightening down your bracket to just kind of pay attention to your upper marks and stuff. If you need to just kind of push it in that direction they don't need to be 100% perfect with everything. 'Cause we do have a little bit of leeway here. So if you're just off like our mark, we're like maybe a 16th of an inch over from where we had made it. It's still all gonna line up just fine. When I use the same long bolts that we've used before. When we we're mocking it up to make our measurements for lining up our brackets we're gonna put a flat washer on it, and gonna lift up on our step line up the hole slide from the outside of our step towards the inside of the step then follow it up on the other side with another flat washer and a nylon locking nut. We're gonna repeat that for the other hole here in the two, over on the other bracket. Will then use a one eighth drill bit to drill through the upper hole in the bracket. And then we'll take the machine screw that comes in our kit and thread it right in. And then we'll do the same thing with the other bracket. Now you might notice that the bolt is a little bit crooked. That's pretty normal due to the shape in here. You do often have to put it in at some kind of an angle due to the various metal braces that's in there. If you try to go straight, oftentimes it'll catch the head of the bolt and just break it off. Now we've got our bolts installed up top. We can come back and tighten down the hardware that we had run through for our step. We're gonna use an 11 millimeter socket and wrench tighten it down. Once you've got that side fully tightened down you can perform the exact same procedures over here on the passenger side to get that side installed. And if you wanted to, you could purchase a second kit since it is a universal fit. You can install those here in the rear. It's gonna follow the same procedures. You're just moving it further back and choosing what spot you wanted to be in. And that completes our look at cars LD custom fit step on our 2018 Ram 1500..
Average Customer Rating: 4.6 out of 5 stars (29 Customer Reviews)
Get in and out of your vehicle with ease by using these rugged, aluminum alloy steps. Diamond tread surface provides sure footing, and the black finish complements almost any application. Multi-Mount system ensures a precise, stable fit.Mounted step about halfway on front edge of seat. Entering truck, my foot placement is towards the back of the step. Exiting the truck, my foot placement misses the step. I would move the step further back (front edge of step with front edge of seat) if I was to install another set. Mounting hardware does not sit perfectly against frame due to rivets, bolts, and other structural members of the truck. Final location is somewhat dictated by these obstacles. Used supplied and extra shims to fill in gaps between frame and mounting brackets. Final install was solid and product is well made.
The quality of these steps are great however to say they “fit” the Mercedes Sprinter is quite deceiving. When installed as per the instructions, you have only 5” of ground clearance remaining. My fear is that the first irregular driveway will rip them off as they are so low to the ground.

I just needed a clean, simple step for my wife @5’3” to get into our 2010 K1500.
Quick delivery and good price here at etrailer.com
Very Solid step! I had to make custom brackets in order to allow my wife easier access into my 4x4 truck
Perfect fit, very sturdy, exactly what I needed for 21 Sprinter
they are very sturdy.
Fits exactly as described. Very sturdy step! Easy to install with plenty of hardware. Good quality product. Would suggest it to anyone.
I like! Longer and flatter than hoops, easier to use and good traction with muddy or wet boots. Would buy again.
I ordered the side steps at approximately 8:00 PM on Tuesday, December 22 and they were delivered to my house at approximately 11:00 AM on Thursday morning, December 24. The box was carefully packed with steps, bolts, brackets and an instruction sheet. I am converting the steps to mount on a 2021 Jeep Wrangler Rubicon so I do have some additional design work to do. Extremely satisfied with the company, their pricing, and with their efficiency.
Just what I ordered , Thank You
Easy install. Nice wide foot step. Looks awesome. Awesome customer service, Shipping And follow up from etrailer. Will definitely be buying from them again.
Excellent quality product!!!!!. Best part is that it is American made.
Thanks!!!!!!
Great, Good Looken, and Going to last a long time.
Excellent customer service. Package was on time delivery
Na
Do you have a question about this Nerf Bars - Running Board?
Info for this part was:
At etrailer.com we provide the best information available about the products we sell. We take the quality of our information seriously so that you can get the right part the first time. Let us know if anything is missing or if you have any questions.


Thank you! Your comment has been submitted successfully. You should be able to view your question/comment here within a few days.
Error submitting comment. Please try again momentarily.