
Summer Starts Here - Save up to 70%
To see if this custom-fit item will work for you please tell us what vehicle you'll use it with.
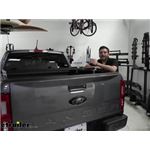
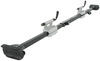
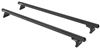
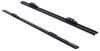
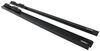
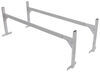
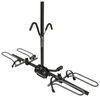
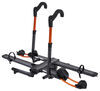
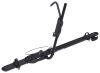
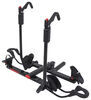
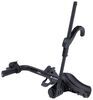
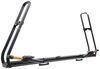
Square steel crossbars mount with clamps onto your truck bed's standard rails to create a rack for carrying gear. The adjustable rack helps to maximize your cargo-carrying capacity by leaving your bed free for other gear.
Features:
Specs:
Note: This cargo rack cannot be used on a truck bed with a tonneau cover. If your truck has an aftermarket over-the-rail bedliner, it may be necessary to cut away sections of the over-the-rail liner to properly install this cargo rack.

Videos are provided as a guide only. Refer to manufacturer installation instructions and specs for complete information.
Hey, everybody, welcome to etrailer.com. I'm Bobby, and today we're taking a look at the Inno Truck Bed Cargo Rack on our 2021 Ford Ranger. Now this is gonna be an excellent way of really maximizing the space in the back of our truck bed here. As you can see, we are gonna need a nice cross bed rail here to give us a lot of versatility for our truck. Not only can we throw kayak carriers up on here, bike carriers, but we even started throwing up some more cargo baskets and for really needing to maximize the amount of space we're using for our cargo on the back end. Well, let's hop up and start taking a closer look.
Great things about these bars, they are pretty sturdy and extremely easy to install. As you can see, we're getting about 110 pounds of weight capacity down here. So that's gonna allow us to get most of our accessories that we actually want to throw up on here. Now keep in mind, you know, can't get too crazy with it. You got a 50 pound kayak, and about a 50 pound bike, you're already pretty maxed out.
However, that's still a lot more use that we are getting with our truck bed. Still allowing us to utilize a lot of that cargo space underneath. It's also pretty well-made here. It is a steel construction with a powder coat finish. So, as long as we're being careful here, not damaging that powder coat, it should last us a long while.
But let's go ahead, take a look at the installation. You see how easy that is to do. Our installation is gonna be very straightforward. I'm gonna go ahead and start with our feet clamp here. You can see we are gonna get just this little plastic piece.
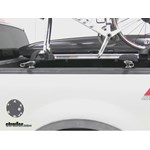
That's gonna serve as a really good base for our feet hole here. So we just went ahead with the long side on our rail, that just protects our sidewall here as you can see, so we're not biting into that, gonna give us a nice distribution of that force. When we start here to, we're gonna go ahead and make sure we've lined up our other ones. We're gonna go ahead and get this dimensions. But for today, I'm gonna put it right at 24 and a half inches, across from each other, center on center. As I know that's what my other feet are. Now, you can really kind of make this your own thing. If you need a little bit wider, you definitely can. Most things that set required like kayak carriers, and other things like that, usually have a pretty standard of 24 inches, really good distance for our crossbars to sit. So we'll go ahead throw this guy under, so we're gonna have it to where our Inno is hanging out over here. We're gonna be clamping on the inside like so. So we go ahead and set that in. And now we just want to start torquing this down, and you can do this from the inside if you need to. So that I get a better position here, then we'll go ahead and spin this as fast as we can. As we get close to the install, your inserts are gonna feel a little bit more resistant to start tightening them. So we're gonna go ahead and actually flip this guy like so. And you can see where this little hole on the inside, it's gonna be great for our finger, just a little extra to get it all the way torqued down, as much as we want it. You'll have a little bit of resistance against ya. So it can really start helping, as we approach this final little rotations. If you have that flipper action, makes that quick and easy to start getting this ratcheted in. Now it's tightened down, I'm gonna make sure our top bolts here are a little loose, and we will have an included Allen wrench here. So all I had to do, kind of wiggle these guys up. You could remove this entirely, but I don't really think it's necessary, especially once we get it set. Just loose enough that we're getting a little bit of clearance here for our bars. So let's go ahead and grab those bars, and start getting it run through. Now you can start doing this in a host a lot of ways, but I like to just start from the outside, inserting through here, kind of walking that clip up a little bit. Once we get it started, it's gonna be real easy to sling the rest of our bar all the way through. We can go ahead and rest it on top of there. Walk around to the other side, then meet up our bar again. Again, kind of repeating that process, just starting to filter it through. Now we just wanna make sure we're a little even, I'm kind of matching up to my other bar. We'll take a quick measurement here. Right about three inches from the outside of our clip, and about three inches on this side. Then go ahead and equate that distance. So now we're set, now I can go ahead, take my Allen wrench, and start tightening down the silver clamp. Now that we're tightened down, we're pretty much good to go. That's really all we have for our actual installation, and now we're ready to start accessorizing. Well, I'm a pretty big fan of this rack. I think it makes it quick and easy to really start utilizing the back of our truck bed to its full potential. You can see it's very sturdy on here. Not gonna be going anywhere, doing a very good job for us. The only thing that I keep in mind, and if you have a tonneau cover, unfortunately this probably won't work great for you, but if you have a tonneau cover that's not taking up a lot of this rail space, maybe we can go ahead, pull that guy up, and use it intermittently between our tonneau cover. And I think that's why I really liked these guys. You know, they're not a permanent solution. They can be a quick access for just those weekend trips, or maybe just giving us a little versatility in our lives. Well, that about does it for our look at the Inno Truck Bed Cargo Rack on our 2021 Ford ranger. I'm Bobby, thank you for watching..
Average Customer Rating: 4.9 out of 5 stars (9 Customer Reviews)
Square steel crossbars mount with clamps onto your truck bed's standard rails to create a rack for carrying gear. The adjustable rack helps to maximize your cargo-carrying capacity by leaving your bed free for other gear.
Received product super fast. When I had questions they responded with in minutes. Product was also exactly what I wanted.

Love the product
Fits my needs perfectly as a I have a Decked bed box system
Makes carrying my PA 14 much easier
Once I received the product it was very easy to install and was exactly what i was looking for. With trucks it is problematic to have rooftop racks and nobody wants to have possessions bouncing around in a truck bed. With this rack I can easily remove my bike, skis or Kayak with little effort and the cost was an added benefit. Great product!
Overall it is a good product, but do not try to stand on it. It will serve as a good rack for equipment. I use it to carry my kayak and a fully loaded cargo basket. I would recommend anyone to buy it.
great for my purpose
Do you have a question about this Ladder Rack?
Info for this part was:
At etrailer.com we provide the best information available about the products we sell. We take the quality of our information seriously so that you can get the right part the first time. Let us know if anything is missing or if you have any questions.


Thank you! Your comment has been submitted successfully. You should be able to view your question/comment here within a few days.
Error submitting comment. Please try again momentarily.