
Summer Starts Here - Save up to 70%
To see if this custom-fit item will work for you please tell us what vehicle you'll use it with.
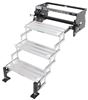
The curved ends on these black powder coated steel steps give your GMC Sierra 1500 a streamlined look. Fully enclosed ends prevent internal corrosion. Top-mounted, non-slip pads provide sure footing and rugged style.
Features:
Specs:
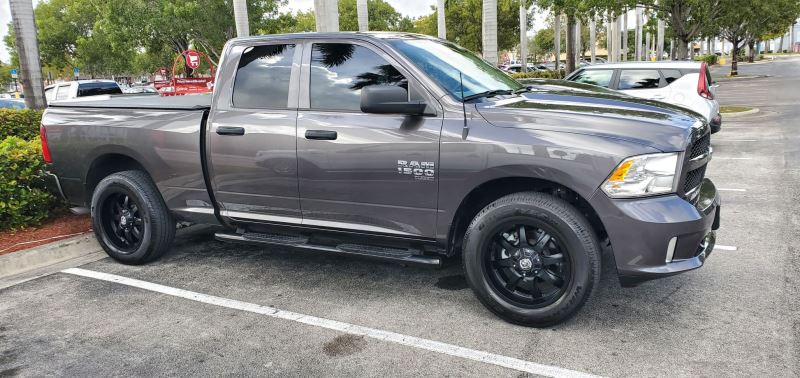
The PRO TRAXX oval step bars from Westin offer the best in both durability and rugged style. Sturdy, black powder coated steel construction and sealed, domed ends work together to prevent internal corrosion. Top-mounted, saddle-pad style step pads have raised tread for excellent grip and deep grooves that allow water to quickly and easily drain for a drier step surface.

Videos are provided as a guide only. Refer to manufacturer installation instructions and specs for complete information.
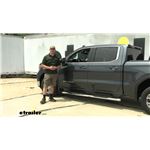
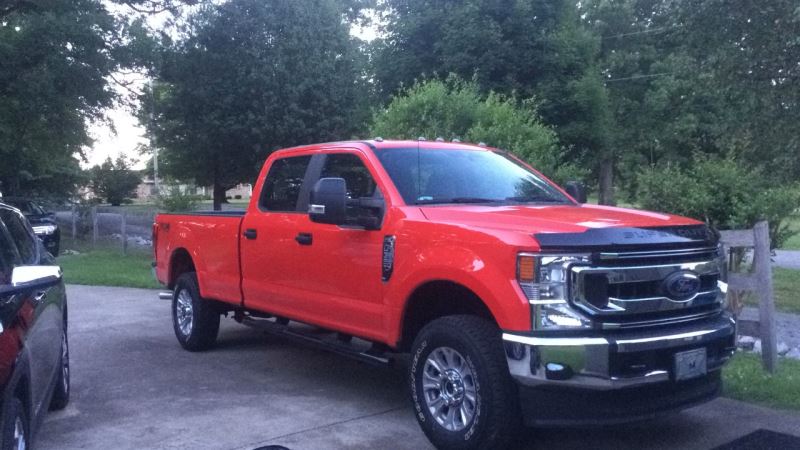
Hi everyone, Aidan here with etrailer. Today we're gonna be taking a look at and showing you how to install these Westin PRO TRAXX oval running boards on our 2019 GMC Sierra 1500. Now this is gonna be for your crew cab. If you've got a double cab or anything like that then just be sure to plug in your vehicle information to our fit guide and find the right kit for you. But this is going to be a very simple way to get an extra step up into your truck with no drilling required. Let's check 'em out.
Now, the big benefit to the oval shape is a wider step pad. The standard round bar that you might see for a lot of running boards can be pretty narrow when you actually step on it, but here the tube underneath as well as that step pad are gonna be four inches wide which when you're actually getting up in and out of your truck, translates to a really nice place to step. Even with my larger work boots on here, it fits really well on that step and I've got plenty of room to step in or out and have very sure footing when I'm doing so. Plus those step pads are gonna have a nice grip to them. They've got some texture and raise ribs on here so that if they are wet, we're not sliding around on our shoes.
This is gonna be the stainless steel version which matches really well with the chrome accents on our truck today. But because it's stainless steel we don't have to worry about rust and corrosion either. The ends of the running boards are completely sealed off so you don't have to worry about water getting inside either. And the polymer step pads are going to be very durable, UV resistant, and of course weather resistant. They come with these plastic bracket covers as well that are going to just hide the metal brackets underneath.
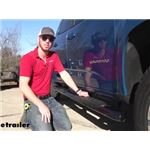
Give it a more clean and polished look I think. And speaking of those brackets it is a bolt on installation. So let's head inside and check out that process together now. Starting off the installation, we wanna lay out all of our hardware and do a little bit of pre-assembly before we get under the truck. Luckily this is a very simple kit.
You're just gonna have three sets of bolts. The smallest ones are gonna get a flat washer and then a second flat washer with a lock nut on the other side. These are gonna be used to secure these plastic covers to your mounting brackets. Then you're going to have a slightly larger set of bolts that get a split lock washer and a flat washer. Those will be used to secure the brackets to the vehicle. And then lastly, we have our largest bolts which use an Allen key to tighten down. They have an internal tube clock washer with a flat washer and those will be used to secure the running board to the bracket. So it's just good to lay everything out, make sure you've got all the pieces and you're not missing anything. And also to check the running boards for damage. But before we get under the truck we're gonna actually attach the plastic cover loosely to the bracket. And like all the other hardware we see throughout this install we're gonna leave it loose until the very end. So our brackets and our plastic covers will attach together. This is going to be the vehicle side of the bracket with the slotted hole and the flat faces. The curved portion will be for the running board. Then on the side you'll notice that there's two offset holes that will match up with these holes on the plastic cover. We're gonna be utilizing this top one closest to the back and this bottom one closest to the front. And you can always look at the front where it says Westin to tell which side is up. So we'll get that attached to the bracket. Grab one of our smaller bolts with flat washer feed it through, and then on the other side, secure it with another flat washer and one of those lock nuts. And then just repeat that same process for the other hole down below. Now I'm tightening these down most of the way just to make it easier for myself later on but we're gonna be leaving this loose and all the other hardware will remain loose. I'll probably just do the same thing where we tighten it most of the way but enough to where it can still be moved by hand. We just make it easier for ourselves down the line. Before we attach our brackets, we do need to do a little bit of prep work because there are going to be some plastic covers that block the threaded mounting holes. Now the diagramming instructions is gonna give you a better reference for where those locations are but essentially we're looking for two of those plastic covers that are stacked vertically on top of each other, one around the front here, one towards the middle, but kind of towards the front still. And then one towards the rear. We've got them marked out with some etrailer stickers underneath so you can see them a little bit better and they are pretty easy to pick out but we'll do our best to show you what they look like in relation to everything else around them. This is the front mounting location right here. You can see that black plastic cover that's in place. It's gonna be the first one you see underneath your truck and if you go straight up from there there's gonna be a matching one somewhere up there. If you move back towards the middle mounting location you're gonna see two of those plastic covers right next to each other. We're gonna be going towards the one that's towards the rear closest to this body mount. And again, going straight up from that is our second cover that we need to remove for our bracket. And then at the very back end of our truck we're gonna find two more of those covers that are right next to each other. In this instance, we're gonna be using the one that's closest to the front of the truck. Again, here's that etrailer sticker we use to mark out that location. Once you've identified all of them, go in with a trim panel tool or a flathead screwdriver something you can use to pop these covers out. They can be a little bit stubborn so you might find that a screwdriver a thin one maybe works a little better to get started but once you do get that tool under there, you can pop them out. Now before we attach our bracket, you can always go through with your hardware and just make sure that it threads into those factory mounting locations smoothly. If not, you might grab a wire brush and just try to clean them out because they might be a bit dirty. But we'll just hold our bracket up once we've verified these both work and get it attached. Because that bottom mounting location is slotted, we can leave that bottom bolt in, just slide it on and then grab our top bolt and get it threaded in as well. I'll try to keep my hand out of the way as best I can. But just get those both attached. So I've just gone through and tightened them by hand enough to where that lock washer isn't crushed at all and I can move these around to make some adjustments if need be. But later we'll come back through with a 13 millimeter socket to tighten and torque it down. But for now, repeat this same process with the covers and the brackets for the other two mounting locations. With all the brackets in place, we're ready to attach the running board. I recommend laying down a towel or something, especially with these chrome ones just to protect them before you get them attached to the brackets. And they are side specific, you want to just flip it over and check for the threaded holes underneath and make sure that they match up with the brackets. An easy way to do that though is to look at the rear of the running board where we have two sets of threaded holes in very close proximity to each other. That's gonna be for the rear of the vehicle. We're gonna be utilizing the ones that aren't on the very end today, but depending on your truck, the instructions may have you use these ones instead. So just look for that. That's so you can tell which side is which and we can flip it over and line it up with the brackets. We'll get this set into place and just try to level it out as best you can. If you go underneath and lay on the ground you should be able to find where the holes on the bracket are aligning with the threaded holes on the running board. You can also feel it too. So just get the hardware that we showed at the very start started in there on all the locations so it'll hold itself up. And each bracket will have two of those bolts to hold it in. And now everything is loosely installed. You can see we've got a lot of movement in the running board here, both front to back and side to side and the tilt of the board itself. But that's good. We want that for adjustments. The first thing you need to do is tighten and torque the brackets to your vehicle using that 13 millimeter socket that we mentioned before. And if you don't have a torque wrench you can pick one up here at etrailer or check one out and rent it from nearby auto parts stores around you. But once that's done, we can check the angle of the running board to make sure it is level and flat, tightened and torqued, and then lastly get the plastic covers secured using a 10 millimeter wrench. Get those tightened down so that they're in position blocking the brackets and looking how you want them. And when you're tightening these down it is pretty hard to reach but it is possible on the ground. You can find the specific torque specs in your instructions. Once you're happy with how level the running board is, you can go back and tighten down those bolts. They do provide an Allen key in the kit which is great for running them down but if you want to have them torqued properly you will need to have an attachment that goes onto your torque wrench. We're using a six millimeter for ours and then we can torque it down. Our final step is positioning these covers so that they sit flush and give our running boards a nice clean look. Two 10 millimeter wrenches are gonna be your best friend here, especially if one is ratcheting because that's gonna make the whole process a lot easier. Just go back there, hold onto the nut with one side or the bolt head, and then tighten down the other side with the ratcheting wrench and repeat that for the remaining covers. And then you're done. You can just repeat that process on the other side. I like to finish up just by cleaning off the boards because they are chrome and we did get a little bit of sweat on them so they look pretty smudged up, but nothing a little bit of soapy water can't fix and then they're looking good as new. The installation process is very straightforward. Luckily all the brackets are the same. All the factory mounting locations are easy to get to and they look really good on the truck too. So that'll do it for our look at and installation of these Westin running boards on our 2019 GMC Sierra 1500. Thanks for watching.
Average Customer Rating: 4.7 out of 5 stars (311 Customer Reviews)
The curved ends on these black powder coated steel steps give your vehicle a streamlined look. Fully enclosed ends prevent internal corrosion. Top-mounted, non-slip pads provide sure footing and rugged style.Ordered Westin 4" running boards cab length for 2024 Chevy 2500. Product arrived quickly and matched exactly as ordered. Perfect fit and easy to install. Would highly recommend.
I like the product very much. One thing wrong was, I am handi-capped and the package was delivered without even a knock on my door. It is too heavy to move. If I was home, I would have asked for it to be put in the back end of my truck.
Now I need to figure out how to get this thing moved.
Hopping they look good on my truck as advertised.
Easy installation and they look great on the truck. Easy for us to get into vehicle. Definitely recommend.
Excellent company. Never have. Any prob lems.
Look good, very stable. Arrived on tim e.
Installation of Nerf Bars was a breeze. So easy using the factory mounting holes. Perfect size for the regular cab truck.
Thule rack also straight forward install. We plan to load it up this week and really test it out. Looking forward to putting all of this equipment to work.
These arrived a day earlier than was told. The box was in good condition and all of the parts were included. The installation instructions were good and the online videos helped. I installed them right after they were delivered. The bars look really good, I'm surprised at only 3 mounts per side though. Kinda looks like it should have 4. They are solid and I'm expecting many years of use.
These rails look amazing on my truck!! Only reason for 4 stars instead of 5 is the drivers side and passenger side are different and instructions only displays drivers side. 1.5 hour installation still not bad!

I haven't had any reason to dislike the nerf bars I purchased a year ago . They look good on my truck and the way they were installed in exactly right place . At times I wish I had got stainless but other than that , they are perfect .
I like that feel very solid no flexing when anyone stands on them. I have had a couple of friends who really like the look of them on the truck and ask where I got them. After one year of them on my 2022 Colorado I have had no problems at all.
Made it easier to enter the truck. Not to hard for one person to install by themselves. I love the way they look.
Quality of the product is great, however the instructions weren't very clear. Now that they are installed I am very happy.
These nerf bars are great! They are very well constructed, are easy to install, and look good. The fit my 2020 F-350 perfectly. They also are a great price. I went with the matte black finish and it looks great. I like the fact that the ends of the bars welded shut unlike other bars I have had which typically have had a plastic cap over the end. The plastic cap will eventually leak and the bars rust from the inside out. These bars do ride a bit higher than my old OEM Ford nerf bars did. This gives improves the look but creates a higher step. The one thing I would suggest to the manufacturer is to supply a few extra spacer washer in the kit for the purpose of leveling it out visually.
Parts fit and installation was a breeze. The instructions should tell you that brackets have a stamp for location: Driver Side and Passenger Side. Found out via [online] (PF = Passenger Front, DF= Driver Front, PR = Passenger Rear, DR = Driver Rear. Otherwise the running board looks great
Super easy to install, so save yourself a little time and put the little black plastic vanity pieces on before you mount anything to the vehicle..did passenger that way and it was much easier. Even with doing the drivers side the order of instructions it still only took 45 minutes start to finish, had I done both sides with the vanity pieces first probably would have been done in 30 minutes.
The nerf bars I purchased a year ago have held up wonderfully. They have no rust and the color is still fantastic. They were a great addition to my truck. They changed the look of my stock 2019 Ram 1500 completely.
We were able to mount the running boards in a bout 2 hours total. They are very sturdy, everything lined up exactly, and they look Great! I had to call tech support because the instructions had not been updated to make sure it would fit my 2019 4Runner. They answered the phone quickly and confirmed that they would fit all the way up to a 2023 4Runner and they were easy to mount!
Extreme helpful determining the right product and getting it to me quickly. It was exactly as advertised and installed easily. Continues to work even better than expected. Thank you.
Good points:
The rails and brackets lined up pervert with the Dodge provided rod posts.
All in all installation was tight and sturdy.
Not so good points:
The stainless finish lacked a brilliant shine that I expected.
Had some dull spots. Stainless thickness gauge seamed a little light.
Installation instructions we’re not clear.
Brackets instructions should have diagram showing the layout.
Hardware could of been labeled better as well.
Easy installation and a nice upgrade for my truck.
Installed one year ago on my 2015 Jeep Rubicon Wrangler Unlimited. Installation was simple, with the exception of one thing. To install the step you must permanently remove the "rock sliders" with leaves the bottom seam of the body exposed.
The steps still look in newish condition, except for the color (now dark gray) which has caught up with all the black plastic on my Jeep, thanks to the AZ sun. The rubber tread can be slick when wet.
Info for this part was:
At etrailer.com we provide the best information available about the products we sell. We take the quality of our information seriously so that you can get the right part the first time. Let us know if anything is missing or if you have any questions.


Thank you! Your comment has been submitted successfully. You should be able to view your question/comment here within a few days.
Error submitting comment. Please try again momentarily.