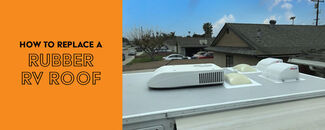
There's one thing all RVers have in common: they all need to breathe. This is why vents are such a necessary component of any enclosed trailer or RV—they allow the flow of fresh air, help eliminate odors, and even help protect you against gases and fumes inside the camper.Over time, your RV's roof vent can leak, break down, or simply stop moving air as well as it should. If it's time to replace your RV roof vent (or install a new vent in a new location), the good news is that this is a project you can take on yourself at home. Below, we'll go step-by-step through the process of selecting and installing or replacing a roof vent.NOTE: This guide addresses the installation of a complete roof vent assembly. If you only need to replace the cover/lid located on the outside of the RV, check out our article on that topic here.
Choosing the Right RV Roof Vent
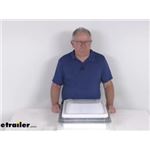
Measure Roof Vent Opening
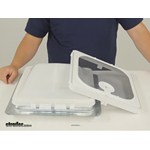
Measure Garnish Size
Select Vent Options
Installing the RV Roof Vent
Remove Old Garnish or Cut New Opening
Remove Putty and Old RV Roof Vent
Insert and Seal New RV Roof Vent
Insert New Garnish
Choosing the Right RV Roof Vent
Before you can install a new vent, you first need to select the right unit. There are a few things to consider when purchasing a new vent or selecting a replacement.
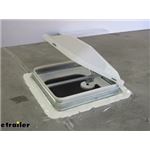
1. Measure Roof Vent Opening
Measure the opening for your roof vent on your camper. If you're installing a vent in a location in which there was no vent previously, you'll have to cut an opening between roof joists to install the new unit. Standard roof vent openings are 14-1/4 x 14-1/4 inches.
Pro tip: It's easiest to measure the vent opening from inside the trailer. If your trailer's vent has an interior trim piece or garnish, remove it first to expose the edges of the opening.
The leg length of this garnish is 5" from the top of the lip to the top of the garnish.2. Measure Garnish SizeA garnish is the trim piece that covers the vent opening on the inside of your trailer for a clean, finished look. Usually the garnish slides into a groove or channel on the vent and is attached with screws to the trailer ceiling.Garnishes come in different sizes or depths (referred to as leg length) to fit different vent models and roof thicknesses. Most vent assembly kits include a garnish, though you can purchase one separately if you need a different size.Make sure your garnish is the right length by measuring your roof's thickness from inside your trailer, then checking the garnish dimensions. If your roof is thin and you can't find a short enough garnish, you can purchase a longer one and cut it to fit with a fine tooth saw or tin snips.
Pro tip: It's best to trim your garnish indoors, especially in winter, so that the plastic remains at room temperature. Warm plastic will be easier to trim and will be less likely to crack or shatter.
Watch Now: Best RV Vent Options
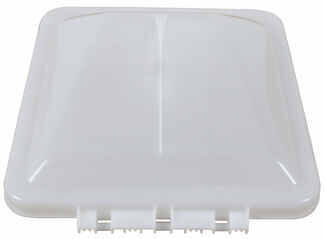
3. Select Vent OptionsNow that the necessary measurements are out of the way, you can decide on color as well as any extra bells and whistles you might want, such as fans or remote control options. We'll go over some of the main options below.FansFans increase air flow and circulation and are a great choice for larger RVs and campers and for those without A/C. If your old vent has a fan, make sure the new vent has one as well, and also ensure the new vent uses the same kind of power source as your old one (most use 12V DC power, but some run on 110V AC).If you don't currently have a fan but want one, you can upgrade and make the switch by running wires to power the motor. (A good fan may even replace the need for air conditioning.)In addition, some powered vents bring even fancier options to the table. Most vents require you to crank them open by hand, but some include remotes that allow you to open/close the dome or control the fan from afar. Some also have an automatic feature, which allows the unit to sense the temperature in the camper and turn the fan on/off as needed.Metal vs Plastic Vent CoversMetal lids are the most durable type. They won't crack in a hail storm or erode in the sun. They offer a flat, low profile for additional clearance. They also block out the light when closed.Plastic lids typically have domes and are taller than flat metal covers. The dome shape allows water runoff, prevents ice damming, and is less likely to leak. Most come in white or tinted smoke colors and allow light to filter through, so you don't have to rely entirely on your interior lights. However, they are more easily damaged by the elements than metal covers are (though polycarbonate plastic covers will be more UV-resistant than polypropylene covers).
Installing the RV Roof Vent
Whether you are replacing an existing vent or installing one from scratch, the installation instructions are going to be quite similar. Check your vent assembly product description and installation instructions to see if any additional install kits or supplies are necessary.
The following featured installation uses the MaxxFan Deluxe Roof Vent w/12V Fan, # MA00-06401K, on a 2018 CrossRoads Zinger travel trailer. The following should be used as guide. Make sure to read and follow all manufacturer instructions in the owner's manual included with your vent assembly kit.
Supplies Needed to Replace an Old Vent
To replace an old vent, you will need:
Caulk gun (if sealant requires caulk gun for application)
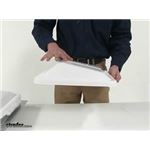
Installing the MaxxFan Deluxe Roof Vent w/ 12V Fan
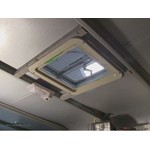
Pictured: removing garnish from vent opening
Step 1: Remove Old Garnish or Cut New Opening
If you are replacing an existing vent, remove the old trim ring/garnish piece from inside the RV.If you are installing a vent in a new location, mark the desired location for your vent (make sure to stay between roof joists). Then cut a 14-1/4" x 14-1/4" (or other size as necessary) opening through the roof and ceiling.
Scrape off old sealant to expose screws
Step 2: Remove Putty and Old RV Roof Vent
If you are installing a vent in a new location, skip this step and move on to Step 3.On the roof, carefully peel off any old sealant around your existing vent to access the mounting screws. You can use a putty knife or other tool. Take off the vent. If you have a powered unit with wires, make sure your camper power is off and clip the wires, leaving sufficient wire length behind to make new connections. Then scrape off residual sealant to get as clean a surface as possible.
Warning: When removing old sealant with a putty knife or other tool, be careful not to scratch the roof or tear the roof membrane.
Apply butyl tape to trim ring and press into place
Make wiring connections
Insert new vent
Step 3: Insert and Seal New RV Roof Vent
Without a fan: If installing a vent without a fan, apply butyl tape or sealant to your new vent. Insert the vent into the hole (make sure it's facing the proper direction! Check your installation instructions for details) and press into place, creating a seal. Make sure all screw holes are completely covered. Screw into place with included mounting screws, then apply self-leveling sealant over the screws.With a fan: If you are installing a vent with a fan, you'll want to route your power supply and ground wires first so that you can make your connections before inserting the fan. Apply butyl tape or sealant to the trim ring and press into place, creating a seal (make sure it's facing the proper direction! Check your installation instructions for details). Make sure all holes are covered. Screw into place with included mounting screws, then apply self-leveling sealant over the screws. Make your wiring connections, then carefully mount your fan, tucking the wires inside the hole you drilled as you insert the fan. Screw into place.
Pro tip: Use the manual control knob to open the fan prior to inserting. This will make it easier to get everything in place.
Step 4: Insert New Garnish
Attach the interior garnish piece inside the camper. Trim to fit if necessary, then screw in place. Be careful not to crack the garnish when you do so. Tuck any protruding wires out of the way (just make sure your wires don't get stuck in the fan). Test any functions of the vent, including the open/close function and the fan, if you have one.And that's it! You have a new vent. Enjoy the fresh air.
Still have questions?Email us or give us a call at 800-298-8924.
Alright so I still don't know if you have no hitch, a factory hitch, or an aftermarket hitch. An extended hitch isn't really a thing but there are extenders that can be added to your existing hitch. I'll cover both possibilities just to…
The overall dimensions of the Better Bath RV Kitchen Sink part #LC421572 including the lip are 25" long x 15" wide x 7" tall. The lip is 1" so if you wanted the bowl dimensions that would be 23" long x 13" wide x 7"…
In order to determine the correct roof vent, measure where the vent opens. The standard trailer roof vent opening is roughly 14-1/4" x 14-1/4" and have roof vents that measure 14" x 14". To pick the correct cover, you will also…
The Rubber Trim for RVs, Boats, and Utility Vehicle Trim Molding #SR78FR that you mentioned is not sold by the foot, so if you need 33', then I recommend using one #SR78FR and one #SR96ZR for a total of 35'. Since this is a bit longer than…
There is; all you need is the following mounting kit and you can tilt the solar panels of the 570 watt Go Power Overlander Solar Charging System #GP99MR: - Adjustable Mount Kit #34244034 This will let you tilt the solar panels up to 75 degrees so…
Hey Dave, the wiring that comes with the etrailer RV Solar Panel Kit part #e59FV is 7.5 meters long. I attached a diagram that shows how multiple panels attach to the controller. This is compatible with lithium batteries too. Is this first time with…
Hey Linda, Yep, it sure will; the WeatherTech Roll Up SunShade Kit #WT87QV will indeed fit your 2024 Nexus Viper 27V. This is a good choice as it is double-sided with one reflective side to keep the sun (and heat!) out of your motorhome, with the…
Lance does have a proprietary plug, but many customers see a standard 6-way or 7-way round and notice it doesn't fit their factory 7-way as well. I've attached an article to help if you have one of the 7-way or 6-way round connectors which we…
You can have a 2-5/16 inch hitch ball on either a 1 inch or 1-1/4 inch shank. The nut on a hitch ball with a 1-1/4 inch shank takes a wrench with a 1-7/8 inch socket. A hitch ball with a 1 inch shank will take a wrench with a 1-1/2 inch socket. You…
Hey Dennis, looks like you really did your research and know your stuff. The Dexter E-Z Flex Suspension Kit - Double-Eye Springs - Tandem Axle - 6,000 lbs #K71-652-00 is an excellent kit that will work well for your 2016 Stealth WA2313 Toy Hauler.…


 Christine ONLINE NOW
 CALL US 1-800-940-8924


Questions and Comments about this Article